Every month a group of bloggers are challenged by C'mon Get Crafty to create a new craft or project from their own stash of goodies! Everyone is allowed a $10 allowance for necessities to complete their project (i.e. paint brushes, glue, etc), but the bulk of it must be created from their own stash of goodies. This month I decided to make a Pillowcase Dress from Fat Quarters.

Pillowcase Dress From Fat Quarters
I made this for my granddaughter who will be 1 in May. I am estimating that she will be between a 12 month and 18 month size this summer.
Materials:
2 Print Fat Quarters (same print)
1 Solid Color Fat Quarter to coordinate with print
1 ½ - 2 yards coordinating 7/8" ribbon
Thread to match
Optional: bias tape to match print fabric
Directions:
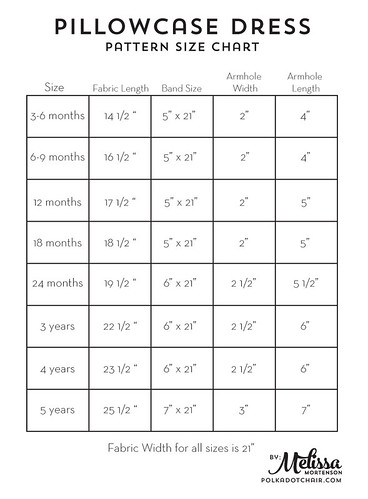
You can use this chart to make your measurements. I got this chart from The Polka Dot Chair but if you search on Pinterest you can find others. I looked at several and averaged it out to estimate my measurements.
Step 1:
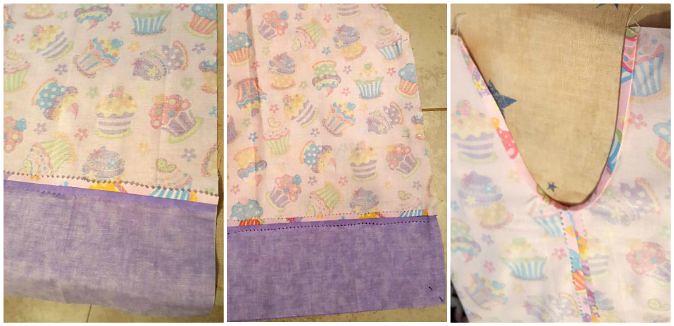
Put the 2 pattern pieces of fabric together. If your fabric has a pattern, put them right sides together making sure the pattern is going the same direction. Otherwise it doesn't matter. Fold them in half so that your fabric is 9" wide. Cut desired length off bottom. I cut mine so that it was 15" inches long. Draw your armhole using the above dimensions then cut it out. Cut the solid piece of fabric for your band. Since my opened print fabric is 18" wide, I cut mine 18" wide and 5 " wide. You will need 2 of these.

Step 2:
Pin the solid bands, right sides together on the bottom of each piece of the dress. Sew using a 5/8" seam. Trim seam and iron open. Pin the 2 dress pieces with right sides together. Sew from under arm hole to the bottom of the dress in a 5/8" seam. Trim seam and iron open. For the arm holes, either sew bias tape along the arm hole or iron and sew a small 1/2" seam. I had to cut the arm hole a little after I had sewn the front to back to make it curve a little more at the bottom.
Step 3:
Fold under and iron 1/2" along the top on both the front and back. Fold under and iron another 1". Sew along the bottom edge to make a casing for the ribbon. Using a safety pin, thread ribbon through the front casing and around through back casing. Tie a bow from the ribbon and trim as needed. To keep the ribbon from unraveling you can use some clear nail polish or some fray check.

I had all the fabric (purchased from Hobby Lobby) and thread so the only thing I had to purchase was the ribbon. It is grosgrain that was on sale at Joann. The roll was $2.50 and I only used part of the roll.