Showing posts with label craft destash challenge. Show all posts

Candy Corn Cutie Baby Outfit

Happy Halloween!For the Craft Destash we are challenged to create a project using only items currently found in our craft stash. We were to make something new with crafty supplies or re-make an item we've been holding on to for a while. For this challenge I decided to make this Candy Corn Cutie outfit from a free svg file from svglove.com.

Corn Cutie Outfit from www.thisautoimmunelife.com #candycorncutie #Halloween #cricut #freesvg

Candy Corn Cutie


Materials:

SVG File
1 sheet of black glitter heat transfer vinyl
Small scrap of white glitter heat transfer vinyl
Small scrap of yellow and orange everyday iron-on
t-shirt or onesie

1 yard of each yellow, white and orange ribbon in various width
Candy corn button
fancy elastic

This is really easy to make. Just download the free svg file and upload it to your cutting machine software. Be sure to remember to reverse your image before you make the cut. Then follow the manufacturer's directions for ironing onto the shirt using a heat press or iron. Since little kids grow so fast I usually just iron these with an iron as it will probably only be worn a couple of times!

To make hair bows I use my Bowdabra. But the Ribbon Retreat has some great videos on making hair bows without using one. After you make the bow, just glue the candy corn button in the center.  Then glue the bow onto a piece of fancy elastic that you sew or glue into a circle. You can also use a hair clip if the child has enough hair. 


Candy Corn Cutie Outfit from www.thisautoimmunelife.com #candycorncutie #Halloween #cricut #freesvg

How To Make A Fall Market Tote

Collaborating this month with a lovely group of Bloggers to bring you some new craft ideas. For the October Craft Destash we are challenged to create a project using only items currently found in our craft stash. We were to make something new with crafty supplies or re-make an item we've been holding on to for a while. For this challenge I decided to make these Fall Market Tote.

 How to make a fall market tote from www.thisautoimmunelife.com #craftdestash #fall #markettote #sewing


For this project, I had everything I needed. I was a little short on the interfacing so I had to purchase a package of that for $4. So this project ended up being very inexpensive!

Fall Market Tote


Materials:

1 yard main fabric
1 yard lining fabric
Fall fabric panel 
Medium weight fusible interfacing
Fusible web (make sure it's sewing machine safe)
Directions:

½"seam unless noted otherwise
press seams open after sewing
Cutting:

From the main fabric cut 2 pieces that are 21" x 19" as well as 2 pieces that are 2" x 21". The 19" side is the height and the 21" side is the width.
From the lining fabric you will also cut 2 pieces that are 21" x 19" and 2 pieces that are 2" x 21". In addition you will need to cut 1 piece that is 9½" x 21" (the base fabric). 
With the interfacing you will cut 4 sections that are 21" x 19" and 2 sections that are 2" x 21".

Iron the interfacing to the wrong side of your main fabric and lining fabric. Also iron the interfacing to the 2" x 21" strips which will be the straps.
Sewing:

Main Bag

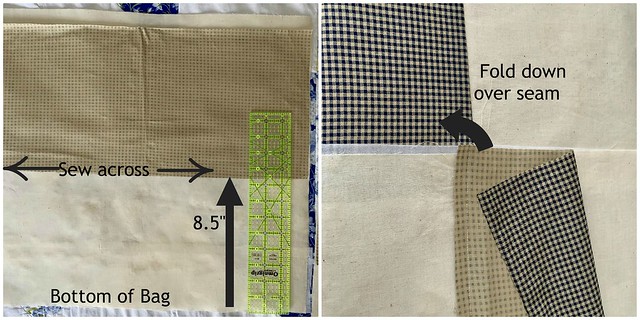
With the main fabric laying right side up, place the base fabric  (9½ x 21" piece) right side down on top 8½" from the bottom.  Sew across. Repeat with the other piece of main fabric and base. Then fold the base fabric down at the seam and iron it. Stitch a topstitch across the bag about ¼" from where you folded the fabric down.

Fall Market Bag Collage 1 

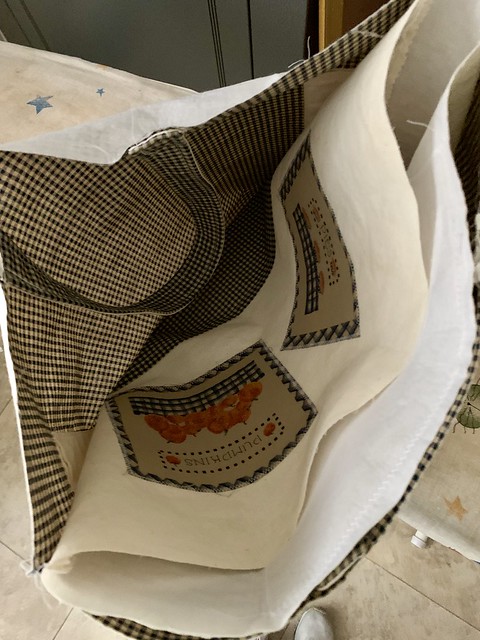
Cut out all the pieces from the fall fabric panel. Iron the steam a seam to the back. Then place them on the bag according to your preference and iron them down. Use a zigzag stitch to go around each applique.

Fall Market Bag Collage 2 

Lay the right sides together and sew around the bag, leaving the top open.

If you would like to make an inside pocket, cut a 6½" x 10½" piece of the main fabric. Iron under a ¼" seam all the way around then iron it down another ¼". Sew down the seam on all 4 sides. Then place the pocket on the right side of one of your lining pieces. Sew down the two sides and across the bottom. Then sew a line up the middle so that you have two pockets.

2019-10-06 14.24.24-1 
Lining

Lay the two lining pieces together with right sides facing. Sew down the two sides and bottom using a 5/8" seam. This makes your lining just a bit smaller than the main bag. Leave this bag inside out.
Creating Bottom

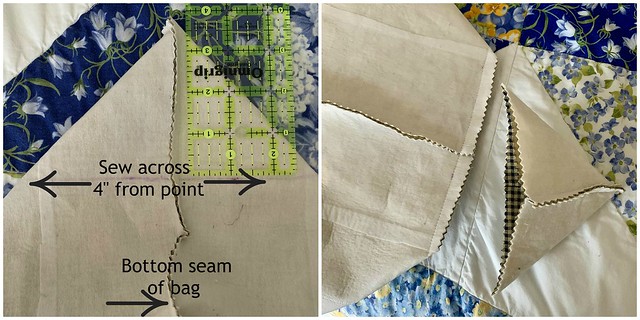
To create a flat bottom on your bag, flatten the bottom seam so that it forms a triangle on both edges. Mark 4" down from point and sew across those lines. Repeat on lining bag. Cut off excess triangle of fabric from all 4 corners.

Fall Market Bag Collage 3 
Straps

To sew the straps, place one lining and one main fabric right sides together. Sew up each long side. Repeat with other strap. Then turn those right side out. Pin one strap onto the right side of the lining bag so that the raw edges are lined up with the top edge of the bag. The edges of one strap will be about 5 inches apart. Baste this in place then repeat with the other strap.

Fall Market Bag Collage 4
Finishing

Place the main bag, right side out, inside the lining bag. You will have the right side of the lining bag facing the right side of the main bag. Pin top edges together making sure side seams are lined up. Sew around the top leaving about 5-6" open. Turn the bag by pulling it through the opening. Then iron the seam down and top stitch about ¼" from the top seam.

2019-10-06 14.29.39-1 


How to make a fall market tote from www.thisautoimmunelife.com #craftdestash #fall #markettote #sewing


Fall Table Runner

Every month a group of bloggers are challenged to create a new craft or project from their own stash of goodies! You are allowed $10 max for necessities, but must primarily use items you already own. Check out some awesome creations you might be able to make from your own stash! This month I am sharing how to create your own Fall Table Runner!

#CraftRoomDestashChallenge

Fall Table Runner


Fall Table Runner


 I've had this autumn fabric for a couple of years and wanted to make a table runner and matching placemats.

I'm not quite finished with this table runner yet though. I really wanted to learn how to free-motion quilt and thought this would be a great project for that. The only problem is I didn't have a free-motion quilting foot for my sewing machine. I ordered one and thanks to Amazon it came in today! So after I practice a bit and get this quilted I will update the picture. My table runner measures 15 inches wide by 33 inches long. I just measured the center of my kitchen table to find the best size. So, depending on your table size you might have to adjust your fabric measurements.

Materials:


3/4 yard cream or light colored fabric for the front and back

scraps of fall colored fabric for the leaves

1/4 yard fall colored fabric for the border

1/2 yard batting (or scrap measuring at least 15 x 33"


Directions for 15" x 33" Fall Table Runner:


Cutting:

1. Cut a piece of cream fabric 12 ½" x 30 ½". This piece is for the front. Cut another piece 15" x 33" for the backing. 

2. The maple leaves are cut from the scraps of fall fabric. First, iron some Heat N Bond Light to the back of the fabric. Make sure to use the light because the stronger ones will gunk up the needle on your sewing machine. I learned that the hard way! Then trace the pattern on the fabric and cut it out.  I cut 4 but if you are making a different size you can adjust this number.

3. Cut the border from the 1/4 yard of fall fabric - 2 strips will be 2" x 30 ½" and the other 2 strips will be 2" x 15".


Sewing:

4. Lay the leaves, right side up on the 12 ½ x 30 ½ piece of cream fabric. Spread them out to your liking. Iron them on according to the package directions. 

5. Use a sewing machine to applique the leaves onto the fabric. Use the satin stitch on the machine. If you haven't appliqued before you might want to try different stitch widths and lengths to find the one you like. I also have to adjust the presser foot's pressure on the machine I have. Also, if your background fabric has much stretch to it, you might want to iron on some interfacing to the back side before appliqueing. 

6. Pin the 30 ½" border to each side of the cream fabric with right sides together. Sew in a ¼" seam. Press seam towards the border.

7. Pin the 15" borders to the ends, right sides together. Sew in a ¼" seam. Press seam toward border.

8. Lay the backing on the table. Place the batting on top of the backing then place the table runner (face up) on top of the batting. Pin or baste these layers together. 

9. Quilt the layers together. You can quilt around the leaves and down the border or you can try your hand at free-motion quilting. 

10. Sew ½" double-fold binding around the edges. 

I haven't finished the last 2 steps but will be doing some free motion quilting. Then I have some brown binding that I will use to finish the edges.

And the total cost? $0 - I had all the material I needed!

Happy Fall!


Pillowcase Dress from Fat Quarters

Every month a group of bloggers are challenged by C'mon Get Crafty to create a new craft or project from their own stash of goodies! Everyone is allowed a $10 allowance for necessities to complete their project (i.e. paint brushes, glue, etc), but the bulk of it must be created from their own stash of goodies. This month I decided to make a Pillowcase Dress from Fat Quarters

Pillowcase Dress from Fat Quarters from www.thisautoimmunelife.com for February craft destash #craftdestash #pillowcasedress #fatquarter #baby

Pillowcase Dress From Fat Quarters


I made this for my granddaughter who will be 1 in May. I am estimating that she will be between a 12 month and 18 month size this summer.

Materials:


2 Print Fat Quarters (same print)
1 Solid Color Fat Quarter to coordinate with print
1 ½ - 2 yards coordinating 7/8" ribbon
Thread to match
Optional: bias tape to match print fabric

Directions:


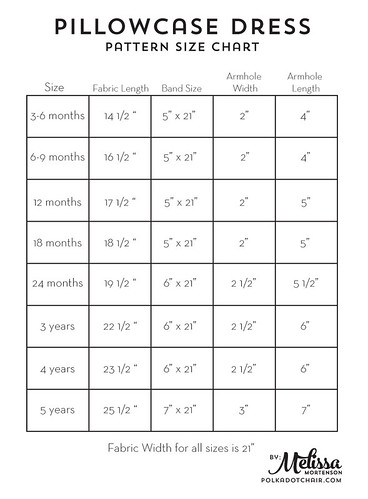
You can use this chart to make your measurements. I got this chart from The Polka Dot Chair but if you search on Pinterest you can find others. I looked at several and averaged it out to estimate my measurements.

Print

Step 1:


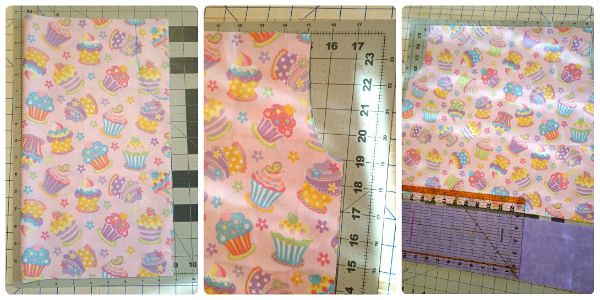
Put the 2 pattern pieces of fabric together. If your fabric has a pattern, put them right sides together making sure the pattern is going the same direction. Otherwise it doesn't matter. Fold them in half so that your fabric is 9" wide. Cut desired length off bottom. I cut mine so that it was 15" inches long. Draw your armhole using the above dimensions then cut it out. Cut the solid piece of fabric for your band. Since my opened print fabric is 18" wide, I cut mine 18" wide and 5 " wide. You will need 2 of these.

pillowcase dress step 1

Step 2:


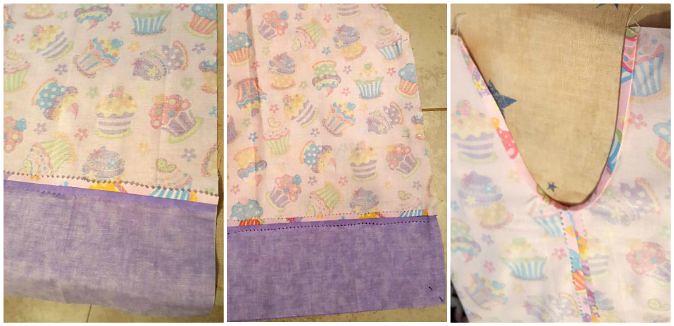
Pin the solid bands, right sides together on the bottom of each piece of the dress. Sew using a 5/8" seam. Trim seam and iron open. Pin the 2 dress pieces with right sides together. Sew from under arm hole to the bottom of the dress in a 5/8" seam. Trim seam and iron open. For the arm holes, either sew bias tape along the arm hole or iron and sew a small 1/2" seam. I had to cut the arm hole a little after I had sewn the front to back to make it curve a little more at the bottom.

pillowcase dress collage 2

Step 3:


Fold under and iron 1/2" along the top on both the front and back. Fold under and iron another 1". Sew along the bottom edge to make a casing for the ribbon. Using a safety pin, thread ribbon through the front casing and around through back casing. Tie a bow from the ribbon and trim as needed. To keep the ribbon from unraveling you can use some clear nail polish or some fray check.

pillowcase dress collage 3

I had all the fabric (purchased from Hobby Lobby) and thread so the only thing I had to purchase was the ribbon. It is grosgrain that was on sale at Joann. The roll was $2.50 and I only used part of the roll.


craft room destash


Meet Your Hosts:


Search This Blog

Powered by Blogger.