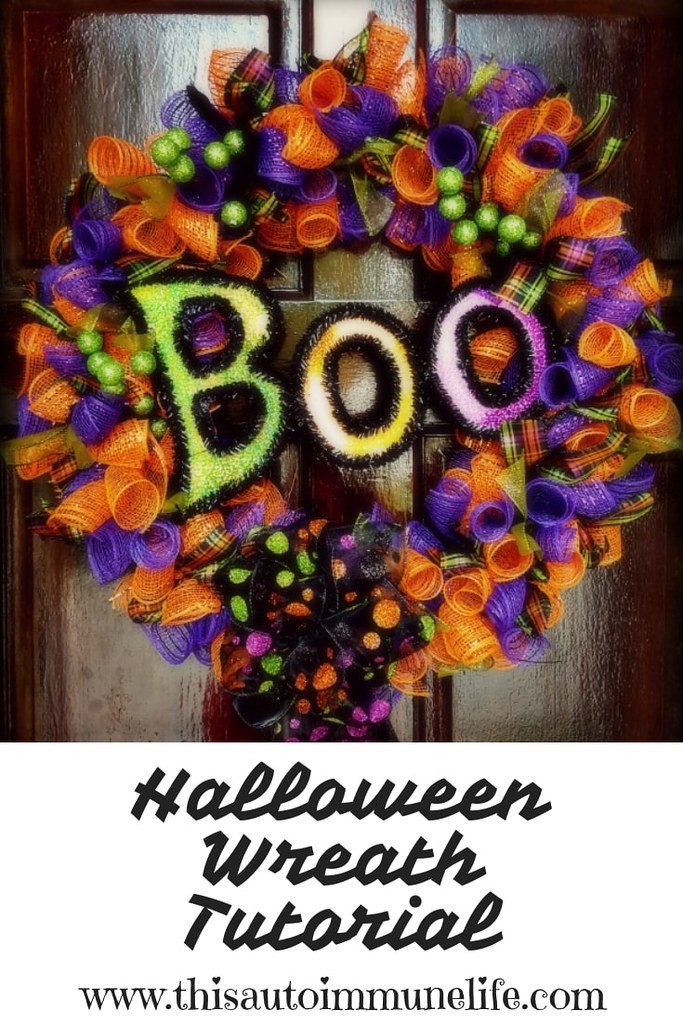
Halloween Wreath Tutorial
Halloween will be here before you know it! Decorating for Halloween can be so much fun. Decorative mesh wreaths have become a really popular way to decorate over the last few years. However, purchasing a pre-made wreath can be quite expensive - $50 or more! For under $15 and a few hours of your time you can make your own. Give this Halloween Wreath Tutorial a try to add color to your door without adding the expense of a pre-made one.

Materials:
18" wire wreath frame
orange and purple decorative mesh rolls
25 pipe cleaners (I used black)
Halloween ribbon -
1 roll plaid
1 roll green glitter
1 roll dots
"boo" sign from the dollar store
other decorations of choice
Instructions:
- Gather materials. If desired, use pipe cleaners to wrap around metal wreath frame. This prevents the bow bundles from slipping.
- To start, cut decorative mesh into 10 inch pieces then cut plaid and green ribbon to the width of the decorative mesh. Mine was 5 inches wide so that is how long I cut the ribbon. It took me about 30 "bow bundles" to make this wreath. So you will cut 30 orange mesh, 30 purple mesh, 30 plaid ribbon and 30 green ribbon pieces. Then cut 15 pipe cleaners in half to make 30 pipe cleaner pieces.
- Roll 1 piece of orange mesh (use the natural curl of the ribbon) and 1 piece of purple mesh. Pinch them together in the middle. Then add 1 piece of plaid ribbon. I did 20 of these then I made 10 with the green glitter ribbon.
- While everything is pinched, use 1 piece of the pipe cleaner to wrap around the middle where the ribbon is pinched together. As you make them, lay them on the wreath form to make sure you have enough.
- When you have enough start attaching them to the wreath form by wrapping the ends of the pipe cleaner around the form.
- To attach the "Boo" sign just use a little bit of hot glue and place it on the ribbon. Attach any other decorative items you have.
- Finally, make a large bow from the dot ribbon. Use this video if you need help making the bow.


Happy Halloween!