Beautiful Baby Girl Christmas Ornament

Do you have a new little one in your life this Christmas? Then this easy yet beautiful Baby Girl Christmas Ornament will be the perfect gift!


DIY Beautiful Baby Girl Christmas Ornament #sponsoredpost #DecoArt #ExtremeSheen from www.thisautoimmunelife.com #Christmasornament

Baby Girl Christmas Ornament **sponsored post**


Thanks to DecoArt for providing the paint for this project!
Materials:

1-3.25" translucent glass ornament
Extreme Sheen DecoArt paint in Rose Quartz
Small jewel stickers ( got mine at Dollar Tree)
Pink, white & silver ribbon in various widths
Sheer white/glitter ribbon
Pink and white feathers
Hot glue gun
Small paper plate

This ornament is so easy to make and looks just beautiful with the Extreme Sheen paint! I was provided with a set of Extreme Sheen paint from DecoArt for this project. I chose to use the Rose Quartz color as it is the perfect "baby girl" color!
Directions:

First, make sure your ornament is clean on the outside. I cleaned mine with an alcohol wipe. Then I used a yellow sharpie (so it wouldn't show through afterwards) and drew the initial "E" on the outside. Using the stick on jewels, cover the monogram. I also used the jewels to put "19" on the back for the year.

Take the top hanger part off of the ornament. Shake the bottle of paint to make sure it is well mixed. Then pour a little at a time inside the ornament around the edge. Start to swirl it around so it covers the inside of the ornament. Add a little at a time until you have enough inside to cover the entire ornament.

#DecoArt sponsored Christmas Ornament #ExtremeSheen #Christmas

Turn the ornament over onto the paper plate so that all of the excess paint will drip out. This took several days for mine so I occasionally moved the ornament around on the plate so it wasn't sitting in the drained out paint. If you have a heat tool you can use it to speed up the drying process.

While the paint is drying add the decor to the ornament cap. Tie one piece of ribbon around the top for hanging. I used a piece of white/glitter sheer. Take some strips of ribbon about 8" long and stack them together. Then tie them in a knot around the metal hanging part. Put a couple of small feather stems inside the knot. Add a little dab of hot glue to hold the knot and the feathers. Take 2 pieces of sheer ribbon and tie a bow. Glue the bow to the front of the knot.

Once the paint is dry inside the ornament, put the cap back on the ornament. Don't you think the metallic paint gives this ornament a beautiful finish!

DIY beautiful baby girl Christmas Ornament made with DecoArt paint from www.thisautoimmunelife.com #Christmas #ornament #DecoArt #babygirl


Quilted Christmas Pillow

Collaborating this month with a lovely group of Bloggers to bring you some new craft ideas. For the November Craft Destash we are challenged to create a project using only items currently found in our craft stash. We were to make something new with crafty supplies or re-make an item we've been holding on to for a while. For this challenge, hosted by Megan from C'mon Get Crafty,  I decided to make this Quilted Christmas Pillow.


Quilted Christmas Pillow for your holiday decorating from www.thisautoimmunelife.com #Christmas #Quilt #Pillow

I made this pillow for a sweet friend of mine. She is always so thoughtful and caring. I wanted to show her that I had been thinking about her and appreciate her friendship.
I had everything I needed to make this pillow. The red and green fabric I had inherited from my mother years ago. Really, I don't ever remember her sewing anything so I'm not sure why she had this fabric. I had purchased the white fabric about a year ago when it was on sale as I use a lot of it with my quilting. The embroidery thread is also in my stash as I used to do a lot of cross-stitch. 


Quilted Christmas Pillow


Materials for a 20" pillow:

2 green squares 6" each
2 red squares 6" each
4 red squares 6" each, in a different pattern
8 white squares 6" each
20" x 20" piece of batting
White material for back 
20" pillow form
Optional:
2 packs of red embroidery thread
1 pack of gold embroider thread
Directions:

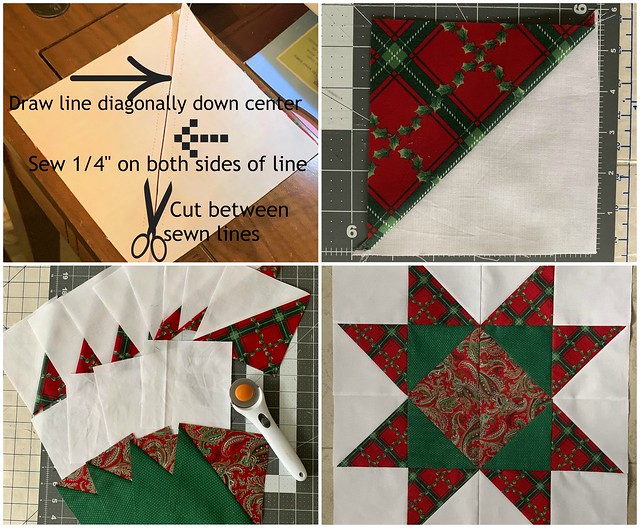
First you will be making "half-square triangles" (HST). To do that, take one white square and one red (outer) print. Place them with right sides together. Draw a line diagonally down the center. Sew a scant ¼" away from each side of the seam. Cut down the middle between the seams. This gives you 2 matching half square triangles. Repeat this with 3 more whites/reds. Then use the other red pattern with the green to create 2 more sets. Press these open pressing the seam towards the darker fabric. You will end up the 4 of the red/green, 8 of the white/red and will have 4 of the plain white squares left over.

Quilted Christmas Pillow Steps

You will notice that the white squares are a little larger than the half square triangles. Trim the white pieces down so they are the same size as the HST. Then start sewing your squares together in a scant ¼" seam. I sewed them row by row then sewed the rows together but you can do it however you like! Place the batting on the back and quilt however you like. I just quilted along my stitching lines which is called "stitch in the ditch". 

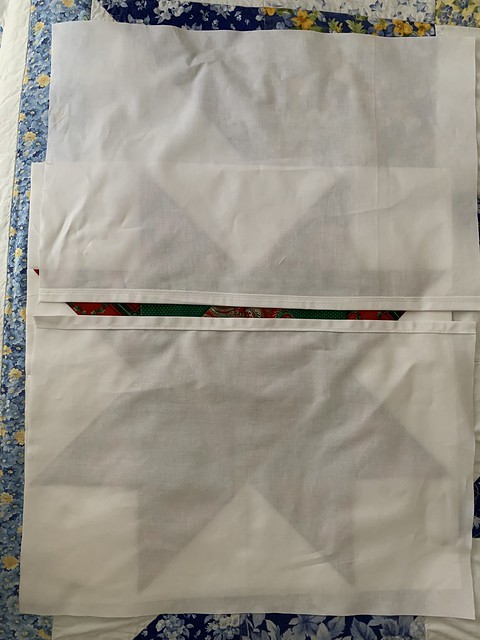
To make the back, cut 2 pieces of your backing fabric to measure 20" long and 14" wide. Make a narrow hem along 1 20" side of each piece. 

2019-10-18 14.19.10
Tassels

If you want to make tassels, you will use 1 pack of embroidery thread for 2 tassels. Tie a loop of gold thread around each end of the embroidery thread for the hanger. Take another piece of gold thread and tie very tightly around the ends to secure the loop thread. Cut across the center of the thread. Trim any loose threads. Then make another one of these.

Quilted Christmas Pillow Tassel

To put the pillow together, lay the quilted piece face up. Then put the tassels in each corner so that the tassel is laying on the quilted piece and the gold loop is laying off (you will catch the gold thread as you sew). Lay the backing pieces face down so that they overlap to make an envelope. Pin the edges then sew all the way around the outside edge in a ¼" seam. Make sure you caught the gold tassel thread. I put a knot in the thread right by the corner seam to help hold it. Press the seams to one side then turn right side out.

Finally add the pillow form and it's ready!


Quilted Christmas Pillow to decorate your home for the holidays from www.thisautoimmunelife.com #Christmas #quilt #pillow


For last month's challenge I made this Fall Market Tote.

Free Printable Christmas Puppets For Kids

Do you need a Christmas craft to keep your kids busy?  Download these Free Printable Christmas Puppets for Kids and let them start on the Christmas fun!


Printable Christmas Puppets 


If you would like to keep your kids busy, you can use the pdf files. Then let them cut out each character! Otherwise (or if you have small children) you can download the png files. Png files are usable in most cutting machines. Just use the print then cut feature. These are zip files. If you are unsure how to unzip them, you can find directions here from Microsoft support.

The reindeer and gingerbread man are symmetrical so you will just print 2 copies of the same page. All the other characters are mirrored so when you glue one picture to each side of a craft stick they will match up. It works best to print on cardstock but you could also print on plain copy paper. (In the picture above I printed the elf on paper and it didn't turn out as nicely as the others!) Each puppet measures about 5 inches tall.

Once the puppets are cut, use glitter, buttons, sequins or other fun craft items to decorate them. Then use a craft stick or pipe cleaner for the handle and glue a matching puppet face to each side. 

Use a cardboard box or a tabletop for the stage and let your kids use their imaginations!


Healthy Gingerbread Donuts

Are you looking for something a little healthier for breakfast this holiday season? Well look no further. These Healthy Gingerbread Donuts made in non-stick donut pans from Zulay Kitchen will certainly hit the spot!


Healthy Gingerbread Donuts


**This is a sponsored post and also includes affiliate links. I received the donut pans from Zulay Kitchens. All opinions are my own.
Ingredients for 9 donuts:

1/2 cup almond flour
1 cup gluten free flour blend
1/2 tsp baking powder
1/2 tsp baking soda
1/4 tsp sea salt
1 tsp gingerbread spice
1/3 cup xylitol
1 tsp vanilla extract
1 tsp lemon juice
1/2 cup unsweetened almond milk
1 egg
1 Tbsp honey
1/4 cup molasses

Directions:

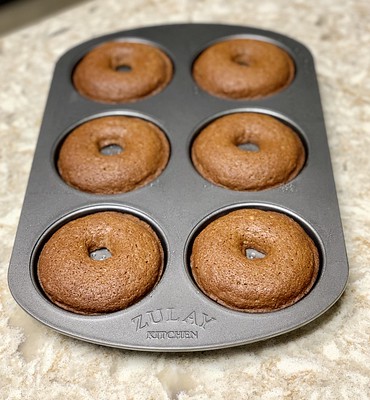
First of all, thanks so much to Zulay Kitchen for providing these donut pans. I have been wanting to get some donut pans so I was really excited to receive these. These pans are reasonably priced and the no-stick feature makes it so easy to get the donuts out of the pan! They have a store on their website but they also have an Amazon store where you can find these donut pans. Zulay is also one of the sponsors for our giveaway so be sure to scroll down and enter the giveaway!

Preheat the oven to 350°.

Add the lemon juice to the almond milk and stir. Let it sit while you are mixing the other ingredients. (You are making "buttermilk")

Mix all of the dry ingredients (almond flour through xylitol) in a large bowl. 

2019-11-16 11.31.16-1 

In a small bowl slightly beat the egg. Then add the vanilla, honey and molasses. Stir to mix well. Then add the milk and stir to mix.

Add the wet ingredients to the bowl with the dry ingredients. Mix until well combined.

Use a ladle or fill a measuring cup to add the batter to the pan. Fill about ¾ of the way for each donut. Place pans in oven and cook for 12-15 minutes.

Remove from oven and let the donuts cool in pan for about 10 minutes. Remove to a wire rack to cool completely.

2019-11-16 11.39.12-1 


Rustic Christmas Gift Tags

Are you ready to start wrapping all of those gifts you've been buying during Black Friday week? It's kind of funny how it used to be just one day. Then it was several days and now it's all week! Anyway, once you are ready to wrap you can download these free printable Rustic Christmas Gift Tags to help decorate your packages!


Just click on the link below to download your free Rustic Christmas Gift Tags file. They are available in png to use with a cutting machine or pdf if you prefer to cut them with scissors. 

Free Christmas Gift Tags


DIY Angel Ornament

Merry Christmas and welcome to the 25 Days of Christmas Blog Hop and my diy angel ornament tutorial! This blog hop features one of my favorite things about the Christmas season - Christmas movies! 


It's the most wonderful time of the year - time for the annual 25 Days Of Christmas Movies Blog Hop! #ChristmasMoviesHop


We have 25 talented bloggers gathered together to share with you all the wonderful crafts and recipes you can make this Christmas season, based off of some of the most beloved holiday classic films. There are 25 films to be inspired by for your holiday season, and 25 talented bloggers to aid your inspiration! If you love Christmas movies, you have come to the right place!!


Let’s Meet The Hosts!


Megan ~ C’mon Get Crafty | Marie ~ The Inspiration Vault | Carmen ~ Gross to Grandiose


Christine ~ My Kitchen My Craft | Crissy ~ It's a Wonderful Life | Emily ~ Domestic Deadline


Stephanie ~ The Tip Toe Fairy | Rebecca ~ The Moments at Home | Marianne ~ Songbird


Ashley ~ Attempts at Domestication | Sue ~ A Purdy Little House | Roseann ~ This Autoimmune Life


Kim ~ Kimspireddiy | Jaime ~ Love Jaime | Terri ~ Christmas Tree Lane |Lyne ~ The Paper Addict


Nicole ~ For the the Love of Food | Marie ~ DIY Adulation | Paula ~ Paula Tisch


Lara~ Love on a Plate | Jaclyn ~ The Dotted Nest


DIY Angel Ornament Tutorial from www.thisautoimmunelife.com 

Movies with angels have always been a favorite of mine. The Preacher's Wife is one of those movies. The Preacher's Wife is a remake of the 1947 classic The Bishop's Wife starring Cary Grant. It stars Denzel Washington, Whitney Houston and Courtney B. Vance as the main characters. In this feel good movie, Reverend Biggs is having trouble with his marriage. In addition his church is being threatened by the property developer.  With desperation, Reverend Biggs prays to God for help - and help arrives in the form of an angel named Dudley. Although Dudley begins to fall for Rev. Biggs' wife Julia, in the end the uplifting message about family and faith shines through. 

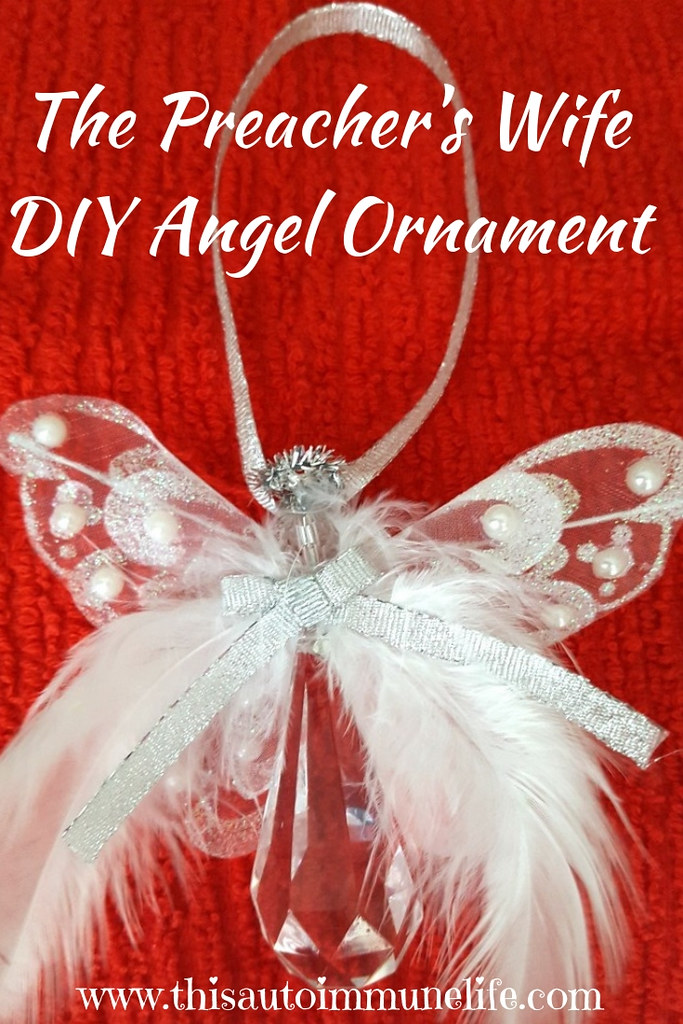
To share my love of angels, I created this angel ornament.

Angel Ornament


Materials (makes 3):

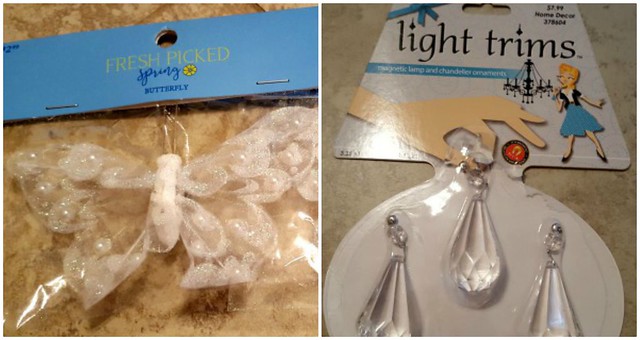
3 Lacy Butterflies (purchased from Joann from spring clearance)
1 package crystal light trim chandelier ornaments (purchased from Hobby Lobby)
Silver pipe cleaner
1 yard silver ribbon
6 white feathers

Angel Ornament Materials 
Directions:

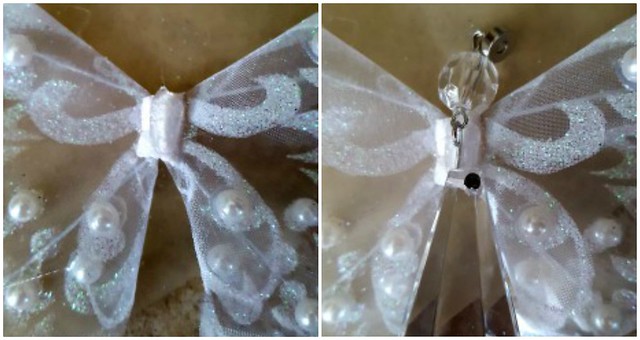
Take the body off of the butterfly. Glue (with hot glue) the wings to the back of the crystal trim along the metal piece holding the 2 beads together. 

Angel Ornament Step 1 

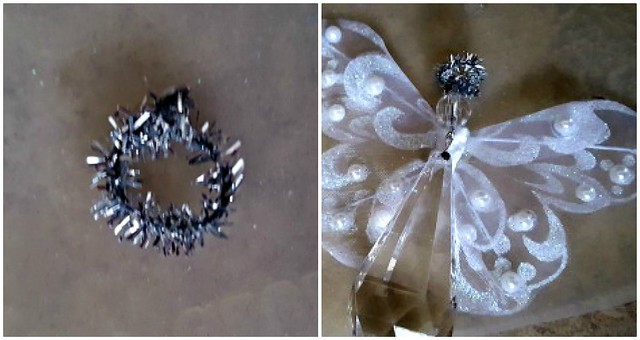
Make a halo out of a small piece of the silver pipe cleaner. Glue it to the top above the "head" bead. 

Angel Ornament Step 2 

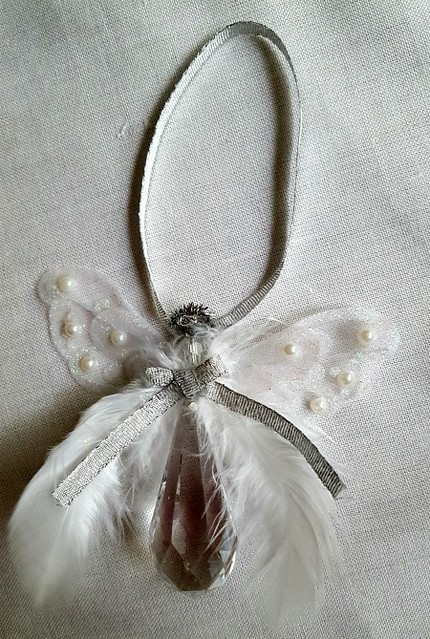
Use 2 of the white feathers and glue the ends on the front of the ornament just underneath the head. Tie a bow with the silver ribbon and glue it over the ends of the feathers to cover them. Use another piece of the silver ribbon to make a hanger. Glue it to the back of the head.

Angel Ornament 7 

Repeat 2 more times with the remaining materials. You will have 3 beautiful angel ornaments!


The Preacher's Wife DIY Angel Ornament Pinterest 


Free Printable Santa Countdown Calendar

 Christmas is coming! Let the countdown begin by downloading this Free Printable Santa Countdown Calendar!


Free Printable Santa Countdown Calendar


Free Printable Santa Christmas Countdown Calendar from www.thisautoimmunelife.com #countdown #Christmas #calendar

When my brothers and I were young, my mom always had a Santa picture that we used as a countdown for Christmas. We glued cotton balls onto his beard during the month of December. When it was Christmas eve his beard was full. You can do the same with this picture. You can use cotton balls or pompoms to fill his beard.  Just click on the link to get your free download! Then  print out the picture on cardstock or paper. Stick it in a frame or just hang on the refrigerator for your kids to have some fun as they countdown to the special day!

Printable Christmas Countdown Stickers

Are you ready for the Christmas countdown? You can decorate your planner with these Christmas Countdown Stickers! 


I am sharing these stickers today on the Happy Holidays Link Party. Be sure to stop over to that page to find lots of holiday ideas - recipes, crafts, decorations . . . You can also add your own holiday blog post to the link up.

As always, my printable stickers are available in several different formats including png and pdf. I am also linking my Cricut Design Space file. Since Cricut will only print and cut images up to 6" x 9", I've split the file so it will print on two pages. I don't own a Silhouette so if it has similar issues leave a comment and I will create a usable file.

These Christmas Countdown Stickers are just under 1.5" in diameter so you can use them on the month page or on the daily pages of your planner. Just print them out on sticker paper and cut them using your cutting machine or scissors. Just click on the link below to get the free downloadable files. 


Enjoy these free stickers and enjoy your holidays!

Great Gifts For A Stylish Office

Whether you work from home or go somewhere to work everyday, your office deserves to be stylish! I've compiled this list of Great Gifts For A Stylish Office! With the holidays approaching there is no better time to surprise your favorite girl with one of these beautiful gifts. 


Ten Beautiful Gold and Sparkly Gifts


Gold Dot Mouse Pad


Great Gifts for a Stylish Office 

White and Gold Stapler


Great Gifts for a Stylish Office


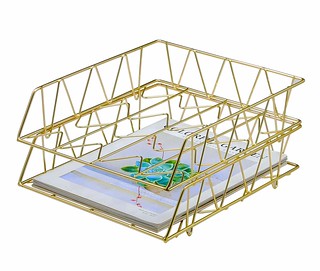
Gold Letter Tray Organizer


Great Gifts for a Stylish Office

Gold String Lights


Great Gifts for a Stylish Office 

White & Gold Office Chair


white & gold office chair 

White Marble Paper Clip Holder


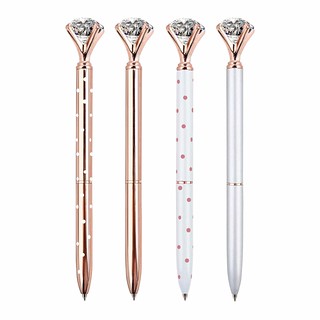
Gold Paper ClipsGold and White Pens 


Gold Pens


Make Things Happen File Folders 


Make Things Happen

Gold Letter Board 


Gold Letter board"Do More of What Makes You Sparkle" Notebook 


Gold Notebook

So what do you think? Gold and sparkly is sure to be a hit! 

For other great Christmas gift ideas to make at home check here.


Fabric Scrap Christmas Tree Garland

Welcome to the November Pinterest Challenge Blog Hop!  The purpose of this Pinterest Challenge is to motivate all the participants of this hop (and you too) to not just pin, but to make it happen! This month, I chose to make a Fabric Scrap Christmas Tree Garland. My inspiration came from this pin from Crafting Cheerfully.


Fabric Scrap Christmas Tree Garland


Materials:

Christmas tree pattern from Crafting Cheerfully (or you can make your own)
Green felt - 1 large sheet or 2 small
Scraps of fabric in green as well as brown
Fabric glue
Contrasting thread or embroidery floss
Ribbon or twine

Directions:

Print and cut out Christmas tree pattern. I traced it on a piece of cardboard to use as my template. Use the template to cut trees out of the felt. This will be your backing.

Then I made a template for each section of the tree. Using 6 different fabrics, I cut one of each section of the tree from each fabric. I also used the brown fabric to cut small rectangles for the trunk.

fabric scrap christmas tree garland 5 

Starting with the trunk and working your way up the tree, use a small amount of fabric glue to adhere each section of fabric to the felt.

If you don't like sewing you could add extra fabric glue and stop here, attaching each tree to the ribbon with hot glue.

I used a gold thread in my sewing machine and stitched around each section of the tree. You could also use embroidery thread and sew around the edges - totally up to you!

I spaced my trees out about 8" apart on the ribbon then sewed them on with the gold thread. 

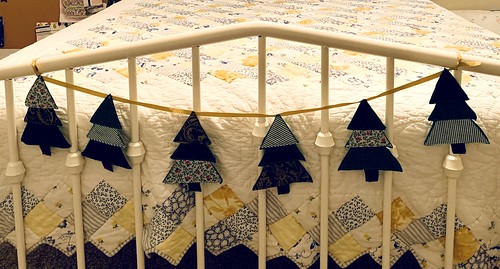
This is a really quick little project that you can do with your kids! I hung the garland on the footboard of my daughter's bed  to make it a little more festive when she comes to visit!

fabric scrap christmas tree garland 6 


Fabric Scrap Christmas Tree Garland from www.thisautoimmunelife.com #PinterestChallenge #Christmas #ChristmasTree #ChristmasGarland #FabricScraps


Gluten Free Autumn Apple Spice Cake

Gluten Free Autumn Apple Spice Cake


One of my favorite things about the fall season is all of the delicious flavors! This recipe for Gluten Free Autumn Apple Spice Cake includes many of those fall flavors - apples, cinnamon and pumpkin spice! It would certainly make a great addition to your Thanksgiving dessert table. In addition to being full of flavor it is also gluten, dairy and refined sugar free! 


Gluten Free Autumn Apple Spice Cake


Ingredients for cake:

3/4 cup almond flour
1/2 cup gluten free flour blend
1 teaspoon baking soda
1 teaspoon pumpkin pie spice
1/2 teaspoon salt
1/4 teaspoon xantham gum
1/2 cup honey
1 egg
1/2 cup applesauce
1/4 cup melted coconut oil
1 small apple chopped

For the "icing":
2 tablespoons softened coconut oil
1/2 cup honey
1/2 teaspoon cinnamon

Directions:
Preheat the oven to 350 and lightly grease an 8" x 8" pan.
Mix all dry ingredients (from almond flour to xantham gum) in a medium size bowl.
In a large bowl mix 1/2 cup of honey, egg, applesauce and coconut oil. 
Slowly mix the dry ingredients into the wet ingredients until well blended. Then stir in the apples.
Pour batter into greased pan and bake for about 20 minutes or until lightly browned.
Mix the icing ingredients in a small bowl until well blended. Once cake has cooled, pour the icing over the cake right before serving.


November 2017 Planner Stickers

November 2017 Planner Stickers


"Give thanks to the Lord, for He is good; His love endures forever!" Psalm 107:1 I am thankful for so many things this year! First of all, my family which will be growing next year with a new son-in-law (my daughter) and a new grandchild (my step-daughter)! Second is my health which has held steady this year. And also my job where I have wonderful friends and get to touch the lives of many children each and every day! What are some of the things you are thankful for this year? Whatever they may be, I hope you can use these November 2017 Planner Stickers to remind you of all of those things!

Just click on the link below to get your free pdf or png download.  Cut these on your cutting machine or the old fashioned way - with scissors! This is the sticker paper I use to print them on. It is a nice quality paper at a reasonable price!

Happy Thanksgiving!


November 2017 Planner Stickers


These free images are mostly found on Pixabay or Freepik.

How to Make Your Own Chicken Stock

How To Make Your Own Chicken Stock


Do you want to get the most out of your Thanksgiving turkey? Learn How To Make Your Own Chicken Stock (or turkey stock in this case) and nothing will go to waste! Why would you want to make your own when you can buy it at the store? First and foremost is all the health benefits it has to offer!

There is good reason why your mother or grandmother fed you homemade chicken soup when your were sick! In a study done by the University of Nebraska, the findings "suggests that chicken soup may contain a number of substances with beneficial medicinal activity. A mild anti-inflammatory effect could be one mechanism by which the soup could result in the mitigation of symptomatic upper respiratory tract infections." UNMC

According to Dr. Axe, ingredients released from the bones including "proline and glycine are important for a healthy gut and digestion, muscle repair and growth, a balanced nervous system, and strong immune system." In addition, collagen and gelatin formed in the bone broth prevent bone loss, reduce joint pain and promote healthy skin, hair, and nails


How To Make Your Own Chicken Stock

Ingredients:


1 large stock pot

bones from turkey or chicken

several carrots

several celery stalks

small onion 

fresh herbs of your choice

salt and pepper

apple cider vinegar*

water

Directions:


  1. Break up the bones from your turkey or chicken and place them in the bottom of the stock pot.

  2. Cut carrots, celery and onion into chunks and place in the pot.

  3. Place herbs (I use thyme and rosemary) in herb infuser (or make a bouquet garni) and place or hook that in the pot.

  4. Fill the pot with water covering all of the other ingredients. Add 2 tablespoons of apple cider vinegar and salt and pepper to taste.

  5. Cover the pot, bring to a slow boil then simmer on low for at least 12 hours or up to 24 hours. Be sure to skim off any foam (impurities) that form on the top.

  6. Let cool then pour broth through a strainer to remove all solids. 

  7. Store broth in the refrigerator for 3-5 days or pour into freezer bag and freeze for later use.


*Adding an acid (like lemon juice or apple cider vinegar) will help to extract minerals from the bones.

Healthy Thanksgiving Side Dishes

Healthy Thanksgiving Side Dishes


If you are trying to find Healthy Thanksgiving Side Dishes, look no further! These side dishes will help you cut the calories without sacrificing flavor on your Thanksgiving table! 


Healthy Thanksgiving Side Dishes


Healthy Thanksgiving Side Dishes


1. Cranberry Sauce from Alton Brown uses honey and fresh cranberries.


2. Garlic Roasted Butternut Squash from Eat Well 101 gets its flavor 

from garlic sauce and Cajun seasonings.


Healthy Thanksgiving Side Dishes


3. Thanksgiving Slaw from The Kitchn include almonds and

cranberries and will last up to 2 hours on the buffet without wilting.


Thanksgiving Salad

4. Apple Cranberry Spinach Salad from Julia's Album combines

spinach, fruits, nuts and avocados served with a vinaigrette dressing.


5. Baked Carrots from This Autoimmune Life uses a small

amount of olive oil with Montreal steak seasoning for a burst of flavor.


6. Nanou's Garlic Green Beans from The Life Jolie combines fresh 

green beans, garlic and a brown butter sauce.


7. Cauliflower Stuffing from Delish offers a great alternative

for your gluten-free or low-carb friends.


8. Roasted Broccoli and Brussels Sprouts from Moms Without Answers are

roasted with a small amount of Parmesan cheese until crispy.


9. Sweet Potatoes with Cranberries offers a sugar-free sweet potato option

Search This Blog

Powered by Blogger.