Free Printable Santa Countdown Calendar

 Christmas is coming! Let the countdown begin by downloading this Free Printable Santa Countdown Calendar!

Free Printable Santa Countdown Calendar


Free Printable Santa Christmas Countdown Calendar from www.thisautoimmunelife.com #countdown #Christmas #calendar

When my brothers and I were young, my mom always had a Santa picture that we used as a countdown for Christmas. We glued cotton balls onto his beard during the month of December. When it was Christmas eve his beard was full. You can do the same with this picture. You can use cotton balls or pompoms to fill his beard.  Just click on the picture to get your free download! Then  print out the picture on cardstock or paper. Stick it in a frame or just hang on the refrigerator for your kids to have some fun as they countdown to the special day!


Free Printable Christmas Countdown Calendar from www.thisautoimmunelife.com #Christmas #countdown #calendar

Printable Christmas Countdown Stickers

Are you ready for the Christmas countdown? You can decorate your planner with these Christmas Countdown Stickers! 

Christmas Countdown Stickers from www.thisautoimmunelife.com #Christmas #countdown #stickers

I am sharing these stickers today on the Happy Holidays Link Party. Be sure to stop over to that page to find lots of holiday ideas - recipes, crafts, decorations . . . You can also add your own holiday blog post to the link up.

As always, my printable stickers are available in several different formats including png and pdf. I am also linking my Cricut Design Space file. Since Cricut will only print and cut images up to 6" x 9", I've split the file so it will print on two pages. I don't own a Silhouette so if it has similar issues leave a comment and I will create a usable file.

These Christmas Countdown Stickers are just under 1.5" in diameter so you can use them on the month page or on the daily pages of your planner. Just print them out on sticker paper and cut them using your cutting machine or scissors. Just click on the picture above to get the free downloadable files. 

If you would like other Christmas stickers for your planner, you can click here or here.

Enjoy these free stickers and enjoy your holidays!
 

Printable Christmas Countdown Stickers - get ready for the holiday season with these printable stickers for your planner! from www.thisautoimmunelife.com #Christmas #planner #stickers #countdown

Great Gifts For A Stylish Office

Whether you work from home or go somewhere to work everyday, your office deserves to be stylish! I've compiled this list of Great Gifts For A Stylish Office! With the holidays approaching there is no better time to surprise your favorite girl with one of these beautiful gifts. 


Great Gifts for a Stylish Office from www.thisautoimmunelife.com #stylishoffice #goldoffice #girloffice


Ten Beautiful Gold and Sparkly Gifts


Gold Dot Mouse Pad


Great Gifts for a Stylish Office 

White and Gold Stapler


Great Gifts for a Stylish Office


Gold Letter Tray Organizer


Great Gifts for a Stylish Office

Gold String Lights


Great Gifts for a Stylish Office 

White & Gold Office Chair


white & gold office chair 

White Marble Paper Clip Holder


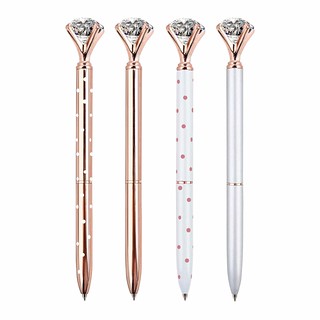
Gold Paper ClipsGold and White Pens 


Gold Pens


Make Things Happen File Folders 


Make Things Happen

Gold Letter Board 


Gold Letter board"Do More of What Makes You Sparkle" Notebook 


Gold Notebook

So what do you think? Gold and sparkly is sure to be a hit! 

For other great Christmas gift ideas to make at home check here.


Fabric Scrap Christmas Tree Garland

Welcome to the November Pinterest Challenge Blog Hop!  The purpose of this Pinterest Challenge is to motivate all the participants of this hop (and you too) to not just pin, but to make it happen! This month, I chose to make a Fabric Scrap Christmas Tree Garland. My inspiration came from this pin from Crafting Cheerfully.

Fabric Scrap Christmas Tree Garland from www.thisautoimmunelife.com #pinterestchallenge #christmas #fabricscraps #ChristmasTree #ChristmasGarland

Fabric Scrap Christmas Tree Garland


Materials:

Christmas tree pattern from Crafting Cheerfully (or you can make your own)
Green felt - 1 large sheet or 2 small
Scraps of fabric in green as well as brown
Fabric glue
Contrasting thread or embroidery floss
Ribbon or twine

Directions:

Print and cut out Christmas tree pattern. I traced it on a piece of cardboard to use as my template. Use the template to cut trees out of the felt. This will be your backing.

Then I made a template for each section of the tree. Using 6 different fabrics, I cut one of each section of the tree from each fabric. I also used the brown fabric to cut small rectangles for the trunk.

fabric scrap christmas tree garland 5 

Starting with the trunk and working your way up the tree, use a small amount of fabric glue to adhere each section of fabric to the felt.

If you don't like sewing you could add extra fabric glue and stop here, attaching each tree to the ribbon with hot glue.

I used a gold thread in my sewing machine and stitched around each section of the tree. You could also use embroidery thread and sew around the edges - totally up to you!

I spaced my trees out about 8" apart on the ribbon then sewed them on with the gold thread. 

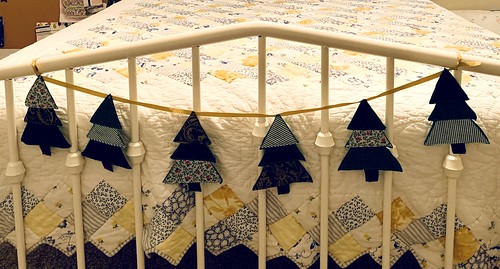
This is a really quick little project that you can do with your kids! I hung the garland on the footboard of my daughter's bed  to make it a little more festive when she comes to visit!
fabric scrap christmas tree garland 6 


Fabric Scrap Christmas Tree Garland from www.thisautoimmunelife.com #PinterestChallenge #Christmas #ChristmasTree #ChristmasGarland #FabricScraps


Heat Transfer Vinyl Wooden Christmas Ornament

Collaborating once again this month with a lovely group of Bloggers to bring you some new craft ideas. For the December Craft Destash we are challenged to create a project using only items currently found in our craft stash. We were to make something new with crafty supplies or re-make an item we've been holding on to for a while. For this challenge, hosted by Megan from C'mon Get Crafty,  I decided to make this Heat Transfer VInyl Wooden Christmas Ornament.

Heat Transfer Vinyl Wooden Christmas Ornament from www.thisautoimmunelife.com #htv #ChristmasOrnament #woodenornament #personalized

HTV Wooden Christmas Ornament


Materials:

Wooden Ornament (I purchased these from Hobby Lobby)
White Paint
Gold Paint
Printable Heat Transfer Vinyl
Directions:

Use the white paint to paint the circle part of the ornament. It will take several coats. Then use the gold paint to paint the around the edge of the ornament as well as the "hanging" part. Get a dry paint brush and load it with a little gold paint. Run your finger along the bristles to speckle the ornament with the gold paint. Make sure all the paint is dry before moving on to the next step.

Heat Transfer Vinyl Wooden Christmas Ornament from www.thisautoimmunelife.com #HTV #personalized #ChristmasOrnament

Find a design you like or create your own. I use both Canva and iPiccy to create and edit photos. Both sites are free! Upload your image to your cutting machine software. In Cricut you will want to flatten your design so it doesn't try to cut all the white spaces! Then use the print then cut feature to make your design. I use this printable heat transfer vinyl from Expression Vinyl. They did not provide me with this product and I am not an affiliate. I just really like the way you can customize your HTV with this product! The only thing I don't like about this product is that it is hard to peel the backing off. It seems to work best if you peel the front from the backing (if that makes sense). 

Position your HTV image on the wooden ornament. The directions that come with the HTV says to heat for 12 seconds but I found that it took more around 20 seconds to make sure it was adhered to the wood. Finally, seal with a clear coat spray and add a ribbon to hang.

Let's meet this month's bloggers!!


C'mon Get Crafty


Domestic Deadline | Across the Blvd


This Autoimmune Life | Sew Crafty Crochet


Square Monogrammed Christmas Wreath

Have you decorated for Christmas yet? This Monogram Christmas Wreath is perfect to hang on your front door!


Square Monogram Christmas Wreath from www.thisautoimmunelife.com #Christmas #OrientalTrading #wreath #square #monogram


Square Monogrammed Christmas Wreath


This post is sponsored by Oriental Trading but all opinions are my own. Some of the materials used to make this wreath were provided by them.

Materials:


These are provided by Oriental Trading:
Snowy Pine Picks
Green Square Wire Wreath Form
Crystal Drops
LED String Lights
Other materials: **affiliate links below
Floral Tape and Floral Wire
2 berry picks
Mesh Tulle 6" roll
Wooden Letter
Gray Paint
Invisible Thread
Gray Buffalo Check Ribbon

Directions:


First paint the wooden letter. It will take several coats of paint. Be sure to let it dry in between coats. Use the invisible thread and tie a piece on each side of the letter.  Make sure the thread is long enough to reach the frame. Then use those threads to tie it to the frame.

wreath supplies 

Then wrap the wire wreath with the mesh so it doesn't scratch the door. (I did this after I attached the pine picks and it was a little difficult!) Attach the pine picks to the wreath form using floral tape or floral wire. I put mine all in one direction going around the frame but you can attach them however you like.  Attach the red berry picks to the bottom left corner using floral wire.

wreath supplies 2 

Make a wreath bow using the buffalo check ribbon. Use floral wire to attach it to the frame over the berry picks.

Add the crystal drops to the sides. You can tie these on with invisible thread so they don't fall off. 

Finally add your LED "fairy" string lights. These are battery operated so just tape the battery pack to the back of the frame behind the bow.

Then you can stand back and admire your work!


Square Monogram Christmas Wreath from www.thisautoimmunelife.com #Christmas #wreath #square #monogram #OrientalTrading


Gluten Free Autumn Apple Spice Cake

Gluten Free Autumn Apple Spice Cake


One of my favorite things about the fall season is all of the delicious flavors! This recipe for Gluten Free Autumn Apple Spice Cake includes many of those fall flavors - apples, cinnamon and pumpkin spice! It would certainly make a great addition to your Thanksgiving dessert table. In addition to being full of flavor it is also gluten, dairy and refined sugar free! 


Gluten Free Autumn Apple Spice Cake


Ingredients for cake:

3/4 cup almond flour
1/2 cup gluten free flour blend
1 teaspoon baking soda
1 teaspoon pumpkin pie spice
1/2 teaspoon salt
1/4 teaspoon xantham gum
1/2 cup honey
1 egg
1/2 cup applesauce
1/4 cup melted coconut oil
1 small apple chopped

For the "icing":
2 tablespoons softened coconut oil
1/2 cup honey
1/2 teaspoon cinnamon

Directions:
Preheat the oven to 350 and lightly grease an 8" x 8" pan.
Mix all dry ingredients (from almond flour to xantham gum) in a medium size bowl.
In a large bowl mix 1/2 cup of honey, egg, applesauce and coconut oil. 
Slowly mix the dry ingredients into the wet ingredients until well blended. Then stir in the apples.
Pour batter into greased pan and bake for about 20 minutes or until lightly browned.
Mix the icing ingredients in a small bowl until well blended. Once cake has cooled, pour the icing over the cake right before serving.


November 2017 Planner Stickers

November 2017 Planner Stickers


"Give thanks to the Lord, for He is good; His love endures forever!" Psalm 107:1 I am thankful for so many things this year! First of all, my family which will be growing next year with a new son-in-law (my daughter) and a new grandchild (my step-daughter)! Second is my health which has held steady this year. And also my job where I have wonderful friends and get to touch the lives of many children each and every day! What are some of the things you are thankful for this year? Whatever they may be, I hope you can use these November 2017 Planner Stickers to remind you of all of those things!

Just click on the picture below to get your free pdf or png download.  Cut these on your cutting machine or the old fashioned way - with scissors! This is the sticker paper I use to print them on. It is a nice quality paper at a reasonable price!

Happy Thanksgiving!

November 2017 Planner Stickers

If you like these, check out the November 2016 planner stickers!

These free images are mostly found on Pixabay or Freepik.

How to Make Your Own Chicken Stock

How To Make Your Own Chicken Stock


Do you want to get the most out of your Thanksgiving turkey? Learn How To Make Your Own Chicken Stock (or turkey stock in this case) and nothing will go to waste! Why would you want to make your own when you can buy it at the store? First and foremost is all the health benefits it has to offer!

There is good reason why your mother or grandmother fed you homemade chicken soup when your were sick! In a study done by the University of Nebraska, the findings "suggests that chicken soup may contain a number of substances with beneficial medicinal activity. A mild anti-inflammatory effect could be one mechanism by which the soup could result in the mitigation of symptomatic upper respiratory tract infections." UNMC

According to Dr. Axe, ingredients released from the bones including "proline and glycine are important for a healthy gut and digestion, muscle repair and growth, a balanced nervous system, and strong immune system." In addition, collagen and gelatin formed in the bone broth prevent bone loss, reduce joint pain and promote healthy skin, hair, and nails


How To Make Your Own Chicken Stock

Ingredients:


1 large stock pot

bones from turkey or chicken

several carrots

several celery stalks

small onion 

fresh herbs of your choice

salt and pepper

apple cider vinegar*

water

Directions:


  1. Break up the bones from your turkey or chicken and place them in the bottom of the stock pot.

  2. Cut carrots, celery and onion into chunks and place in the pot.

  3. Place herbs (I use thyme and rosemary) in herb infuser (or make a bouquet garni) and place or hook that in the pot.

  4. Fill the pot with water covering all of the other ingredients. Add 2 tablespoons of apple cider vinegar and salt and pepper to taste.

  5. Cover the pot, bring to a slow boil then simmer on low for at least 12 hours or up to 24 hours. Be sure to skim off any foam (impurities) that form on the top.

  6. Let cool then pour broth through a strainer to remove all solids. 

  7. Store broth in the refrigerator for 3-5 days or pour into freezer bag and freeze for later use.


*Adding an acid (like lemon juice or apple cider vinegar) will help to extract minerals from the bones.

Healthy Thanksgiving Side Dishes

Healthy Thanksgiving Side Dishes


If you are trying to find Healthy Thanksgiving Side Dishes, look no further! These side dishes will help you cut the calories without sacrificing flavor on your Thanksgiving table! 


Healthy Thanksgiving Side Dishes


Healthy Thanksgiving Side Dishes


1. Cranberry Sauce from Alton Brown uses honey and fresh cranberries.


2. Garlic Roasted Butternut Squash from Eat Well 101 gets its flavor 

from garlic sauce and Cajun seasonings.


Healthy Thanksgiving Side Dishes


3. Thanksgiving Slaw from The Kitchn include almonds and

cranberries and will last up to 2 hours on the buffet without wilting.


Thanksgiving Salad

4. Apple Cranberry Spinach Salad from Julia's Album combines

spinach, fruits, nuts and avocados served with a vinaigrette dressing.


5. Baked Carrots from This Autoimmune Life uses a small

amount of olive oil with Montreal steak seasoning for a burst of flavor.


6. Nanou's Garlic Green Beans from The Life Jolie combines fresh 

green beans, garlic and a brown butter sauce.


7. Cauliflower Stuffing from Delish offers a great alternative

for your gluten-free or low-carb friends.


8. Roasted Broccoli and Brussels Sprouts from Moms Without Answers are

roasted with a small amount of Parmesan cheese until crispy.


9. Sweet Potatoes with Cranberries offers a sugar-free sweet potato option

Search This Blog

Powered by Blogger.