Quilt As You Go Halloween Quilt

This Quilt As You Go Halloween Quilt was inspired from this pin from The Seasoned Homemaker.

Quilt As You Go Halloween Quilt from www.thisautoimmunelife.com #pinterestchallenge #Halloween #Quilt


Halloween Quilt


With a quilt as you go quilt, you add the batting and quilt the individual pieces before adding the backing. This makes it much easier to put together with a regular sewing machine. I used larger size pieces because I had a charm pack that I wanted to use up. But the directions are basically the same. 

Here are the materials I used:

1 pack Halloween charm squares (approx 42 5" x 5" squares)
2 each fat quarter in white, purple and black
Scraps of fabric for candy corn and bat appliques
Steam A Seam Lite sheets - I used these to iron down my appliques
Batting
1 ½ yards backing fabric
Small piece of white ricrac
2 packages Wright's seam binding

Directions:

Follow the basic directions found at The Seasoned Homemaker website. Just know this quilt will be larger. Also, I used premade seam binding instead of binding with the backing fabric.  I just free handed my Halloween appliques. Here is a picture with the sizes. 

Halloween Quilt Appliques 

This was fun to make and didn't take too long. It is a great quilt to use up some scraps you might have laying around! I've been using it as a lap quilt but it could also be used as a wall hanging instead.


Quilt As You Go Halloween Quilt from www.thisautoimmunelife.com #pinterestchallenge #Halloween #Quilt

Free Halloween Stickers

Trick or Treat! The Halloween season is upon us and it's time to get your Free Halloween Stickers. The stickers can be used to decorate your planner or to give to your kids. You can also use them to close a party favor bag or as a cupcake topper. Lots of different ways to use them - just use your creativity! You can also can them into strips and hand them out as a non-candy alternative to trick-or-treaters!

I don't know about you, but I don't like the creepy, scary party of Halloween. I'm much more into the cute decorations. So these stickers are all about the cuteness. If you want to see more Halloween cuteness, check out these cute clay pots or this Halloween t-shirt.  


Free Halloween Stickers


Just click on this link here. You will then be able to download your Halloween stickers! Just print them out on sticker paper to use as stickers or cardstock to use as party decor. The file format is png so you can use it with your cutting machine.

Free Halloween Stickers from www.thisautoimmunelife.com #Halloween #free #stickers

If you are looking for other Halloween printables, just click here. I also have other Halloween stickers available here and here

Hope you have a happy Halloween and enjoy your free printables!

Candy Corn Cutie Baby Outfit

Happy Halloween!For the Craft Destash we are challenged to create a project using only items currently found in our craft stash. We were to make something new with crafty supplies or re-make an item we've been holding on to for a while. For this challenge I decided to make this Candy Corn Cutie outfit from a free svg file from svglove.com.

Corn Cutie Outfit from www.thisautoimmunelife.com #candycorncutie #Halloween #cricut #freesvg

Candy Corn Cutie


Materials:

SVG File
1 sheet of black glitter heat transfer vinyl
Small scrap of white glitter heat transfer vinyl
Small scrap of yellow and orange everyday iron-on
t-shirt or onesie

1 yard of each yellow, white and orange ribbon in various width
Candy corn button
fancy elastic

This is really easy to make. Just download the free svg file and upload it to your cutting machine software. Be sure to remember to reverse your image before you make the cut. Then follow the manufacturer's directions for ironing onto the shirt using a heat press or iron. Since little kids grow so fast I usually just iron these with an iron as it will probably only be worn a couple of times!

To make hair bows I use my Bowdabra. But the Ribbon Retreat has some great videos on making hair bows without using one. After you make the bow, just glue the candy corn button in the center.  Then glue the bow onto a piece of fancy elastic that you sew or glue into a circle. You can also use a hair clip if the child has enough hair. 


Candy Corn Cutie Outfit from www.thisautoimmunelife.com #candycorncutie #Halloween #cricut #freesvg

Black Cat Halloween Bag

Welcome to the Fabric Upcycle Challenge! This month I'm joining a few of my blogging friends to bring you the latest challenge - create an upcycled project made from fabric. Please join me as I show you how I made this black cat Halloween bag! 

September Fabric Upcycle Challenge Black Cat Bag from www.thisautoimmunelife.com #Halloween #bag #upcycle

My inspiration for this bag came as I was looking through the closet and found a pair of black capri pants.  They don't quite fit any longer so they are perfect for a project. At first I thought about making a black cat pillow. But the way they are cuffed made a perfect edging for a bag. And it did not take very long at all to make!

Black Cat Halloween Bag from www.thisautoimmunelife.com #Halloween #bag #blackcat
Materials:

Pair of black pants
White embroidery thread/needle
Purple ric-rac - large size
Green ribbon
Needle and thread or sewing machine
Hot glue gun
Directions:

Cut part of one leg off of the pants. Using a white marking pencil, draw a face and ears. Use the white embroidery thread to create face on the fabric. I used a satin stitch for the heart-shaped nose and an outline stitch for the ears and whiskers. You can also add some eyes if you like.

black cat Halloween bag 1 

Turn pant leg inside out then sew across the bottom with a straight stitch. You can either do this by hand or with a sewing machine.  Cut ric rac into 2-12" pieces. Sew to the inside of the bag just inside the ear stitching. Repeat on back side of bag.

black cat Halloween bag

Turn bag right side out. Make a bow out of the green ribbon then hot glue near the ear. Tada! You are finished!


Healthy Pumpkin Spice Frappuccino

Welcome to the September Pinterest Challenge Blog Hop!  The purpose of this Pinterest Challenge is to motivate all the participants of this hop (and you too) to not just pin, but to make it happen! This month, I chose to make a Healthy Pumpkin Spice Frappuccino. My inspiration came from this pin from The Minimalist Baker.

Pumpkin Spice Frappuccino from www.thisautoimmunelife.com #pinterestchallenge #pumpkinspice #frappuccino #healthy

I love fall and pumpkin spice. But when it is still in the upper 90's outside it is really hard to think about drinking a hot coffee! So I thought I would make a pumpkin spice frappuccino instead. **This requires freezing so be sure to prepare ahead of time!

Pumpkin Spice Frappuccino


Ingredients:

1 cup strong coffee (I used pumpkin spice flavor)
1 cup almond milk
¼ cup pumpkin puree
¼ teaspoon liquid stevia
1 teaspoon pumpkin spice
Directions:

Make coffee and put it in the refrigerator to chill.
Mix the almond milk, pumpkin puree, stevia and pumpkin spice in a bowl. Stir until well blended. 
Pour mixture into an ice cube tray and place in freezer until frozen.
Place coffee and 8-10 pumpkin cubes in a blender. Blend until smooth. 
Top with a dash of cinnamon and enjoy!


**Note: I used 8 pumpkin spice cubes but I have an old blender and it had a hard time blending. The taste is great but it turned out a little icy. This will work best with a newer model blender.


Free Fall Printables

It is time to get decorating for the fall season - the first day of fall was this past Monday! To help you with your decorating I have created these Free Fall Printables featuring both fall and Halloween prints.

Free Fall Printables


The two prints that are wreaths are 8" x 10" in size. The harvest time and ghost pictures are 10" x 10" in size. All prints are high quality pdf files. If you need another format or would like a different size print please feel free to email me.

To get your free printables just click here. All four prints are located in this file so you can download the one you want. Or you can download all four!

I am sharing these prints at the Happy Fall Link Party. Be sure to stop by to find some great fall ideas from other bloggers. Or if you are a blogger yourself you can link up any post related to fall, Halloween or Thanksgiving. It's open from September 28 through October 18.

Free Fall Printables from www.thisautoimmunelife.com #free #fallprintables #halloweenprintables

The images for these fall and Halloween printables come from www.freepik.com. 

If you would like some fall stickers to go along with your printables, check them out here.

Free Fall & Halloween Printables from www.thisautoimmunelife.com #fallprintables #free #Halloweenprintables

Gluten Free Chocolate Pumpkin Bread

Are you craving something pumpkin flavored?  This Chocolate Pumpkin Bread will hit the spot. It is moist and delicious with a hint of pumpkin spice!  And it is not only gluten free but sugar free and dairy free as well.

Gluten Free Sugar Free Chocolate Pumpkin Bread from www.thisautoimmunelife.com #pumpkinbread #glutenfree #sugarfree #fall #chocolatepumpkinbread

Gluten Free Chocolate Pumpkin Bread


1 cup almond flour
1 cup gluten free flour blend
½ cup unsweetened cocoa
3/4 teaspoon xanthan gum
1 teaspoon baking powder
½ teaspoon baking soda
½ teaspoon salt
¾ cup xylitol
1 teaspoon cinnamon
1 teaspoon pumpkin pie spice
15 oz can pumpkin puree
¹⁄3 cup sugar free brown sugar*
2 eggs at room temperature
¹⁄3 cup melted coconut oil
¼ cup milk
2 teaspoons vanilla
1 cup sugar free chocolate chips (if you are not worried about dairy)

*To make sugar free brown sugar, mix 1/3 cup of xylitol with 1 teaspoon of molasses
Directions:

Preheat oven to 350°. Then spray a loaf pan with non-stick spray.

In a large bowl mix dry ingredients from almond flour to pumpkin pie spice so they are well blended. 

In a separate bowl mix wet ingredients from pumpkin puree to vanilla.

Pour wet ingredients into bowl with dry ingredients and mix until well combined. If using the chocolate chips, stir them in at this point.

Add batter to prepared loaf pan and bake for 60-70 minutes. Let cool in pan for 10 minutes then remove from pan.

As with most gluten free products, this is best served the first few days. If you will not be eating it right away, cut into slices and freeze. Then you can defrost 1 or 2 pieces at a time to eat.

Looking for other gluten free pumpkin recipes? Check out these pumpkin spice raisin muffins. 

Gluten, Dairy and Sugar free chocolate pumpkin bread from www.thisautoimmunelife.com #chocolatepumpkinbread #pumpkinbread #glutenfree #sugarfree #dairyfree #fall

Recipe is a modified version of Pumpkin Bread from What the Fork.

How To Make A Fall Market Tote

Collaborating this month with a lovely group of Bloggers to bring you some new craft ideas. For the October Craft Destash we are challenged to create a project using only items currently found in our craft stash. We were to make something new with crafty supplies or re-make an item we've been holding on to for a while. For this challenge I decided to make these Fall Market Tote.

 How to make a fall market tote from www.thisautoimmunelife.com #craftdestash #fall #markettote #sewing


For this project, I had everything I needed. I was a little short on the interfacing so I had to purchase a package of that for $4. So this project ended up being very inexpensive!

Fall Market Tote


Materials:

1 yard main fabric
1 yard lining fabric
Fall fabric panel 
Medium weight fusible interfacing
Fusible web (make sure it's sewing machine safe)
Directions:

½"seam unless noted otherwise
press seams open after sewing
Cutting:

From the main fabric cut 2 pieces that are 21" x 19" as well as 2 pieces that are 2" x 21". The 19" side is the height and the 21" side is the width.
From the lining fabric you will also cut 2 pieces that are 21" x 19" and 2 pieces that are 2" x 21". In addition you will need to cut 1 piece that is 9½" x 21" (the base fabric). 
With the interfacing you will cut 4 sections that are 21" x 19" and 2 sections that are 2" x 21".

Iron the interfacing to the wrong side of your main fabric and lining fabric. Also iron the interfacing to the 2" x 21" strips which will be the straps.
Sewing:

Main Bag

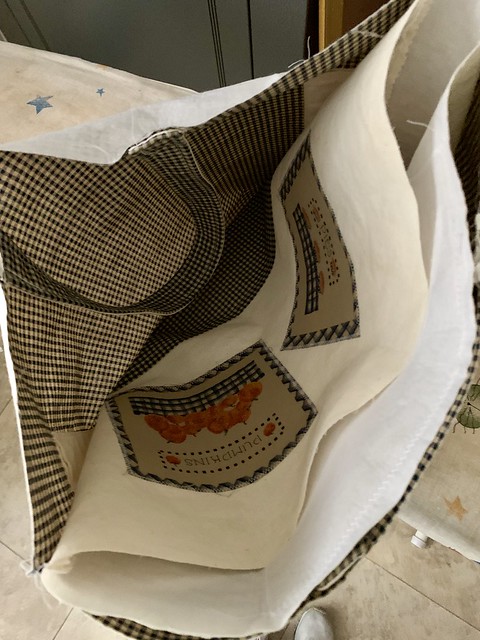
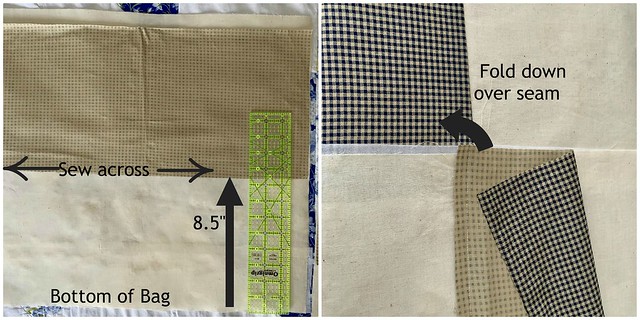
With the main fabric laying right side up, place the base fabric  (9½ x 21" piece) right side down on top 8½" from the bottom.  Sew across. Repeat with the other piece of main fabric and base. Then fold the base fabric down at the seam and iron it. Stitch a topstitch across the bag about ¼" from where you folded the fabric down.

Fall Market Bag Collage 1 

Cut out all the pieces from the fall fabric panel. Iron the steam a seam to the back. Then place them on the bag according to your preference and iron them down. Use a zigzag stitch to go around each applique.

Fall Market Bag Collage 2 

Lay the right sides together and sew around the bag, leaving the top open.

If you would like to make an inside pocket, cut a 6½" x 10½" piece of the main fabric. Iron under a ¼" seam all the way around then iron it down another ¼". Sew down the seam on all 4 sides. Then place the pocket on the right side of one of your lining pieces. Sew down the two sides and across the bottom. Then sew a line up the middle so that you have two pockets.

2019-10-06 14.24.24-1 
Lining

Lay the two lining pieces together with right sides facing. Sew down the two sides and bottom using a 5/8" seam. This makes your lining just a bit smaller than the main bag. Leave this bag inside out.
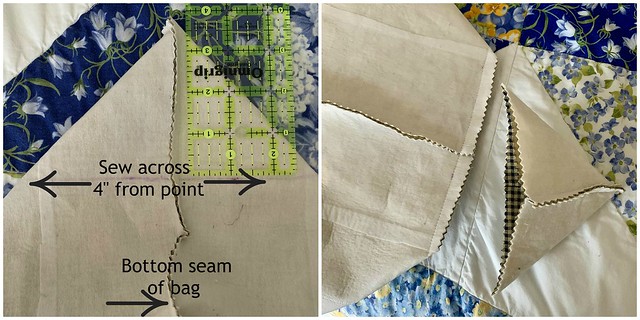
Creating Bottom

To create a flat bottom on your bag, flatten the bottom seam so that it forms a triangle on both edges. Mark 4" down from point and sew across those lines. Repeat on lining bag. Cut off excess triangle of fabric from all 4 corners.

Fall Market Bag Collage 3 
Straps

To sew the straps, place one lining and one main fabric right sides together. Sew up each long side. Repeat with other strap. Then turn those right side out. Pin one strap onto the right side of the lining bag so that the raw edges are lined up with the top edge of the bag. The edges of one strap will be about 5 inches apart. Baste this in place then repeat with the other strap.

Fall Market Bag Collage 4
Finishing

Place the main bag, right side out, inside the lining bag. You will have the right side of the lining bag facing the right side of the main bag. Pin top edges together making sure side seams are lined up. Sew around the top leaving about 5-6" open. Turn the bag by pulling it through the opening. Then iron the seam down and top stitch about ¼" from the top seam.

2019-10-06 14.29.39-1 


How to make a fall market tote from www.thisautoimmunelife.com #craftdestash #fall #markettote #sewing


Fall Table Runner

Every month a group of bloggers are challenged to create a new craft or project from their own stash of goodies! You are allowed $10 max for necessities, but must primarily use items you already own. Check out some awesome creations you might be able to make from your own stash! This month I am sharing how to create your own Fall Table Runner!

#CraftRoomDestashChallenge

Fall Table Runner from www.thisautoimmunelife.com #fall #tablerunner #quilted #applique


Fall Table Runner


 I've had this autumn fabric for a couple of years and wanted to make a table runner and matching placemats.

I'm not quite finished with this table runner yet though. I really wanted to learn how to free-motion quilt and thought this would be a great project for that. The only problem is I didn't have a free-motion quilting foot for my sewing machine. I ordered one and thanks to Amazon it came in today! So after I practice a bit and get this quilted I will update the picture. My table runner measures 15 inches wide by 33 inches long. I just measured the center of my kitchen table to find the best size. So, depending on your table size you might have to adjust your fabric measurements.

Materials:


3/4 yard cream or light colored fabric for the front and back

scraps of fall colored fabric for the leaves

1/4 yard fall colored fabric for the border

1/2 yard batting (or scrap measuring at least 15 x 33"


Directions for 15" x 33" Fall Table Runner:


Cutting:

1. Cut a piece of cream fabric 12 ½" x 30 ½". This piece is for the front. Cut another piece 15" x 33" for the backing. 

2. The maple leaves are cut from the scraps of fall fabric. First, iron some Heat N Bond Light to the back of the fabric. Make sure to use the light because the stronger ones will gunk up the needle on your sewing machine. I learned that the hard way! Then trace the pattern on the fabric and cut it out.  I cut 4 but if you are making a different size you can adjust this number.

3. Cut the border from the 1/4 yard of fall fabric - 2 strips will be 2" x 30 ½" and the other 2 strips will be 2" x 15".


Sewing:

4. Lay the leaves, right side up on the 12 ½ x 30 ½ piece of cream fabric. Spread them out to your liking. Iron them on according to the package directions. 

5. Use a sewing machine to applique the leaves onto the fabric. Use the satin stitch on the machine. If you haven't appliqued before you might want to try different stitch widths and lengths to find the one you like. I also have to adjust the presser foot's pressure on the machine I have. Also, if your background fabric has much stretch to it, you might want to iron on some interfacing to the back side before appliqueing. 

6. Pin the 30 ½" border to each side of the cream fabric with right sides together. Sew in a ¼" seam. Press seam towards the border.

7. Pin the 15" borders to the ends, right sides together. Sew in a ¼" seam. Press seam toward border.

8. Lay the backing on the table. Place the batting on top of the backing then place the table runner (face up) on top of the batting. Pin or baste these layers together. 

9. Quilt the layers together. You can quilt around the leaves and down the border or you can try your hand at free-motion quilting. 

10. Sew ½" double-fold binding around the edges. 

I haven't finished the last 2 steps but will be doing some free motion quilting. Then I have some brown binding that I will use to finish the edges.

And the total cost? $0 - I had all the material I needed!

Happy Fall!


Fall Table Runner from www.thisautoimmunelife.com #fall #tablerunner #quilted #applique


Search This Blog

Powered by Blogger.