Showing posts with label sewing. Show all posts

How To Print on Fabric

Would you like to make fabric tags to put on quilts? Or perhaps to use as a clothing label? Well once you learn How To Print On Fabric you can do both of those things! 

How to Print on Fabric


How To Print On Fabric


Materials:

Freezer Paper
White Fabric
Printer
Iron
Vinegar
Shallow Bowl
Steps:

Cut a piece of freezer paper to fit in your printer. You can use a piece of printer paper and trace around it to make sure you have the correct size. 

Iron the freezer paper onto the white fabric (one side feels more waxy, that side will go on the fabric) then trim the fabric to the same size as the freezer paper. Make sure there are no frayed ends on the fabric to get stuck in your printer!

How To Print On Fabric Collage 

Take the freezer paper and put it in your printer. For my printer I put the side I want printed on face down. So I put the fabric side face down.

Go to your computer and print the design you would like. 

Occasionally it will come out smeared. Just try again. The picture above took me 2 attempts! After it comes out, carefully peel off the freezer paper from the fabric being careful not to smudge the ink. 

How To Print On Fabric 1 

Fill a shallow bowl with vinegar - just enough to cover the fabric. Set your printed fabric in the bowl and let it sit for 5-10 minutes to set the ink. 

How To Print On Fabric 2 

After you take it out of the vinegar, rinse with cold water to get out the vinegar smell. You can either lay it flat to dry or you can use a hair dryer to speed up the process. 

I use some pinking shears to cut around the picture then I sew it on to my project. If it's a quilt I usually use my sewing machine but if it's clothing I hand stitch it on.


Quilted Christmas Pillow

Collaborating this month with a lovely group of Bloggers to bring you some new craft ideas. For the November Craft Destash we are challenged to create a project using only items currently found in our craft stash. We were to make something new with crafty supplies or re-make an item we've been holding on to for a while. For this challenge, hosted by Megan from C'mon Get Crafty,  I decided to make this Quilted Christmas Pillow.


Quilted Christmas Pillow for your holiday decorating from www.thisautoimmunelife.com #Christmas #Quilt #Pillow

I made this pillow for a sweet friend of mine. She is always so thoughtful and caring. I wanted to show her that I had been thinking about her and appreciate her friendship.
I had everything I needed to make this pillow. The red and green fabric I had inherited from my mother years ago. Really, I don't ever remember her sewing anything so I'm not sure why she had this fabric. I had purchased the white fabric about a year ago when it was on sale as I use a lot of it with my quilting. The embroidery thread is also in my stash as I used to do a lot of cross-stitch. 


Quilted Christmas Pillow


Materials for a 20" pillow:

2 green squares 6" each
2 red squares 6" each
4 red squares 6" each, in a different pattern
8 white squares 6" each
20" x 20" piece of batting
White material for back 
20" pillow form
Optional:
2 packs of red embroidery thread
1 pack of gold embroider thread
Directions:

First you will be making "half-square triangles" (HST). To do that, take one white square and one red (outer) print. Place them with right sides together. Draw a line diagonally down the center. Sew a scant ¼" away from each side of the seam. Cut down the middle between the seams. This gives you 2 matching half square triangles. Repeat this with 3 more whites/reds. Then use the other red pattern with the green to create 2 more sets. Press these open pressing the seam towards the darker fabric. You will end up the 4 of the red/green, 8 of the white/red and will have 4 of the plain white squares left over.

Quilted Christmas Pillow Steps

You will notice that the white squares are a little larger than the half square triangles. Trim the white pieces down so they are the same size as the HST. Then start sewing your squares together in a scant ¼" seam. I sewed them row by row then sewed the rows together but you can do it however you like! Place the batting on the back and quilt however you like. I just quilted along my stitching lines which is called "stitch in the ditch". 

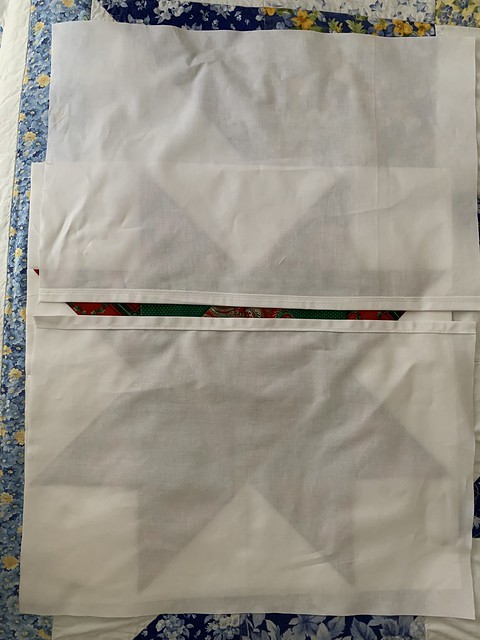
To make the back, cut 2 pieces of your backing fabric to measure 20" long and 14" wide. Make a narrow hem along 1 20" side of each piece. 
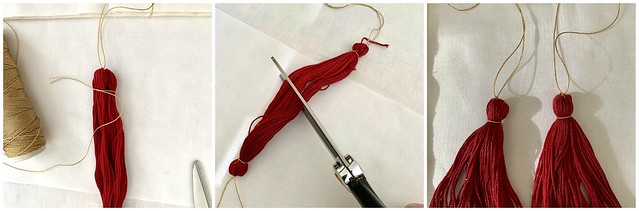
2019-10-18 14.19.10
Tassels

If you want to make tassels, you will use 1 pack of embroidery thread for 2 tassels. Tie a loop of gold thread around each end of the embroidery thread for the hanger. Take another piece of gold thread and tie very tightly around the ends to secure the loop thread. Cut across the center of the thread. Trim any loose threads. Then make another one of these.

Quilted Christmas Pillow Tassel

To put the pillow together, lay the quilted piece face up. Then put the tassels in each corner so that the tassel is laying on the quilted piece and the gold loop is laying off (you will catch the gold thread as you sew). Lay the backing pieces face down so that they overlap to make an envelope. Pin the edges then sew all the way around the outside edge in a ¼" seam. Make sure you caught the gold tassel thread. I put a knot in the thread right by the corner seam to help hold it. Press the seams to one side then turn right side out.

Finally add the pillow form and it's ready!


Quilted Christmas Pillow to decorate your home for the holidays from www.thisautoimmunelife.com #Christmas #quilt #pillow


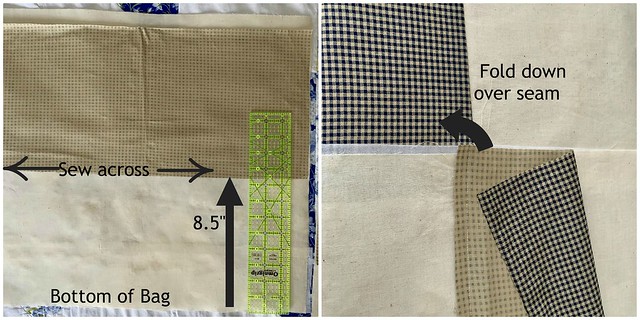
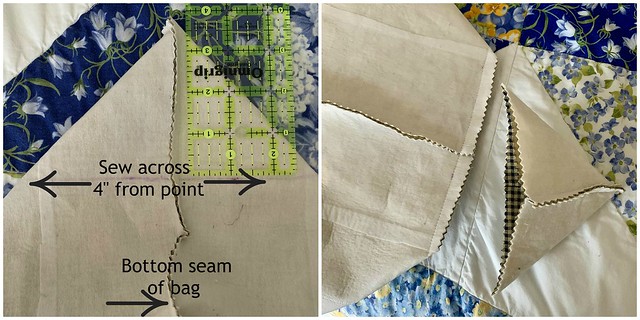
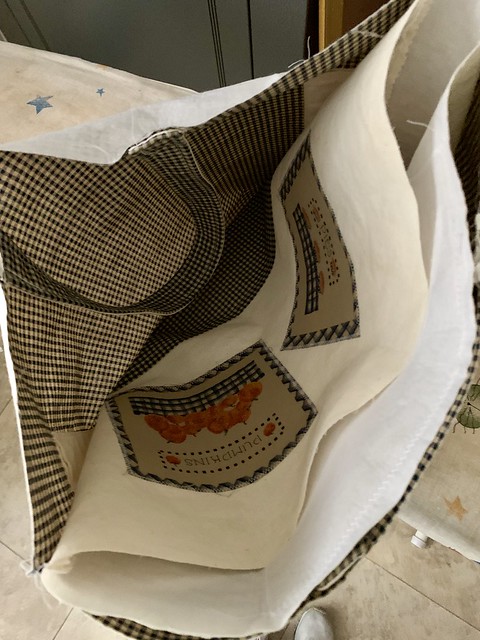
For last month's challenge I made this Fall Market Tote.

Fabric Scrap Christmas Tree Garland

Welcome to the November Pinterest Challenge Blog Hop!  The purpose of this Pinterest Challenge is to motivate all the participants of this hop (and you too) to not just pin, but to make it happen! This month, I chose to make a Fabric Scrap Christmas Tree Garland. My inspiration came from this pin from Crafting Cheerfully.


Fabric Scrap Christmas Tree Garland


Materials:

Christmas tree pattern from Crafting Cheerfully (or you can make your own)
Green felt - 1 large sheet or 2 small
Scraps of fabric in green as well as brown
Fabric glue
Contrasting thread or embroidery floss
Ribbon or twine

Directions:

Print and cut out Christmas tree pattern. I traced it on a piece of cardboard to use as my template. Use the template to cut trees out of the felt. This will be your backing.

Then I made a template for each section of the tree. Using 6 different fabrics, I cut one of each section of the tree from each fabric. I also used the brown fabric to cut small rectangles for the trunk.

fabric scrap christmas tree garland 5 

Starting with the trunk and working your way up the tree, use a small amount of fabric glue to adhere each section of fabric to the felt.

If you don't like sewing you could add extra fabric glue and stop here, attaching each tree to the ribbon with hot glue.

I used a gold thread in my sewing machine and stitched around each section of the tree. You could also use embroidery thread and sew around the edges - totally up to you!

I spaced my trees out about 8" apart on the ribbon then sewed them on with the gold thread. 

This is a really quick little project that you can do with your kids! I hung the garland on the footboard of my daughter's bed  to make it a little more festive when she comes to visit!

fabric scrap christmas tree garland 6 


Fabric Scrap Christmas Tree Garland from www.thisautoimmunelife.com #PinterestChallenge #Christmas #ChristmasTree #ChristmasGarland #FabricScraps


How To Make A Fall Market Tote

Collaborating this month with a lovely group of Bloggers to bring you some new craft ideas. For the October Craft Destash we are challenged to create a project using only items currently found in our craft stash. We were to make something new with crafty supplies or re-make an item we've been holding on to for a while. For this challenge I decided to make these Fall Market Tote.

 How to make a fall market tote from www.thisautoimmunelife.com #craftdestash #fall #markettote #sewing


For this project, I had everything I needed. I was a little short on the interfacing so I had to purchase a package of that for $4. So this project ended up being very inexpensive!

Fall Market Tote


Materials:

1 yard main fabric
1 yard lining fabric
Fall fabric panel 
Medium weight fusible interfacing
Fusible web (make sure it's sewing machine safe)
Directions:

½"seam unless noted otherwise
press seams open after sewing
Cutting:

From the main fabric cut 2 pieces that are 21" x 19" as well as 2 pieces that are 2" x 21". The 19" side is the height and the 21" side is the width.
From the lining fabric you will also cut 2 pieces that are 21" x 19" and 2 pieces that are 2" x 21". In addition you will need to cut 1 piece that is 9½" x 21" (the base fabric). 
With the interfacing you will cut 4 sections that are 21" x 19" and 2 sections that are 2" x 21".

Iron the interfacing to the wrong side of your main fabric and lining fabric. Also iron the interfacing to the 2" x 21" strips which will be the straps.
Sewing:

Main Bag

With the main fabric laying right side up, place the base fabric  (9½ x 21" piece) right side down on top 8½" from the bottom.  Sew across. Repeat with the other piece of main fabric and base. Then fold the base fabric down at the seam and iron it. Stitch a topstitch across the bag about ¼" from where you folded the fabric down.

Fall Market Bag Collage 1 

Cut out all the pieces from the fall fabric panel. Iron the steam a seam to the back. Then place them on the bag according to your preference and iron them down. Use a zigzag stitch to go around each applique.

Fall Market Bag Collage 2 

Lay the right sides together and sew around the bag, leaving the top open.

If you would like to make an inside pocket, cut a 6½" x 10½" piece of the main fabric. Iron under a ¼" seam all the way around then iron it down another ¼". Sew down the seam on all 4 sides. Then place the pocket on the right side of one of your lining pieces. Sew down the two sides and across the bottom. Then sew a line up the middle so that you have two pockets.

2019-10-06 14.24.24-1 
Lining

Lay the two lining pieces together with right sides facing. Sew down the two sides and bottom using a 5/8" seam. This makes your lining just a bit smaller than the main bag. Leave this bag inside out.
Creating Bottom

To create a flat bottom on your bag, flatten the bottom seam so that it forms a triangle on both edges. Mark 4" down from point and sew across those lines. Repeat on lining bag. Cut off excess triangle of fabric from all 4 corners.

Fall Market Bag Collage 3 
Straps

To sew the straps, place one lining and one main fabric right sides together. Sew up each long side. Repeat with other strap. Then turn those right side out. Pin one strap onto the right side of the lining bag so that the raw edges are lined up with the top edge of the bag. The edges of one strap will be about 5 inches apart. Baste this in place then repeat with the other strap.

Fall Market Bag Collage 4
Finishing

Place the main bag, right side out, inside the lining bag. You will have the right side of the lining bag facing the right side of the main bag. Pin top edges together making sure side seams are lined up. Sew around the top leaving about 5-6" open. Turn the bag by pulling it through the opening. Then iron the seam down and top stitch about ¼" from the top seam.

2019-10-06 14.29.39-1 


How to make a fall market tote from www.thisautoimmunelife.com #craftdestash #fall #markettote #sewing


Buffalo Plaid Happy Fall Pillow

Welcome to the thrift store find makeover challenge for August. For the challenge this month, I decided to make this Buffalo Plaid Happy Fall Pillow. So, technically this isn't from the thrift store. It was in a bag at my house that was destined for the thrift store so I think that counts. Right?


Buffalo Plaid Happy Fall Pillow from www.thisautoimmunelife.com #happyfall #buffaloplaid #pillow

It is a shirt that my son wore when he was in high school. He cleaned his room when he got married so I had quite a few bags that had to go to the thrift store. I looked through them to find anything that was still usable and this shirt was definitely craft worthy!

Buffalo Plaid Happy Fall Pillow


Materials:

A shirt in buffalo plaid, this is a small men's
Sweater like fabric for appliques
Heat and Bond
Black glitter Iron-on vinyl
Cricut or other cutting machine and this cutting file
14" pillow form
Also needed: thread, sewing machine and iron
Directions:

To start, cut the sleeves and neck area off of the shirt. Leave the buttons or snaps closed and place it over the pillow form. Adjust button or snap placement and if needed, move the buttons so that the shirt is snug over the pillow. In the picture below I moved the snaps and sewed them back in place. Trim excess fabric from the open ends.

buffalo collage 

Close the buttons/snaps and turn the shirt inside out. Place it back over the pillow form. Pin the open ends together so that the shirt is pulled together right up against the pillow form. I took a little tuck in at the ends so the corners didn't stick out.  Unbutton the shirt and pull out the pillow form. 

buffalo 3

Sew the ends where the shirt is pinned. Trim any excess fabric then turn right side out and place back over pillow form. Make any adjustments as needed.  

Cut the words "Happy Fall" from the black glitter iron-on using your cutting machine. Don't forget to mirror your words and to place the shiny side down on the mat!

Then cut the fall shapes from whatever material you choose. Iron on the Heat and Bond to the back of the fabric before you cut.  I had this cream colored knit that I used. I used my Accuquilt and the fall shapes die to cut them out. But you can certainly find images online to use and trace!

Remove the pillow form and lay the cover flat. Iron on the words and the shapes according to the manufacturer's directions. Then just put the cover on the pillow form and you have brand new fall decor!


Buffalo Plaid Happy Fall Pillow from www.thisautoimmunelife.com #buffaloplaid #happyfall #pillow

Patriotic Quarantine Quilt


To keep my self busy during the quarantine I pulled out all of my red, white and blue fabric and created this "Patriotic Quarantine Quilt". It came together fairly quickly although it's not quite finished due to the fact that I haven't been to the fabric store to buy batting and border/backing fabric!


It's time for the June Pin Challenge! The purpose of the Pinterest Challenge is to motivate us to not just pin, but to make it happen! This month's challenge is all about summer or July 4th projects. The pin I chose was Scrap Jar Stars from Gigi's Thimble.


To make this quilt top I used a red, white and blue layer cake (40 - 10" x 10" pieces), a white jelly roll (2.5" strips) as well as a couple of fat quarters.
The directions on Gigi's Thimble are very well written and were easy to follow. Here is what each 12" block looks like before it is sewn together.


After each block is sewn together white strips are used between each block to create the quilt top. This quilt is made for a full sized bed so I used 25 blocks - 5 rows of 5. Once I add the border it will fit the bed a little better!

For more Pinterest inspired projects from this month's Pinterest Challenge hosts, check out the links below ↓

Pinterest Challenge Blog Hop Image


Now, let's see what the other hosts have created ⇓⇓

You are invited to the Inlinkz link party!

Click here to enter


Fabric Scrap Coasters

Welcome to the monthly Pinterest Challenge for April!  The purpose of the Pinterest Challenge is to motivate all the participants (and you too) to not just pin, but to make it happen! This month's challenge is about Mother's Day or projects geared towards the women in our lives. For this month's project I chose to make these Fabric Scrap Coasters.

This project was inspired by this Pinterest pin from The Fabric Mill Blog.


TO JOIN NEXT MONTH’S #PINTERESTCHALLENGE, CLICK HERE TO SIGN-UP ⇒ May Pinterest Challenge


Materials:


To make 1 coaster you will need 5 - 5" squares of fabric and 1 - 5" square of thin batting. This is a great scrap buster project!


Directions:

Lay the material out as shown in the picture below. The center piece will be the back of the coaster. Lay the piece of batting under that piece.


Fold each of the side pieces in half with the folded side toward the center piece.


Then layer the side fabrics on top of the backing fabric.


Then sew around all 4 sides. Reach into the center of the layered fabric and flip the layered fabrics to the other side. Use something with a dull point to push out the corners. Press the coaster so it lays flat. For more detailed directions for this step, visit the Fabric Mill Blog


For more Pinterest inspired projects from this month's Pinterest Challenge hosts, check out the links below ↓


Pinterest Challenge Blog Hop Image


 Now, let's see what the other hosts have created ⇓⇓


You are invited to the Inlinkz link party!
Click here to enter


Toddler Apron From Fat Quarters

Collaborating once again this month with a lovely group of Bloggers to bring you some new craft ideas. For the April Craft Destash we are challenged to create a project using only items currently found in our craft stash. We were to make something new with crafty supplies or re-make an item we've been holding on to for a while. For this challenge, hosted by Megan from C'mon Get Crafty,  I decided to make this Toddler Apron From Fat Quarters.


I had all the material I needed for this apron so my additional cost is $0! This is going to be a gift for my granddaughter who will be turning 2 next month. She loves to stand on a chair and "help" with the cooking!

Materials:

2 Fat Quarters (19" x 21" pieces of material)
scrap of fabric for pocket
scrap of fabric for ruffle
pattern from Ordinary Lovely blog

Directions:

Print out pattern and tape an 8 1/2" x 11" sheet of paper to the bottom.

Cutting:

Fold your fat quarters (1 is the front fabric and 1 is the backing fabric) in half. Lay them one on top of the other making sure they are lined up. Place the pattern on the folds and pin in place. Cut out making sure to cut both pieces of fabric.
Cut 2 -  19" x 2" pieces for the top ties and cut 2 -  19" x 2" pieces for the waist ties. I used the extra pieces from the fat quarters to cut these.
Cut a 9" x 12" piece out of the scrap fabric for the pocket.
If you are adding a ruffle to the bottom, cut a piece that is 5" x width of fabric (about 42").

Sewing:

I monogrammed the pocket but that is completely optional. If you choose to monogram it, do that first. Then fold the pocket piece in half  with right sides together so the rectangle is 9" x 6". Sew around the edges using a 1/2" seam, leaving a small opening to turn. Clip corners and turn right side out. Press flat. Center the pocket on the front apron piece and sew down one side, across the bottom and up the other side. Make sure to back stitch at the beginning and end to secure it from coming loose.

To make the ties, fold each piece in half lengthwise, right sides together. Sew across one end and up the side of each using a 1/2" seam. Clip corners and turn each piece right side out. Press flat.

If you are adding a ruffle, fold ruffle piece with right sides together so you have a piece that is 2 1/2" x 42". Stitch along the two 2 1/2" edges. Turn right side out and press. Stitch a gathering (long stitch) along the unfinished edge. Pull up gathering stitches so that the ruffle is the same width as the bottom of the apron.

Pin the raw edge of the ruffle to the raw edge of the bottom of the front piece of the apron.  The ruffle will be in laying on the apron. Baste in place. 

Lay the lining fabric right side up. Place one tie at each top corner, raw edges even with ties laying on fabric. Place one tie at each of the waist corners, raw edges even with ties laying on fabric. I forgot to take a picture so I hope this one helps! The blue lines indicate where the pieces should be laying.


Lay the main fabric right side down on top of lining piece. It will be like a sandwich with the ties and ruffle inside. Pin edges and sew in a 1/2" seam all the way around. Leave a small opening for turning. Clip corners and curves. Turn right side out and press. Edge stitch all the way around and you're finished!

Check out some awesome creations you might be able to make from your own stash! #CraftRoomDestashChallenge
 

If you'd like to join in the Craft Room De-Stash Challenge, you can request to join our Facebook group here!

 
craft room destash


Let's meet this month's bloggers!!
 
You are invited to the Inlinkz link party!
Click here to enter

Minnie Mouse Birthday Dress

Minnie Mouse Birthday Dress

A dress for that special girl who is about to have a birthday! This Minnie Mouse birthday dress is perfect to wear anytime or to a celebration!
The Minnie Mouse "Two" embroidery applique file is a purchase from the Sweet Stitch Design store on Etsy.

Other materials needed:

white t-shirt
black ribbon - about 2 yards
1/4 yd red fabric with large white dots
1/4 yd black fabric with large white dots
scraps of fabric for applique
matching thread 

Directions:

First stitch your design on the t-shirt. I have a Brother SE600 which only does a 4" x 4" design so the applique came out a little smaller than I would have liked. The purchased design comes with larger sizes as well.
I wanted the dress to be about 19" long so I laid out the t-shirt on the floor and put a measuring tape on the shoulder and measured down 19". I put a pencil at the 19" mark (just to mark the spot). Then I moved the top of the measuring tape to the point on the t-shirt where I wanted the skirt to start and measured down to the pencil. This measurement is how long the fabric needs to be. Split this amount between the black and red fabric. Then add an inch to each measurement for the seam and hem. For the dress in the picture the red fabric is 7" and the black fabric is 5" long. Both fabrics were cut across the width of the fabric (42").
If you are making a size other than a 2T, the length of the dress will differ. A 3T should be about 20", a 4T is 21" and a size 5 is 24". For other sizes you can do a search on Pinterest!
With right sides together, sew the red and black fabric together along the 42" side using a 1/2" seam. Iron under 1/4" on the 42" side of the red fabric then iron that down another 1/4" to create a 1/2" hem. Repeat with the black fabric. 
Run a gathering stitch along the hemmed edge of the red fabric. Then sew the back seam of the skirt using a 1/2" seam. 
Using a ruler, measure down about 2" under the underarms of the shirt and mark with pencil or water soluble ink. This is about where you will place the upper edge of the skirt. Pull the gathering stitches on the skirt so that it fits around the t-shirt. Pin in place. Use a stretch stitch to sew the skirt in place. 
Cut a piece of black ribbon long enough to go around the top of the skirt, making sure to fold under ends of ribbon where the ends meet. Pin along the top edge of the skirt. Use a stretch stitch to sew the top and bottom edge of the ribbon. Cut another piece to make a bow. Sew it on the front slightly off-center on top of the black ribbon.
Feel free to add other embellishments to your liking! 


Pillowcase Dress from Fat Quarters

Every month a group of bloggers are challenged by C'mon Get Crafty to create a new craft or project from their own stash of goodies! Everyone is allowed a $10 allowance for necessities to complete their project (i.e. paint brushes, glue, etc), but the bulk of it must be created from their own stash of goodies. This month I decided to make a Pillowcase Dress from Fat Quarters

Pillowcase Dress from Fat Quarters from www.thisautoimmunelife.com for February craft destash #craftdestash #pillowcasedress #fatquarter #baby

Pillowcase Dress From Fat Quarters


I made this for my granddaughter who will be 1 in May. I am estimating that she will be between a 12 month and 18 month size this summer.

Materials:


2 Print Fat Quarters (same print)
1 Solid Color Fat Quarter to coordinate with print
1 ½ - 2 yards coordinating 7/8" ribbon
Thread to match
Optional: bias tape to match print fabric

Directions:


You can use this chart to make your measurements. I got this chart from The Polka Dot Chair but if you search on Pinterest you can find others. I looked at several and averaged it out to estimate my measurements.

Print

Step 1:


Put the 2 pattern pieces of fabric together. If your fabric has a pattern, put them right sides together making sure the pattern is going the same direction. Otherwise it doesn't matter. Fold them in half so that your fabric is 9" wide. Cut desired length off bottom. I cut mine so that it was 15" inches long. Draw your armhole using the above dimensions then cut it out. Cut the solid piece of fabric for your band. Since my opened print fabric is 18" wide, I cut mine 18" wide and 5 " wide. You will need 2 of these.

pillowcase dress step 1

Step 2:


Pin the solid bands, right sides together on the bottom of each piece of the dress. Sew using a 5/8" seam. Trim seam and iron open. Pin the 2 dress pieces with right sides together. Sew from under arm hole to the bottom of the dress in a 5/8" seam. Trim seam and iron open. For the arm holes, either sew bias tape along the arm hole or iron and sew a small 1/2" seam. I had to cut the arm hole a little after I had sewn the front to back to make it curve a little more at the bottom.

pillowcase dress collage 2

Step 3:


Fold under and iron 1/2" along the top on both the front and back. Fold under and iron another 1". Sew along the bottom edge to make a casing for the ribbon. Using a safety pin, thread ribbon through the front casing and around through back casing. Tie a bow from the ribbon and trim as needed. To keep the ribbon from unraveling you can use some clear nail polish or some fray check.

pillowcase dress collage 3

I had all the fabric (purchased from Hobby Lobby) and thread so the only thing I had to purchase was the ribbon. It is grosgrain that was on sale at Joann. The roll was $2.50 and I only used part of the roll.


craft room destash


Meet Your Hosts:


No Sew Fleece Blanket Without The Knots

No Sew Fleece Blanket Without Knots

A No Sew Fleece Blanket makes a great Christmas present for anyone who is always cold like I am. It is quick, easy and fairly inexpensive (the NFL fabric is a little more expensive than a regular print). This version does not have knots but instead loops the strips to make it almost look braided from the back. The fleece fabric used is always going on sale at Joann.  Or if it is not on sale just download their app - they are always putting out great coupons.  Walmart is where I found the backing for this blanket. It was on clearance for $2 a yard. You can't beat that! And just an FYI - I am not a Dallas Cowboys fan. I made this blanket for another family member who happens to love the Cowboys. 

No Sew Fleece Blanket Without the Knots


Materials:

2 yards printed fleece 2 yards solid color fleece Scissors

Directions:

  1. Lay the print fabric, right side up, on top of the solid fabric. Trim around the edges to make sure they are all even. Once everything is even, cut a 4 inch square from each corner.
No Sew Fleece Blanket

2. Around all 4 edges, cut 4 inch long strips about 1-2 inches in width.   No Sew Fleece Blanket

 3. Fold the strips up onto the blanket. No Sew Fleece Blanket

 4.  Where the fold is in the strip, cut a small 1/2 inch slit in each strip. No Sew Fleece Blanket No Sew Fleece Blanket

 5. Grab both pieces of fabric on a strip, loop the strip under then push the edges through the slit. Or you can reverse the loop and the "braided" part will be on the front.  Pull strip all the way through. Repeat for every strip all the way around. No Sew Fleece Blanket

 6. It should look like this from the front. No Sew Fleece Blanket

 7. It should look like this from the back. No Sew Fleece Blanket

The finished blanket! No Sew Fleece Blanket Without Knots from www.thisautoimmunelife.com #fleeceblanket

Search This Blog

Powered by Blogger.