Showing posts with label pinterest challenge. Show all posts

Easy Sugar Cookie Bars

Welcome to the April Pinterest Challenge Blog Hop! The purpose of this Pinterest Challenge is to motivate all the participants of this hop (and you too) to not just pin, but to make it happen! So this month, I chose to make Easy Sugar Cookie Bars


To join next month's #pinterestchallenge, click here to sign-up ⇒ May Pinterest Challenge
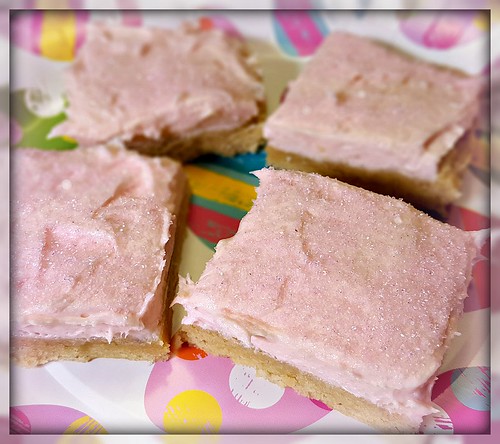
Sugar Cookie Bars 

Sugar Cookie Bars


My daughter had sent me a pin last year to make sugar cookie bars for when she came to visit. I didn't get the chance then so I made them for her when she came home for Easter a few weeks ago. The recipe made a 13 x 9 pan so I cut the recipe in half because I was also making an Oreo cheesecake for my son and didn't want a bunch of leftovers since I don't eat sugar. I made them in a 8 x 8 pan and the cookie bars came out fairly thin. I suppose I should have made the whole recipe and just put some in the freezer. But with the icing added on top she said they were really good so I guess all in all it was a success! 

INGREDIENTS:


For the cookie:

1 cup butter, softened
8 oz cream cheese, softened
1½ cups sugar
1 egg
2 teaspoons vanilla extract
2½ cups flour
1 teaspoon baking powder
½ tsp baking soda

For the frosting:

3/4 cup salted butter, room temperature
3 cups powdered sugar
1 teaspoon vanilla extract
3-4 tablespoons heavy cream
sprinkles


Here is the link the the pin where the original recipe is found. You can find the directions there.

Easy Sugar Cookie Bars


Now let's see what other things Pinterest inspired! Head over and visit the other hosts to see what they crafted, cooked, built, or tried!


Pinterest Challenge Blog Hop

Participants:


Erlene - My Pinterventures • Lauren - Mom Home Guide
Debbee - Debbee's Buzz • Laurie - My Husband Has Too Many Hobbies
Marie - DIY Adulation • Julie - Sum of their Stories
Marie - The Inspiration Vault • T'onna - Sew Crafty Crochet
Pili - My Sweet Things • Debra - Shoppe No. 5
Roseann - This Autoimmune Life • Terri - Our Good Life
Lisa - Blogghetti • Marci - Stone Cottage Adventures
Leslie - Once Upon a Time & Happily Ever After
Rebecca - Simple Practical Beautiful • Cherryl - Farm Girl Reformed
Kelley - Simply Inspired Meals • Joanne - Our Unschooling Journey
Jenny - Cookies Coffee and Crafts • Gail - Purple Hues and Me
Sam - Raggedy Bits
Beverly - Across the Boulevard • Samantha - Little Bits of Home
Kristie - Teadoddles • Shirley - Intelligent Domestications
Kelli - Olympic Nest • Chelsea - Making Manzanita
Cherryl - Farm Girl Reformed • Ola - J'adore Le Decor


Fabric Scrap Christmas Tree Garland

Welcome to the November Pinterest Challenge Blog Hop!  The purpose of this Pinterest Challenge is to motivate all the participants of this hop (and you too) to not just pin, but to make it happen! This month, I chose to make a Fabric Scrap Christmas Tree Garland. My inspiration came from this pin from Crafting Cheerfully.


Fabric Scrap Christmas Tree Garland


Materials:

Christmas tree pattern from Crafting Cheerfully (or you can make your own)
Green felt - 1 large sheet or 2 small
Scraps of fabric in green as well as brown
Fabric glue
Contrasting thread or embroidery floss
Ribbon or twine

Directions:

Print and cut out Christmas tree pattern. I traced it on a piece of cardboard to use as my template. Use the template to cut trees out of the felt. This will be your backing.

Then I made a template for each section of the tree. Using 6 different fabrics, I cut one of each section of the tree from each fabric. I also used the brown fabric to cut small rectangles for the trunk.

fabric scrap christmas tree garland 5 

Starting with the trunk and working your way up the tree, use a small amount of fabric glue to adhere each section of fabric to the felt.

If you don't like sewing you could add extra fabric glue and stop here, attaching each tree to the ribbon with hot glue.

I used a gold thread in my sewing machine and stitched around each section of the tree. You could also use embroidery thread and sew around the edges - totally up to you!

I spaced my trees out about 8" apart on the ribbon then sewed them on with the gold thread. 

This is a really quick little project that you can do with your kids! I hung the garland on the footboard of my daughter's bed  to make it a little more festive when she comes to visit!

fabric scrap christmas tree garland 6 


Fabric Scrap Christmas Tree Garland from www.thisautoimmunelife.com #PinterestChallenge #Christmas #ChristmasTree #ChristmasGarland #FabricScraps


Quilt As You Go Halloween Quilt

This Quilt As You Go Halloween Quilt was inspired from this pin from The Seasoned Homemaker.

Quilt As You Go Halloween Quilt from www.thisautoimmunelife.com #pinterestchallenge #Halloween #Quilt


Halloween Quilt


With a quilt as you go quilt, you add the batting and quilt the individual pieces before adding the backing. This makes it much easier to put together with a regular sewing machine. I used larger size pieces because I had a charm pack that I wanted to use up. But the directions are basically the same. 

Here are the materials I used:

1 pack Halloween charm squares (approx 42 5" x 5" squares)
2 each fat quarter in white, purple and black
Scraps of fabric for candy corn and bat appliques
Steam A Seam Lite sheets - I used these to iron down my appliques
Batting
1 ½ yards backing fabric
Small piece of white ricrac
2 packages Wright's seam binding

Directions:

Follow the basic directions found at The Seasoned Homemaker website. Just know this quilt will be larger. Also, I used premade seam binding instead of binding with the backing fabric.  I just free handed my Halloween appliques. Here is a picture with the sizes. 

Halloween Quilt Appliques 

This was fun to make and didn't take too long. It is a great quilt to use up some scraps you might have laying around! I've been using it as a lap quilt but it could also be used as a wall hanging instead.


Quilt As You Go Halloween Quilt from www.thisautoimmunelife.com #pinterestchallenge #Halloween #Quilt

Healthy Pumpkin Spice Frappuccino

Welcome to the September Pinterest Challenge Blog Hop!  The purpose of this Pinterest Challenge is to motivate all the participants of this hop (and you too) to not just pin, but to make it happen! This month, I chose to make a Healthy Pumpkin Spice Frappuccino. My inspiration came from this pin from The Minimalist Baker.

Pumpkin Spice Frappuccino from www.thisautoimmunelife.com #pinterestchallenge #pumpkinspice #frappuccino #healthy

I love fall and pumpkin spice. But when it is still in the upper 90's outside it is really hard to think about drinking a hot coffee! So I thought I would make a pumpkin spice frappuccino instead. **This requires freezing so be sure to prepare ahead of time!

Pumpkin Spice Frappuccino


Ingredients:

1 cup strong coffee (I used pumpkin spice flavor)
1 cup almond milk
¼ cup pumpkin puree
¼ teaspoon liquid stevia
1 teaspoon pumpkin spice
Directions:

Make coffee and put it in the refrigerator to chill.
Mix the almond milk, pumpkin puree, stevia and pumpkin spice in a bowl. Stir until well blended. 
Pour mixture into an ice cube tray and place in freezer until frozen.
Place coffee and 8-10 pumpkin cubes in a blender. Blend until smooth. 
Top with a dash of cinnamon and enjoy!


**Note: I used 8 pumpkin spice cubes but I have an old blender and it had a hard time blending. The taste is great but it turned out a little icy. This will work best with a newer model blender.


Patriotic Quarantine Quilt


To keep my self busy during the quarantine I pulled out all of my red, white and blue fabric and created this "Patriotic Quarantine Quilt". It came together fairly quickly although it's not quite finished due to the fact that I haven't been to the fabric store to buy batting and border/backing fabric!


It's time for the June Pin Challenge! The purpose of the Pinterest Challenge is to motivate us to not just pin, but to make it happen! This month's challenge is all about summer or July 4th projects. The pin I chose was Scrap Jar Stars from Gigi's Thimble.


To make this quilt top I used a red, white and blue layer cake (40 - 10" x 10" pieces), a white jelly roll (2.5" strips) as well as a couple of fat quarters.
The directions on Gigi's Thimble are very well written and were easy to follow. Here is what each 12" block looks like before it is sewn together.


After each block is sewn together white strips are used between each block to create the quilt top. This quilt is made for a full sized bed so I used 25 blocks - 5 rows of 5. Once I add the border it will fit the bed a little better!

For more Pinterest inspired projects from this month's Pinterest Challenge hosts, check out the links below ↓

Pinterest Challenge Blog Hop Image


Now, let's see what the other hosts have created ⇓⇓

You are invited to the Inlinkz link party!

Click here to enter


Search This Blog

Powered by Blogger.