Thanksgiving Baby Outfit

Are you getting ready for Thanksgiving? Get your little one ready as well with this Thanksgiving Baby Outfit. Just  click here to access your free Cricut Design Space file. 

Thanksgiving Baby Outfit


Thanksgiving Baby Outfit from www.thisautoimmunelife.com

Halloween Wreath Tutorial

Halloween Wreath Tutorial


Halloween will be here before you know it! Decorating for Halloween can be so much fun. Decorative mesh wreaths have become a really popular way to decorate over the last few years. However, purchasing a pre-made wreath can be quite expensive - $50 or more!  For under $15 and a few hours of your time you can make your own. Give this Halloween Wreath Tutorial a try to add color to your door without adding the expense of a pre-made one.

Halloween Wreath Tutorial from www.thisautoimmunelife.com #halloween #wreath


[tweetshare tweet="Make your own decorative mesh Halloween wreath with this tutorial!" username="autoimmunelife1"]Materials:

18" wire wreath frame

orange and purple decorative mesh rolls

25 pipe cleaners (I used black)

Halloween ribbon -

  1 roll plaid 

  1 roll green glitter

  1 roll  dots

"boo" sign from the dollar store

other decorations of choice
Instructions: 


  1. Gather materials. If desired, use pipe cleaners to wrap around metal wreath frame. This prevents the bow bundles from slipping.Halloween Wreath

  2. To start, cut decorative mesh into 10 inch pieces then cut plaid and green ribbon to the width of the decorative mesh. Mine was 5 inches wide so that is how long I cut the ribbon. It took me about 30 "bow bundles" to make this wreath. So you will cut 30 orange mesh, 30 purple mesh, 30 plaid ribbon and 30 green ribbon pieces. Then cut 15 pipe cleaners in half to make 30 pipe cleaner pieces.Halloween Wreath

  3. Roll 1 piece of orange mesh (use the natural curl of the ribbon) and 1 piece of purple mesh. Pinch them together in the middle. Then add 1 piece of plaid ribbon. I did 20 of these then I made 10 with the green glitter ribbon.Halloween WreathHalloween Wreath Tutorial

  4. While everything is pinched, use 1 piece of the pipe cleaner to wrap around the middle where the ribbon is pinched together. As you make them, lay them on the wreath form to make sure you have enough.Halloween Wreath TutorialHalloween Wreath Tutorial

  5. When you have enough start attaching them to the wreath form by wrapping the ends of the pipe cleaner around the form.

  6. To attach the "Boo" sign just use a little bit of hot glue and place it on the ribbon. Attach any other decorative items you have.

  7. Finally, make a large bow from the dot ribbon. Use this video if you need help making the bow.


Happy Halloween!


Halloween Wreath Tutorial from www.thisautoimmunelife.com #Halloween #wreath #tutorial

October 2017 Stickers

October 2017 Stickers


October is the month for pumpkin spice everything, caramel apples, candy corn and trick-or-treating! The weather is starting to cool off and the holiday season is just beginning.  Don't you just love this time of year! To help you celebrate the season you can download these free October 2017 Stickers. They come in pdf and png for both the Life and Happy planners. Use your Cricut or Silhouette cutting machine or cut by hand. Just click on the picture below. It will take you to the folder with all the files you need. 

This sticker paper is what I use to print my stickers. 

Happy Halloween!

October 2017 Stickers


Halloween Painted Clay Pot Tutorial

Halloween will be here before we know it!  Do you love to decorate for Halloween? If so, you can create these cute pots to add to your decor. Just follow this easy Halloween Painted Clay Pot Tutorial!

Halloween Painted Clay Pot Tutorial including Kawaii Ghost and Candy Corn from www.thisautoimmunelife.com

Halloween Painted Clay Pot Tutorial


Materials:

Clay pot (I used 6" for ghost and 12" for candy corn)
Primer 
Foam paint brush
Small paint brush for face details
Craft Paints - white, orange, yellow and black
Sealer
Ribbon 

Instructions for the ghost and candy corn:

Clean pot with soap and water. Allow to dry completely. I let mine sit in the sun for several hours.

halloween pot tutorial 

Use a primer to paint the pot. I used Kilz because that is what I had. Be sure to paint both the inside and outside of the pot if you plan to use the pot outside. Allow the primer to dry according to the directions on the product you use. Then, using the white paint, paint several coats to completely cover the pot.

halloween clay pot tutorial 
For the ghost:

Add some round eyes with the black paint. Also add a round mouth. In addition, if you want your ghost to be a girl, add some cute eye lashes. When the black is dry add some white highlights to the eyes. For the cheeks I added a little water to the orange then dabbed it on. After all the paint has dried, spray both the inside and outside of the pot with a sealer.

halloween clay pot tutorial from www.thisautoimmunelife.com 

Finally, I added a bow for my little girl ghost. There was a crack at the top so this was a great way to hide it!

Halloween painted clay pot tutorial from www.thisautoimmunelife.com
For the candy corn:

With the pot sitting on the rim, place a piece of painters tape about 2 inches down from the top. Also tape the rim of the pot. Paint everything in between the painter's tape with the orange paint. It may require 2 coats.

After the orange paint dries, remove the painter's tape. Add a piece of painters tape to the bottom of the orange section. Paint the bottom rim with the yellow paint. Remove the painter's tape when the yellow has dried.

Use white paint to create two oval eyes. Also add a round yellow nose. When those dry, use black to add pupils to the eyes and outline the nose. Also use black to create eyebrows and a mouth. After everything has dried, spray both the inside and outside of the pot with sealer.

Happy Halloween!


PaintedClay Pot Tutorial for September Pinterest Challenge from www.thisautoimmunelife.com

National Pumpkin Day

National Pumpkin Day


Nothing says fall like pumpkin!  National Pumpkin Day is celebrated on Thursday October 26 this year. And it seems that you can get just about anything in pumpkin spice flavor.  From cookies, cakes and coffee to chips and salsa, pumpkin spice is everywhere!  I've even seen pumpkin spice dog bones! To help celebrate here are a few delicious pumpkin desserts and snacks to make. There are a few Paleo recipes included as well.


National Pumpkin Day1. Pumpkin Caramel Cheesecake Bars with Streusel Topping from Chelsea's Messy Apron

Pumpkin Caramel Cheesecake BarsPumpkin Caramel Cheesecake Bars with Streusel Topping


2. Pumpkin Spice Caramel Rice Krispies from Coco and Ash


""</aRice Krispie Treats with Pumpkin and Caramel


3. Pumpkin Bread with Pumpkin Buttercream Frosting from Nancy Creative

""</aPumpkin Bread with Pumpkin Buttercream Frosting


4. Pumpkin Spice White Chocolate Snickerdoodle Cookies

Pumpkin Spice SnickerdoodlesPumpkin Spice White Chocolate Snickerdoodles


5. Pumpkin Spice Coconut Macaroons from Crunchy Creamy Sweet


Pumpkin Spice Coconut MacaroonsPumpkin Spice Coconut Macaroons


6. Pumpkin Cheesecake Bars from A Treat's Affair


Pumpkin Cheesecake BarsPumpkin Cheesecake Bars


7. Three Layer Pumpkin Brownies from Wholefully


Pumpkin BrowniesPumpkin Brownies


8. Pumpkin Spice Smoothie from Lemon Tree Dwelling


Pumpkin Pie SmoothiePumpkin Spice Smoothie


9. Paleo Pumpkin Coffee Cake from Jay's Baking Me Crazy


Paleo Pumpkin Coffee CakePaleo Pumpkin Coffee Cake


10. Paleo Pumpkin Bars from What Molly Made


Paleo Pumpkin BarsPaleo Pumpkin Bars


Whatever recipe you decide to try, Happy National Pumpkin Day!

Save

Save

Save

Save

Save

Save

Save

Save

Save

Save

Save

Save

Save

Save

Save

Save

Save

Save

Save

Save

Halloween Ghost Baby Bib

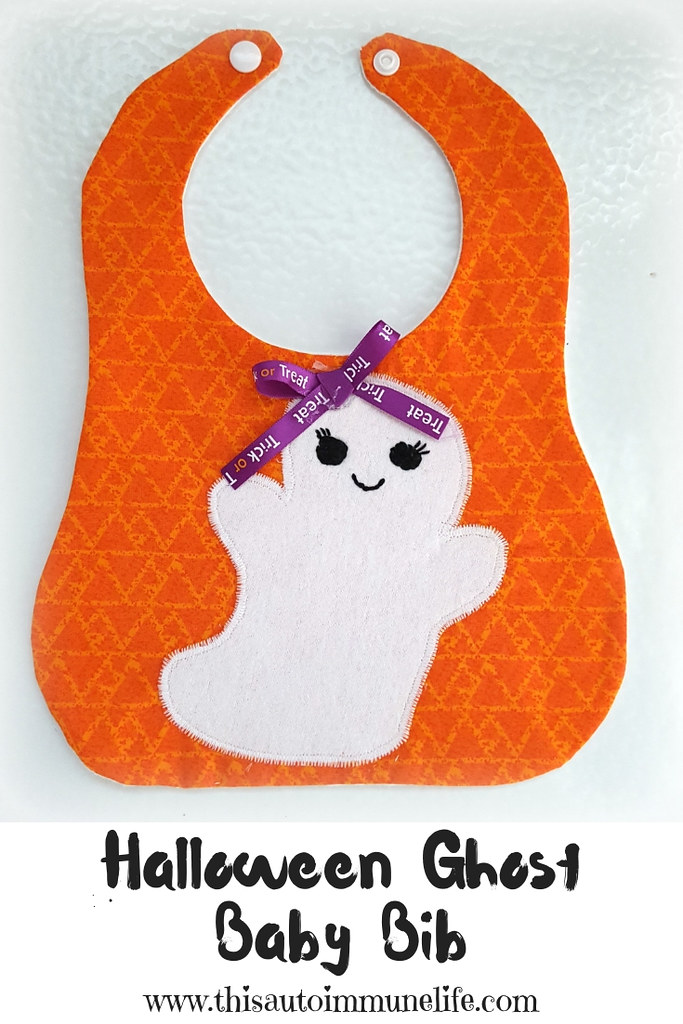
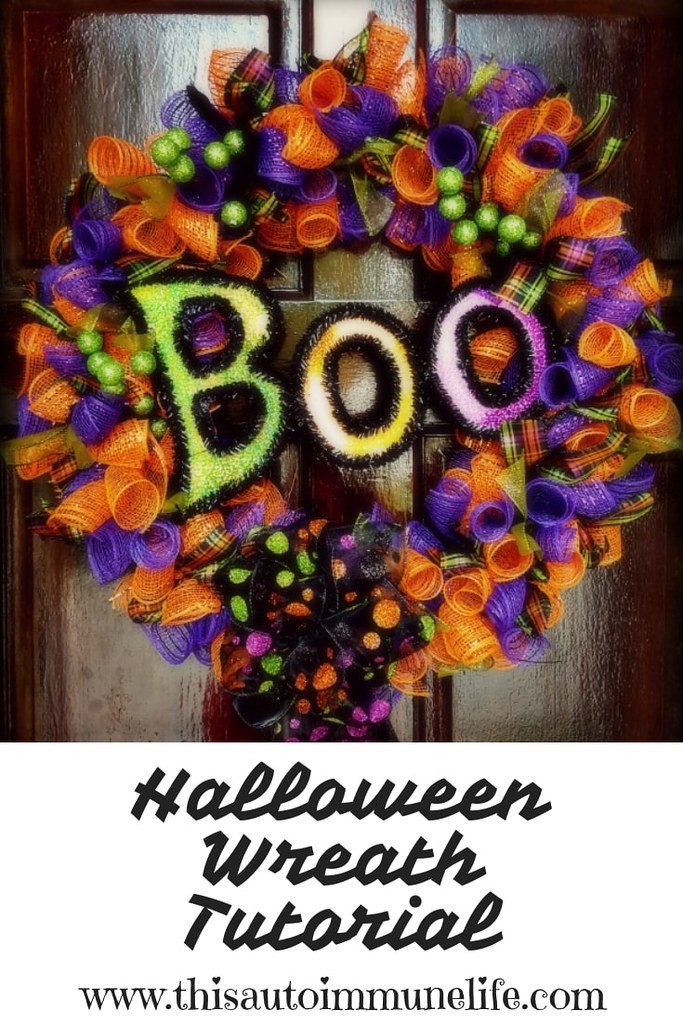
Are you ready for Halloween? This month I am sharing how to create your own Halloween Ghost Baby Bib to add some festive flair to your little one!


Halloween Ghost Baby Bib for September Monthly Craft Destash Challenge from www.thisautoimmunelife.com

Halloween Ghost Baby Bib


Materials:

¼ yard orange colored fabric
¼ yard flannel
6" x 6" piece of white fabric

small piece of Heat and Bond Lite
small piece of fusible interfacing

Babyville snaps

black embroidery floss


Directions:

Part 1

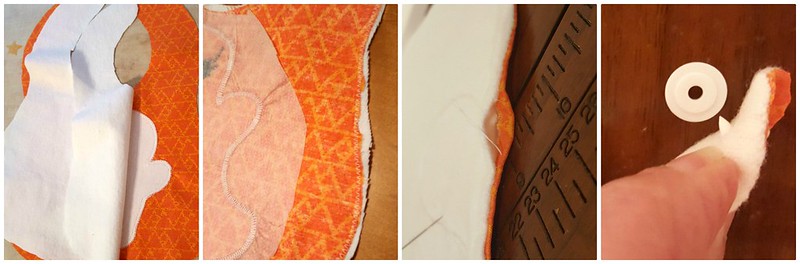
1. Using the pattern (or any pattern of your choice), cut 1 bib from the orange fabric and 1 bib from the flannel.

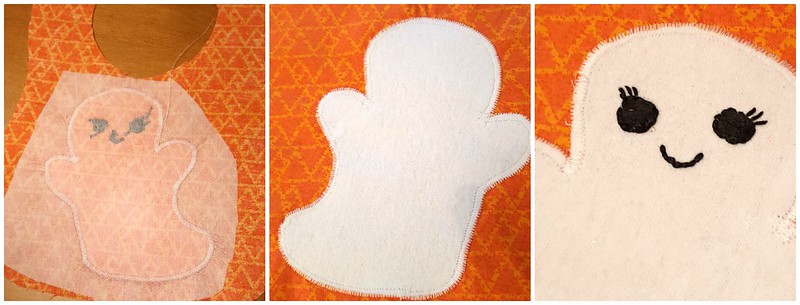
2. Trace the ghost pattern on paper side of Heat and Bond Lite. The ghost should be a little less than 6" x 6". Make sure you are using the Lite product if you are sewing your applique on your sewing machine. If you use a heavier one it can gunk up your needle. Follow the directions to iron the Heat and Bond to the wrong side of the white piece of fabric. Then cut out the ghost.

3. Iron the ghost to the right side of the orange fabric following the directions on your package. 

Baby Ghost Bib 11

Part 2

4. Cut out a piece of fusible interfacing to cover the ghost with about a 1" margin all the way around. Iron it on the back side of the orange fabric. This will keep your fabric from puckering when you applique.

5. Using the zigzag stitch on your sewing machine, sew all the way around the outside edge of the ghost. 

6. For the ghost's mouth and eyes use 3 strands of the black embroidery floss. Sew a stem stitch in a semi-circle for the mouth. For the eyes, use a back stitch to outline the circles then fill in with a satin stitch. Then just add some straight stitches if you want your ghost to be a girl.

Baby Ghost Bib Tutorial from www.thisautoimmunelife.com

Part 3


7. Place the orange fabric and flannel fabrics right sides together. Sew around the outside edge with a zigzag stitch leaving about a 2" opening along the bottom for turning. Clip curves then turn right side out. Iron along the edge then sew the opening along the bottom closed with either your machine or hand stitching.


Baby Ghost Bib Tutorial from www.thisautoimmunelife.com

8. Add a snap to each side of the top of the bib. You could also add Velcro or a button for securing the bib. 


Halloween Ghost Baby Bib Tutorial from www.thisautoimmunelife.com #Halloween #Baby #Bib

Cute Baby Crocheted Pumpkin Hat

 This Cute Baby Crocheted Pumpkin Hat pattern is a great project for fall. The pattern is shared by Loganberry Handmade

Cute baby crocheted pumpkin hat for the September Pinterest Challenge from www.thisautoimmunelife.com

Cute Baby Crocheted Pumpkin Hat


Materials:

1 skein lightweight orange yarn
small amount of green and white yarn
crochet hook size h

The hat is worked in 5 parts - the hat, vine, stem, leaf and flower. Then you sew all the pieces together. It is relatively easy to make. The only stitch I was not familiar with was the front post double crochet. So of course I googled it and followed these directions.  There are also plenty of youtube videos to show you how.

The size is for 6-12 months. Because this is for my granddaughter it is the perfect size as she will be 6 months old in the fall. And the cute scallops gives it that added touch that make it perfect for a little girl!

So, stop by Loganberry Handmade to get the free pattern! Then you too can make this cute hat!
Looking for other cute baby crocheted hats? Click here

BabyCrochetedPumpkinHat Pinterest 

Search This Blog

Powered by Blogger.