Showing posts with label quilting. Show all posts

How To Print on Fabric

Would you like to make fabric tags to put on quilts? Or perhaps to use as a clothing label? Well once you learn How To Print On Fabric you can do both of those things! 

How to Print on Fabric


How To Print On Fabric


Materials:

Freezer Paper
White Fabric
Printer
Iron
Vinegar
Shallow Bowl
Steps:

Cut a piece of freezer paper to fit in your printer. You can use a piece of printer paper and trace around it to make sure you have the correct size. 

Iron the freezer paper onto the white fabric (one side feels more waxy, that side will go on the fabric) then trim the fabric to the same size as the freezer paper. Make sure there are no frayed ends on the fabric to get stuck in your printer!

How To Print On Fabric Collage 

Take the freezer paper and put it in your printer. For my printer I put the side I want printed on face down. So I put the fabric side face down.

Go to your computer and print the design you would like. 

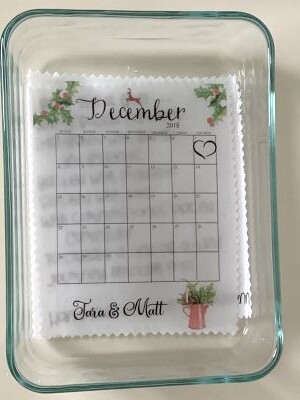
Occasionally it will come out smeared. Just try again. The picture above took me 2 attempts! After it comes out, carefully peel off the freezer paper from the fabric being careful not to smudge the ink. 

How To Print On Fabric 1 

Fill a shallow bowl with vinegar - just enough to cover the fabric. Set your printed fabric in the bowl and let it sit for 5-10 minutes to set the ink. 

How To Print On Fabric 2 

After you take it out of the vinegar, rinse with cold water to get out the vinegar smell. You can either lay it flat to dry or you can use a hair dryer to speed up the process. 

I use some pinking shears to cut around the picture then I sew it on to my project. If it's a quilt I usually use my sewing machine but if it's clothing I hand stitch it on.


Quilted Christmas Pillow

Collaborating this month with a lovely group of Bloggers to bring you some new craft ideas. For the November Craft Destash we are challenged to create a project using only items currently found in our craft stash. We were to make something new with crafty supplies or re-make an item we've been holding on to for a while. For this challenge, hosted by Megan from C'mon Get Crafty,  I decided to make this Quilted Christmas Pillow.


Quilted Christmas Pillow for your holiday decorating from www.thisautoimmunelife.com #Christmas #Quilt #Pillow

I made this pillow for a sweet friend of mine. She is always so thoughtful and caring. I wanted to show her that I had been thinking about her and appreciate her friendship.
I had everything I needed to make this pillow. The red and green fabric I had inherited from my mother years ago. Really, I don't ever remember her sewing anything so I'm not sure why she had this fabric. I had purchased the white fabric about a year ago when it was on sale as I use a lot of it with my quilting. The embroidery thread is also in my stash as I used to do a lot of cross-stitch. 


Quilted Christmas Pillow


Materials for a 20" pillow:

2 green squares 6" each
2 red squares 6" each
4 red squares 6" each, in a different pattern
8 white squares 6" each
20" x 20" piece of batting
White material for back 
20" pillow form
Optional:
2 packs of red embroidery thread
1 pack of gold embroider thread
Directions:

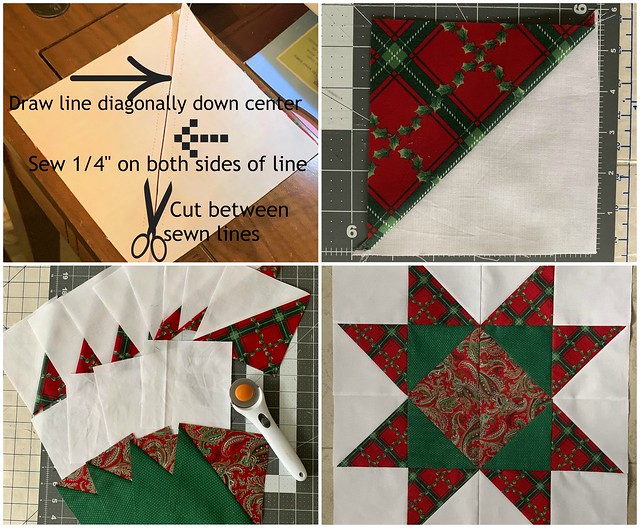
First you will be making "half-square triangles" (HST). To do that, take one white square and one red (outer) print. Place them with right sides together. Draw a line diagonally down the center. Sew a scant ¼" away from each side of the seam. Cut down the middle between the seams. This gives you 2 matching half square triangles. Repeat this with 3 more whites/reds. Then use the other red pattern with the green to create 2 more sets. Press these open pressing the seam towards the darker fabric. You will end up the 4 of the red/green, 8 of the white/red and will have 4 of the plain white squares left over.

Quilted Christmas Pillow Steps

You will notice that the white squares are a little larger than the half square triangles. Trim the white pieces down so they are the same size as the HST. Then start sewing your squares together in a scant ¼" seam. I sewed them row by row then sewed the rows together but you can do it however you like! Place the batting on the back and quilt however you like. I just quilted along my stitching lines which is called "stitch in the ditch". 

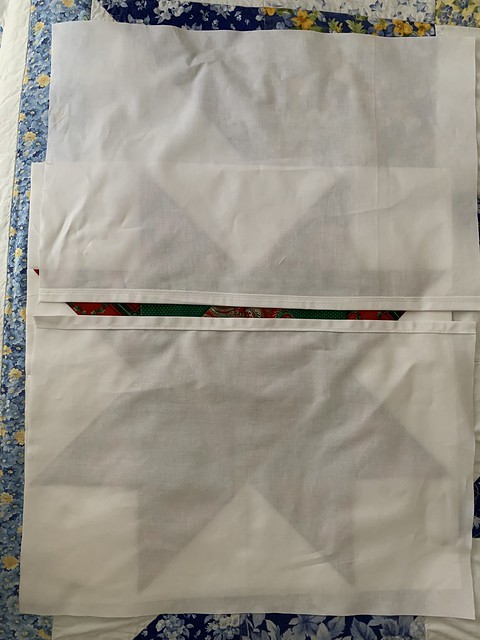
To make the back, cut 2 pieces of your backing fabric to measure 20" long and 14" wide. Make a narrow hem along 1 20" side of each piece. 

2019-10-18 14.19.10
Tassels

If you want to make tassels, you will use 1 pack of embroidery thread for 2 tassels. Tie a loop of gold thread around each end of the embroidery thread for the hanger. Take another piece of gold thread and tie very tightly around the ends to secure the loop thread. Cut across the center of the thread. Trim any loose threads. Then make another one of these.

Quilted Christmas Pillow Tassel

To put the pillow together, lay the quilted piece face up. Then put the tassels in each corner so that the tassel is laying on the quilted piece and the gold loop is laying off (you will catch the gold thread as you sew). Lay the backing pieces face down so that they overlap to make an envelope. Pin the edges then sew all the way around the outside edge in a ¼" seam. Make sure you caught the gold tassel thread. I put a knot in the thread right by the corner seam to help hold it. Press the seams to one side then turn right side out.

Finally add the pillow form and it's ready!


Quilted Christmas Pillow to decorate your home for the holidays from www.thisautoimmunelife.com #Christmas #quilt #pillow


For last month's challenge I made this Fall Market Tote.

Quilt As You Go Halloween Quilt

This Quilt As You Go Halloween Quilt was inspired from this pin from The Seasoned Homemaker.

Quilt As You Go Halloween Quilt from www.thisautoimmunelife.com #pinterestchallenge #Halloween #Quilt


Halloween Quilt


With a quilt as you go quilt, you add the batting and quilt the individual pieces before adding the backing. This makes it much easier to put together with a regular sewing machine. I used larger size pieces because I had a charm pack that I wanted to use up. But the directions are basically the same. 

Here are the materials I used:

1 pack Halloween charm squares (approx 42 5" x 5" squares)
2 each fat quarter in white, purple and black
Scraps of fabric for candy corn and bat appliques
Steam A Seam Lite sheets - I used these to iron down my appliques
Batting
1 ½ yards backing fabric
Small piece of white ricrac
2 packages Wright's seam binding

Directions:

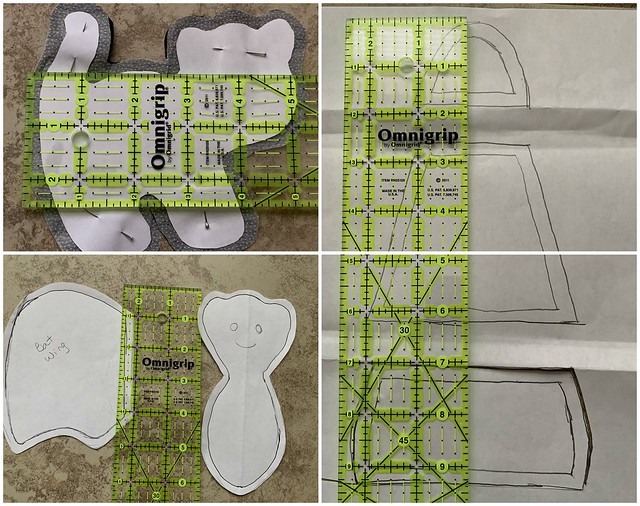
Follow the basic directions found at The Seasoned Homemaker website. Just know this quilt will be larger. Also, I used premade seam binding instead of binding with the backing fabric.  I just free handed my Halloween appliques. Here is a picture with the sizes. 

Halloween Quilt Appliques 

This was fun to make and didn't take too long. It is a great quilt to use up some scraps you might have laying around! I've been using it as a lap quilt but it could also be used as a wall hanging instead.


Quilt As You Go Halloween Quilt from www.thisautoimmunelife.com #pinterestchallenge #Halloween #Quilt

Fall Table Runner

Every month a group of bloggers are challenged to create a new craft or project from their own stash of goodies! You are allowed $10 max for necessities, but must primarily use items you already own. Check out some awesome creations you might be able to make from your own stash! This month I am sharing how to create your own Fall Table Runner!

#CraftRoomDestashChallenge

Fall Table Runner


Fall Table Runner


 I've had this autumn fabric for a couple of years and wanted to make a table runner and matching placemats.

I'm not quite finished with this table runner yet though. I really wanted to learn how to free-motion quilt and thought this would be a great project for that. The only problem is I didn't have a free-motion quilting foot for my sewing machine. I ordered one and thanks to Amazon it came in today! So after I practice a bit and get this quilted I will update the picture. My table runner measures 15 inches wide by 33 inches long. I just measured the center of my kitchen table to find the best size. So, depending on your table size you might have to adjust your fabric measurements.

Materials:


3/4 yard cream or light colored fabric for the front and back

scraps of fall colored fabric for the leaves

1/4 yard fall colored fabric for the border

1/2 yard batting (or scrap measuring at least 15 x 33"


Directions for 15" x 33" Fall Table Runner:


Cutting:

1. Cut a piece of cream fabric 12 ½" x 30 ½". This piece is for the front. Cut another piece 15" x 33" for the backing. 

2. The maple leaves are cut from the scraps of fall fabric. First, iron some Heat N Bond Light to the back of the fabric. Make sure to use the light because the stronger ones will gunk up the needle on your sewing machine. I learned that the hard way! Then trace the pattern on the fabric and cut it out.  I cut 4 but if you are making a different size you can adjust this number.

3. Cut the border from the 1/4 yard of fall fabric - 2 strips will be 2" x 30 ½" and the other 2 strips will be 2" x 15".


Sewing:

4. Lay the leaves, right side up on the 12 ½ x 30 ½ piece of cream fabric. Spread them out to your liking. Iron them on according to the package directions. 

5. Use a sewing machine to applique the leaves onto the fabric. Use the satin stitch on the machine. If you haven't appliqued before you might want to try different stitch widths and lengths to find the one you like. I also have to adjust the presser foot's pressure on the machine I have. Also, if your background fabric has much stretch to it, you might want to iron on some interfacing to the back side before appliqueing. 

6. Pin the 30 ½" border to each side of the cream fabric with right sides together. Sew in a ¼" seam. Press seam towards the border.

7. Pin the 15" borders to the ends, right sides together. Sew in a ¼" seam. Press seam toward border.

8. Lay the backing on the table. Place the batting on top of the backing then place the table runner (face up) on top of the batting. Pin or baste these layers together. 

9. Quilt the layers together. You can quilt around the leaves and down the border or you can try your hand at free-motion quilting. 

10. Sew ½" double-fold binding around the edges. 

I haven't finished the last 2 steps but will be doing some free motion quilting. Then I have some brown binding that I will use to finish the edges.

And the total cost? $0 - I had all the material I needed!

Happy Fall!


Patriotic Quarantine Quilt


To keep my self busy during the quarantine I pulled out all of my red, white and blue fabric and created this "Patriotic Quarantine Quilt". It came together fairly quickly although it's not quite finished due to the fact that I haven't been to the fabric store to buy batting and border/backing fabric!


It's time for the June Pin Challenge! The purpose of the Pinterest Challenge is to motivate us to not just pin, but to make it happen! This month's challenge is all about summer or July 4th projects. The pin I chose was Scrap Jar Stars from Gigi's Thimble.


To make this quilt top I used a red, white and blue layer cake (40 - 10" x 10" pieces), a white jelly roll (2.5" strips) as well as a couple of fat quarters.
The directions on Gigi's Thimble are very well written and were easy to follow. Here is what each 12" block looks like before it is sewn together.


After each block is sewn together white strips are used between each block to create the quilt top. This quilt is made for a full sized bed so I used 25 blocks - 5 rows of 5. Once I add the border it will fit the bed a little better!

For more Pinterest inspired projects from this month's Pinterest Challenge hosts, check out the links below ↓

Pinterest Challenge Blog Hop Image


Now, let's see what the other hosts have created ⇓⇓

You are invited to the Inlinkz link party!

Click here to enter


Search This Blog

Powered by Blogger.