I got a text from my daughter at the beginning of summer - "Mom, if you are not too busy this summer I have a few projects for you to do". My daughter teaches pre-k and I teach 5th/6th grade. During the summer months I do like to work on "projects". Sewing, baking and gardening are how I like to spend my time.
Milk crate seats (5 of them) for her small group table was one of the projects she asked me to make. I looked online and found quite a few websites with directions on how to make them. The only problem was all the milk crate seats seemed to have the cushion attached to a piece of wood which was then laid on the milk crate. If you've ever worked with or been around 4-5 year-olds you can see why this would be a problem. Spills, accidents, boogers ... you get the picture. The cushions I made for her classroom are both removable and washable. My daughter really liked that the crate chair cushions would be washable!
If you don't have a mom that will make milk crate seats for you, I decided to do a tutorial of my process so you can make them for yourself.
Materials for Seat Cushions -
Makes 1 removable cushion for milk crate size 15" x 13 ½"½ yard Foam - depending on how much money you want to spend you can buy 1" or 2" thick
1 yard Cotton Material, washed and dried
5 sew-on snaps or velcro
Directions:
1. Cut foam to fit the top of the milk crate. These crates go open side down.2.Place foam in center of fabric and trim fabric so that there is 9 inches of fabric on all sides of the foam.

3. Leave foam in center of fabric (wrong side up) and using a washable marker draw squares coming off of each corner of the foam. These squares should be 9" x 9".

4. Cut 8 strips 1" x 12" for the ties. Pin ties lengthwise right sides together and sew with a 1/8" seam across one small edge and down the length. Turn right side out. Here is a great tutorial on how to turn skinny tubes of fabric. You could also skip this step and use grosgrain ribbon for the ties.

5. Take 2 ties and pin unfinished end on right side of fabric about ¾" down from the right angle you drew.
6. Fold fabric right sides together matching the lines of the square. It will form a triangle.
7. Sew down the line. I reinforced the area where the ties are by reversing my machine back over that area.

8. Use pinking shears to trim off the extra piece of fabric that forms the triangle.
9. Press the seam open.

10. Make a 1" hem around all the edges. Press under 1" and then fold edge under and press that down so you have ½" seam. Sew along the edge of the inner fold.

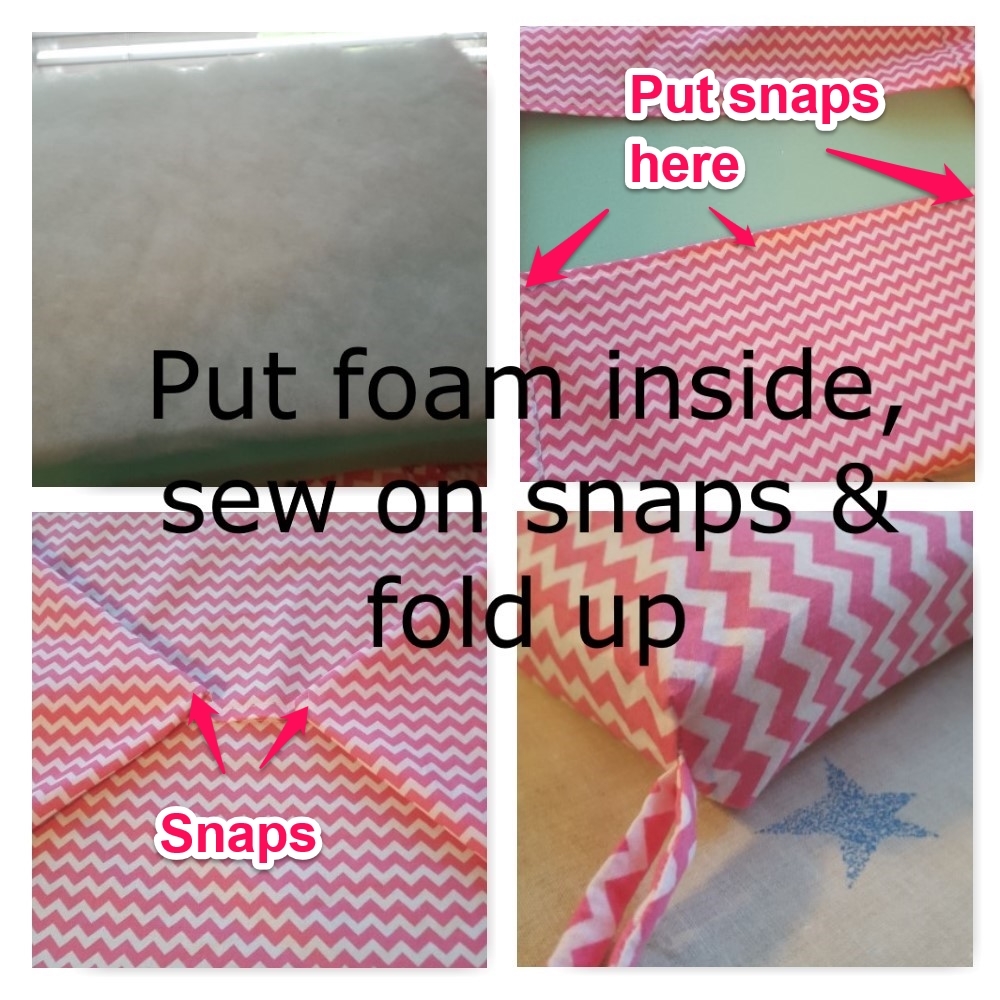
11. I put a thin layer of batting on top of the green foam so the green didn't show through the white on the fabric. This is optional. With batting side down place foam inside fabric. Pull fabric around foam so that the top is smooth.
12. Add snaps or velcro along long edge of opening. Also add snaps to the points that fold over.


Enjoy your new milk crate seats!


0 comments:
Post a Comment