I made this pillow for a sweet friend of mine. She is always so thoughtful and caring. I wanted to show her that I had been thinking about her and appreciate her friendship.
I had everything I needed to make this pillow. The red and green fabric I had inherited from my mother years ago. Really, I don't ever remember her sewing anything so I'm not sure why she had this fabric. I had purchased the white fabric about a year ago when it was on sale as I use a lot of it with my quilting. The embroidery thread is also in my stash as I used to do a lot of cross-stitch.
Quilted Christmas Pillow
Materials for a 20" pillow:
2 green squares 6" each
2 red squares 6" each
4 red squares 6" each, in a different pattern
8 white squares 6" each
20" x 20" piece of batting
White material for back
20" pillow form
Optional:
2 packs of red embroidery thread
1 pack of gold embroider thread
Directions:
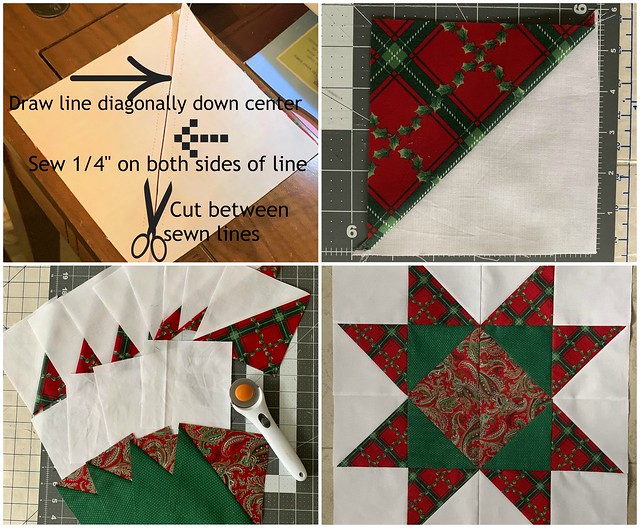
First you will be making "half-square triangles" (HST). To do that, take one white square and one red (outer) print. Place them with right sides together. Draw a line diagonally down the center. Sew a scant ¼" away from each side of the seam. Cut down the middle between the seams. This gives you 2 matching half square triangles. Repeat this with 3 more whites/reds. Then use the other red pattern with the green to create 2 more sets. Press these open pressing the seam towards the darker fabric. You will end up the 4 of the red/green, 8 of the white/red and will have 4 of the plain white squares left over.

You will notice that the white squares are a little larger than the half square triangles. Trim the white pieces down so they are the same size as the HST. Then start sewing your squares together in a scant ¼" seam. I sewed them row by row then sewed the rows together but you can do it however you like! Place the batting on the back and quilt however you like. I just quilted along my stitching lines which is called "stitch in the ditch".
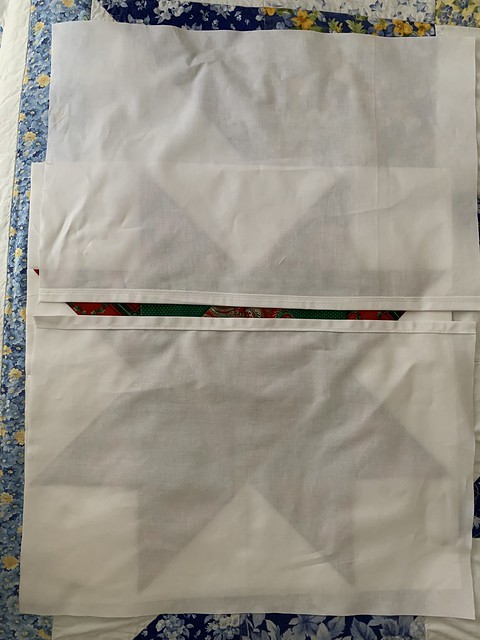
To make the back, cut 2 pieces of your backing fabric to measure 20" long and 14" wide. Make a narrow hem along 1 20" side of each piece.

Tassels
If you want to make tassels, you will use 1 pack of embroidery thread for 2 tassels. Tie a loop of gold thread around each end of the embroidery thread for the hanger. Take another piece of gold thread and tie very tightly around the ends to secure the loop thread. Cut across the center of the thread. Trim any loose threads. Then make another one of these.

To put the pillow together, lay the quilted piece face up. Then put the tassels in each corner so that the tassel is laying on the quilted piece and the gold loop is laying off (you will catch the gold thread as you sew). Lay the backing pieces face down so that they overlap to make an envelope. Pin the edges then sew all the way around the outside edge in a ¼" seam. Make sure you caught the gold tassel thread. I put a knot in the thread right by the corner seam to help hold it. Press the seams to one side then turn right side out.
Finally add the pillow form and it's ready!

For last month's challenge I made this Fall Market Tote.


What a lovey pillow for the holidays. The colors are beautiful.
ReplyDeleteSuch a stunning work of art! I'm in awe!
ReplyDelete