Showing posts with label baby. Show all posts

Beautiful Baby Girl Christmas Ornament

Do you have a new little one in your life this Christmas? Then this easy yet beautiful Baby Girl Christmas Ornament will be the perfect gift!


DIY Beautiful Baby Girl Christmas Ornament #sponsoredpost #DecoArt #ExtremeSheen from www.thisautoimmunelife.com #Christmasornament

Baby Girl Christmas Ornament **sponsored post**


Thanks to DecoArt for providing the paint for this project!
Materials:

1-3.25" translucent glass ornament
Extreme Sheen DecoArt paint in Rose Quartz
Small jewel stickers ( got mine at Dollar Tree)
Pink, white & silver ribbon in various widths
Sheer white/glitter ribbon
Pink and white feathers
Hot glue gun
Small paper plate

This ornament is so easy to make and looks just beautiful with the Extreme Sheen paint! I was provided with a set of Extreme Sheen paint from DecoArt for this project. I chose to use the Rose Quartz color as it is the perfect "baby girl" color!
Directions:

First, make sure your ornament is clean on the outside. I cleaned mine with an alcohol wipe. Then I used a yellow sharpie (so it wouldn't show through afterwards) and drew the initial "E" on the outside. Using the stick on jewels, cover the monogram. I also used the jewels to put "19" on the back for the year.

Take the top hanger part off of the ornament. Shake the bottle of paint to make sure it is well mixed. Then pour a little at a time inside the ornament around the edge. Start to swirl it around so it covers the inside of the ornament. Add a little at a time until you have enough inside to cover the entire ornament.

#DecoArt sponsored Christmas Ornament #ExtremeSheen #Christmas

Turn the ornament over onto the paper plate so that all of the excess paint will drip out. This took several days for mine so I occasionally moved the ornament around on the plate so it wasn't sitting in the drained out paint. If you have a heat tool you can use it to speed up the drying process.

While the paint is drying add the decor to the ornament cap. Tie one piece of ribbon around the top for hanging. I used a piece of white/glitter sheer. Take some strips of ribbon about 8" long and stack them together. Then tie them in a knot around the metal hanging part. Put a couple of small feather stems inside the knot. Add a little dab of hot glue to hold the knot and the feathers. Take 2 pieces of sheer ribbon and tie a bow. Glue the bow to the front of the knot.

Once the paint is dry inside the ornament, put the cap back on the ornament. Don't you think the metallic paint gives this ornament a beautiful finish!

DIY beautiful baby girl Christmas Ornament made with DecoArt paint from www.thisautoimmunelife.com #Christmas #ornament #DecoArt #babygirl


Thanksgiving Baby Outfit

Are you getting ready for Thanksgiving? Get your little one ready as well with this Thanksgiving Baby Outfit. Just  click here to access your free Cricut Design Space file. 

Thanksgiving Baby Outfit


Thanksgiving Baby Outfit

Halloween Ghost Baby Bib

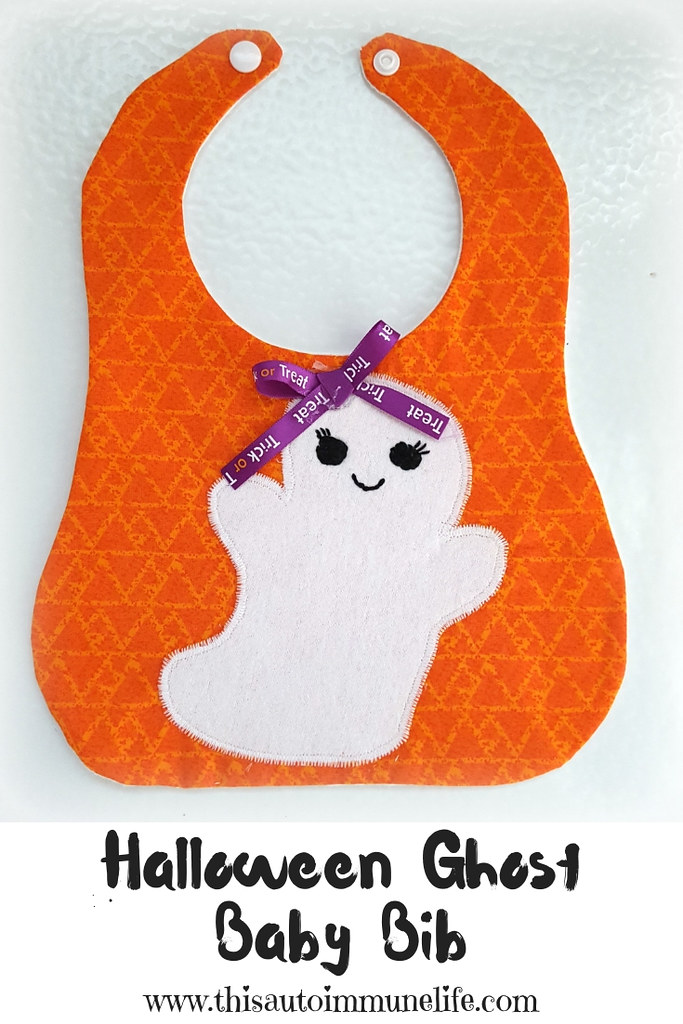
Are you ready for Halloween? This month I am sharing how to create your own Halloween Ghost Baby Bib to add some festive flair to your little one!


Halloween Ghost Baby Bib for September Monthly Craft Destash Challenge from www.thisautoimmunelife.com

Halloween Ghost Baby Bib


Materials:

¼ yard orange colored fabric
¼ yard flannel
6" x 6" piece of white fabric

small piece of Heat and Bond Lite
small piece of fusible interfacing

Babyville snaps

black embroidery floss


Directions:

Part 1

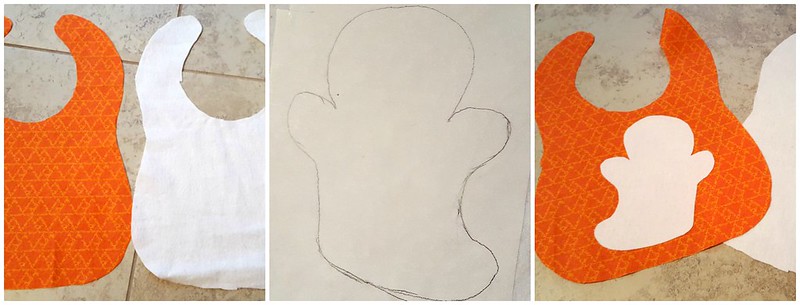
1. Using the pattern (or any pattern of your choice), cut 1 bib from the orange fabric and 1 bib from the flannel.

2. Trace the ghost pattern on paper side of Heat and Bond Lite. The ghost should be a little less than 6" x 6". Make sure you are using the Lite product if you are sewing your applique on your sewing machine. If you use a heavier one it can gunk up your needle. Follow the directions to iron the Heat and Bond to the wrong side of the white piece of fabric. Then cut out the ghost.

3. Iron the ghost to the right side of the orange fabric following the directions on your package. 

Baby Ghost Bib 11

Part 2

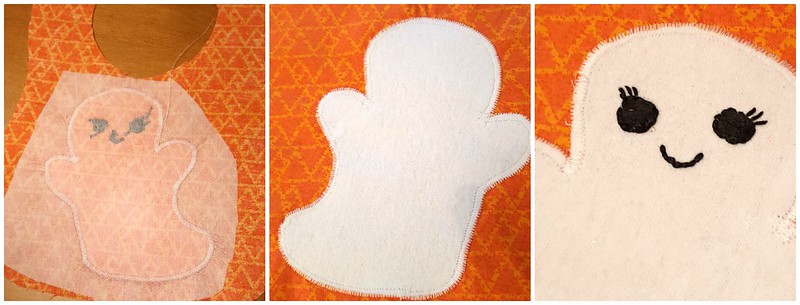
4. Cut out a piece of fusible interfacing to cover the ghost with about a 1" margin all the way around. Iron it on the back side of the orange fabric. This will keep your fabric from puckering when you applique.

5. Using the zigzag stitch on your sewing machine, sew all the way around the outside edge of the ghost. 

6. For the ghost's mouth and eyes use 3 strands of the black embroidery floss. Sew a stem stitch in a semi-circle for the mouth. For the eyes, use a back stitch to outline the circles then fill in with a satin stitch. Then just add some straight stitches if you want your ghost to be a girl.

Baby Ghost Bib Tutorial from www.thisautoimmunelife.com

Part 3


7. Place the orange fabric and flannel fabrics right sides together. Sew around the outside edge with a zigzag stitch leaving about a 2" opening along the bottom for turning. Clip curves then turn right side out. Iron along the edge then sew the opening along the bottom closed with either your machine or hand stitching.


Baby Ghost Bib Tutorial from www.thisautoimmunelife.com

8. Add a snap to each side of the top of the bib. You could also add Velcro or a button for securing the bib. 


Halloween Ghost Baby Bib Tutorial from www.thisautoimmunelife.com #Halloween #Baby #Bib

Candy Corn Cutie Baby Outfit

Happy Halloween!For the Craft Destash we are challenged to create a project using only items currently found in our craft stash. We were to make something new with crafty supplies or re-make an item we've been holding on to for a while. For this challenge I decided to make this Candy Corn Cutie outfit from a free svg file from svglove.com.

Corn Cutie Outfit from www.thisautoimmunelife.com #candycorncutie #Halloween #cricut #freesvg

Candy Corn Cutie


Materials:

SVG File
1 sheet of black glitter heat transfer vinyl
Small scrap of white glitter heat transfer vinyl
Small scrap of yellow and orange everyday iron-on
t-shirt or onesie

1 yard of each yellow, white and orange ribbon in various width
Candy corn button
fancy elastic

This is really easy to make. Just download the free svg file and upload it to your cutting machine software. Be sure to remember to reverse your image before you make the cut. Then follow the manufacturer's directions for ironing onto the shirt using a heat press or iron. Since little kids grow so fast I usually just iron these with an iron as it will probably only be worn a couple of times!

To make hair bows I use my Bowdabra. But the Ribbon Retreat has some great videos on making hair bows without using one. After you make the bow, just glue the candy corn button in the center.  Then glue the bow onto a piece of fancy elastic that you sew or glue into a circle. You can also use a hair clip if the child has enough hair. 


Candy Corn Cutie Outfit from www.thisautoimmunelife.com #candycorncutie #Halloween #cricut #freesvg

Pregnancy Announcement Idea

Need an idea to announce your pregnancy? This cute image should be just the thing! 


Now that my daughter is expecting her first child, a lot of my posts will probably be baby related!

I created this file in Cricut Design Space using the free "Friends" font from daFont. If someone you know is due in November of 2020, you can feel free to get a copy of my file here. I then used the file to create a design in Canva. 
To create the design in Canva, first remove the grid in Cricut Design Space using the settings. Then use your screen snipping tool to capture the image. Create a new design in Canva. Find a onesie background in the images. Then upload the clipped image into Canva. Add it to your image then edit it to remove the background ( I love this feature!). Arrange the image on the onesie and you're finished! Canva saves automatically but you can download your creation for free or create prints at a cost.
If you need to create your own file for a different month, see this post for directions on how to use this font in Cricut Design Space. 

Toddler Apron From Fat Quarters

Collaborating once again this month with a lovely group of Bloggers to bring you some new craft ideas. For the April Craft Destash we are challenged to create a project using only items currently found in our craft stash. We were to make something new with crafty supplies or re-make an item we've been holding on to for a while. For this challenge, hosted by Megan from C'mon Get Crafty,  I decided to make this Toddler Apron From Fat Quarters.


I had all the material I needed for this apron so my additional cost is $0! This is going to be a gift for my granddaughter who will be turning 2 next month. She loves to stand on a chair and "help" with the cooking!

Materials:

2 Fat Quarters (19" x 21" pieces of material)
scrap of fabric for pocket
scrap of fabric for ruffle
pattern from Ordinary Lovely blog

Directions:

Print out pattern and tape an 8 1/2" x 11" sheet of paper to the bottom.

Cutting:

Fold your fat quarters (1 is the front fabric and 1 is the backing fabric) in half. Lay them one on top of the other making sure they are lined up. Place the pattern on the folds and pin in place. Cut out making sure to cut both pieces of fabric.
Cut 2 -  19" x 2" pieces for the top ties and cut 2 -  19" x 2" pieces for the waist ties. I used the extra pieces from the fat quarters to cut these.
Cut a 9" x 12" piece out of the scrap fabric for the pocket.
If you are adding a ruffle to the bottom, cut a piece that is 5" x width of fabric (about 42").

Sewing:

I monogrammed the pocket but that is completely optional. If you choose to monogram it, do that first. Then fold the pocket piece in half  with right sides together so the rectangle is 9" x 6". Sew around the edges using a 1/2" seam, leaving a small opening to turn. Clip corners and turn right side out. Press flat. Center the pocket on the front apron piece and sew down one side, across the bottom and up the other side. Make sure to back stitch at the beginning and end to secure it from coming loose.

To make the ties, fold each piece in half lengthwise, right sides together. Sew across one end and up the side of each using a 1/2" seam. Clip corners and turn each piece right side out. Press flat.

If you are adding a ruffle, fold ruffle piece with right sides together so you have a piece that is 2 1/2" x 42". Stitch along the two 2 1/2" edges. Turn right side out and press. Stitch a gathering (long stitch) along the unfinished edge. Pull up gathering stitches so that the ruffle is the same width as the bottom of the apron.

Pin the raw edge of the ruffle to the raw edge of the bottom of the front piece of the apron.  The ruffle will be in laying on the apron. Baste in place. 

Lay the lining fabric right side up. Place one tie at each top corner, raw edges even with ties laying on fabric. Place one tie at each of the waist corners, raw edges even with ties laying on fabric. I forgot to take a picture so I hope this one helps! The blue lines indicate where the pieces should be laying.


Lay the main fabric right side down on top of lining piece. It will be like a sandwich with the ties and ruffle inside. Pin edges and sew in a 1/2" seam all the way around. Leave a small opening for turning. Clip corners and curves. Turn right side out and press. Edge stitch all the way around and you're finished!

Check out some awesome creations you might be able to make from your own stash! #CraftRoomDestashChallenge
 

If you'd like to join in the Craft Room De-Stash Challenge, you can request to join our Facebook group here!

 
craft room destash


Let's meet this month's bloggers!!
 
You are invited to the Inlinkz link party!
Click here to enter

Pillowcase Dress from Fat Quarters

Every month a group of bloggers are challenged by C'mon Get Crafty to create a new craft or project from their own stash of goodies! Everyone is allowed a $10 allowance for necessities to complete their project (i.e. paint brushes, glue, etc), but the bulk of it must be created from their own stash of goodies. This month I decided to make a Pillowcase Dress from Fat Quarters

Pillowcase Dress from Fat Quarters from www.thisautoimmunelife.com for February craft destash #craftdestash #pillowcasedress #fatquarter #baby

Pillowcase Dress From Fat Quarters


I made this for my granddaughter who will be 1 in May. I am estimating that she will be between a 12 month and 18 month size this summer.

Materials:


2 Print Fat Quarters (same print)
1 Solid Color Fat Quarter to coordinate with print
1 ½ - 2 yards coordinating 7/8" ribbon
Thread to match
Optional: bias tape to match print fabric

Directions:


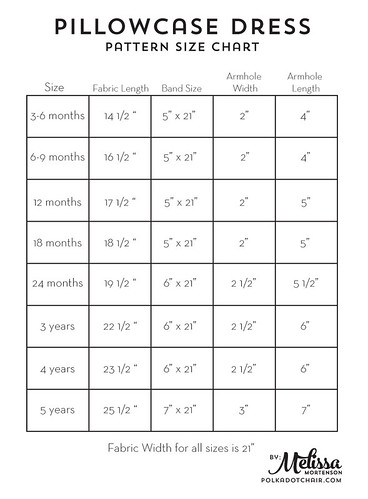
You can use this chart to make your measurements. I got this chart from The Polka Dot Chair but if you search on Pinterest you can find others. I looked at several and averaged it out to estimate my measurements.

Print

Step 1:


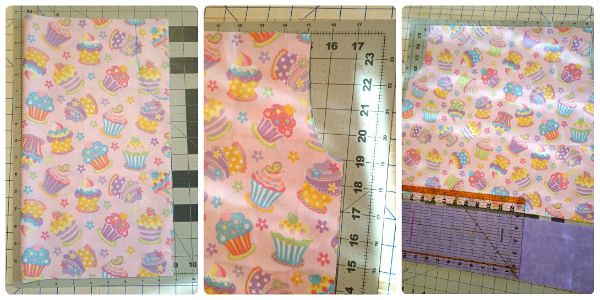
Put the 2 pattern pieces of fabric together. If your fabric has a pattern, put them right sides together making sure the pattern is going the same direction. Otherwise it doesn't matter. Fold them in half so that your fabric is 9" wide. Cut desired length off bottom. I cut mine so that it was 15" inches long. Draw your armhole using the above dimensions then cut it out. Cut the solid piece of fabric for your band. Since my opened print fabric is 18" wide, I cut mine 18" wide and 5 " wide. You will need 2 of these.

pillowcase dress step 1

Step 2:


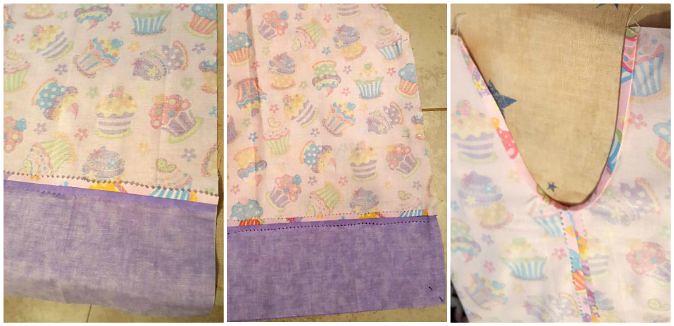
Pin the solid bands, right sides together on the bottom of each piece of the dress. Sew using a 5/8" seam. Trim seam and iron open. Pin the 2 dress pieces with right sides together. Sew from under arm hole to the bottom of the dress in a 5/8" seam. Trim seam and iron open. For the arm holes, either sew bias tape along the arm hole or iron and sew a small 1/2" seam. I had to cut the arm hole a little after I had sewn the front to back to make it curve a little more at the bottom.

pillowcase dress collage 2

Step 3:


Fold under and iron 1/2" along the top on both the front and back. Fold under and iron another 1". Sew along the bottom edge to make a casing for the ribbon. Using a safety pin, thread ribbon through the front casing and around through back casing. Tie a bow from the ribbon and trim as needed. To keep the ribbon from unraveling you can use some clear nail polish or some fray check.

pillowcase dress collage 3

I had all the fabric (purchased from Hobby Lobby) and thread so the only thing I had to purchase was the ribbon. It is grosgrain that was on sale at Joann. The roll was $2.50 and I only used part of the roll.


craft room destash


Meet Your Hosts:


Search This Blog

Powered by Blogger.