Teriyaki Chicken

With school starting it’s always good to have a variety of quick and easy meals.  Teriyaki Chicken is one of those recipes. Just mix up the marinade the night before. Then place the chicken in the marinade first thing in the morning. By the time everyone gets home in the evening all you have to do is take the chicken out of the marinade and cook it! This recipe served together with rice and a salad will put supper on the table in under 30 minutes.
Teriyaki Chicken from www.thisautoimmunelife.com #chicken #recipe
Teriyaki Chicken
Serves 4
Write a review
Print
Prep Time
5 min
Cook Time
10 min
Total Time
15 min
Ingredients
  1. ½ teaspoon liquid stevia or ½ cup sweetener
  2. ½ cup balsamic vinegar
  3. ½ cup gluten free low sodium soy sauce
  4. 2 tablespoons worcestershire sauce
  5. 2 tablespoons sesame oil
  6. 4 teaspoons minced garlic
  7. ½ teaspoon black pepper
  8. 3 large boneless chicken breasts
  9. 1 tablespoon olive oil
Instructions
  1. First, mix stevia through black pepper together in large ziploc bag.
  2. Slice the chicken breasts thin.
  3. Place the chicken breasts in marinade then place in refrigerator for at least 2 hours.
  4. Heat olive oil in pan over medium high heat.
  5. Add chicken breasts and cook over medium high heat about 4 minutes on each side or until browned and cooked through.
  6. Pour some of the marinade in the pan and then cook until slightly thickened.
  7. Finally, enjoy over rice!
Notes
  1. I usually put chicken in marinade before work in the morning and then let it marinate all day.
  2. This chicken is also great cooked on the grill.

Minnie Mouse Birthday Dress

Minnie Mouse Birthday Dress

A dress for that special girl who is about to have a birthday! This Minnie Mouse birthday dress is perfect to wear anytime or to a celebration!
The Minnie Mouse "Two" embroidery applique file is a purchase from the Sweet Stitch Design store on Etsy.

Other materials needed:

white t-shirt
black ribbon - about 2 yards
1/4 yd red fabric with large white dots
1/4 yd black fabric with large white dots
scraps of fabric for applique
matching thread 

Directions:

First stitch your design on the t-shirt. I have a Brother SE600 which only does a 4" x 4" design so the applique came out a little smaller than I would have liked. The purchased design comes with larger sizes as well.
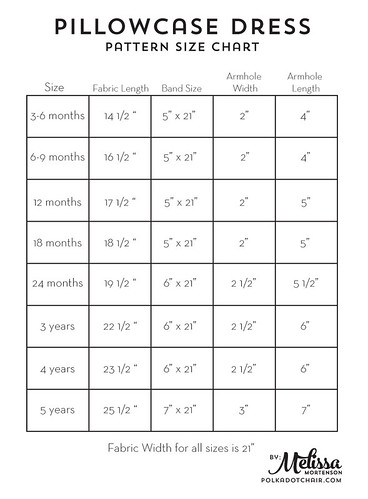
I wanted the dress to be about 19" long so I laid out the t-shirt on the floor and put a measuring tape on the shoulder and measured down 19". I put a pencil at the 19" mark (just to mark the spot). Then I moved the top of the measuring tape to the point on the t-shirt where I wanted the skirt to start and measured down to the pencil. This measurement is how long the fabric needs to be. Split this amount between the black and red fabric. Then add an inch to each measurement for the seam and hem. For the dress in the picture the red fabric is 7" and the black fabric is 5" long. Both fabrics were cut across the width of the fabric (42").
If you are making a size other than a 2T, the length of the dress will differ. A 3T should be about 20", a 4T is 21" and a size 5 is 24". For other sizes you can do a search on Pinterest!
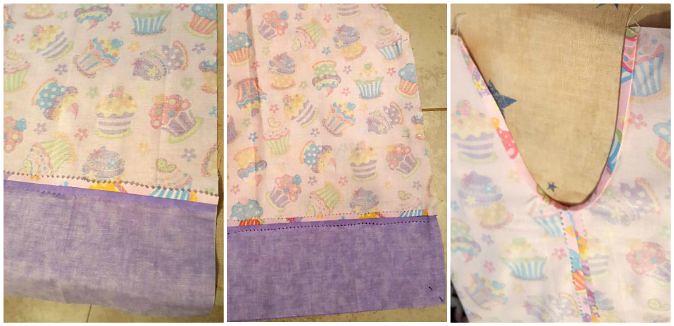
With right sides together, sew the red and black fabric together along the 42" side using a 1/2" seam. Iron under 1/4" on the 42" side of the red fabric then iron that down another 1/4" to create a 1/2" hem. Repeat with the black fabric. 
Run a gathering stitch along the hemmed edge of the red fabric. Then sew the back seam of the skirt using a 1/2" seam. 
Using a ruler, measure down about 2" under the underarms of the shirt and mark with pencil or water soluble ink. This is about where you will place the upper edge of the skirt. Pull the gathering stitches on the skirt so that it fits around the t-shirt. Pin in place. Use a stretch stitch to sew the skirt in place. 
Cut a piece of black ribbon long enough to go around the top of the skirt, making sure to fold under ends of ribbon where the ends meet. Pin along the top edge of the skirt. Use a stretch stitch to sew the top and bottom edge of the ribbon. Cut another piece to make a bow. Sew it on the front slightly off-center on top of the black ribbon.
Feel free to add other embellishments to your liking! 


Happy Easter Peeps

Happy Easter! With things a little crazy right now, I thought I'd offer a free Cricut cut file for the upcoming holiday. Get your free Happy Easter Peeps Cricut Design Space file by clicking on the link. Upload it to your projects in Design Space where you can resize it or even change the colors if you'd like! Enjoy!


Bunny Bum Hair Bow

Easter is almost here! And although it may look a little different this year, your little one can still enjoy the day. To help make it special, you can create this super cute bunny bum hair bow!


All you need is some felt or leather, a hair clip, hot glue and the template. The pompom is optional because the template includes a center for the bow. 
I purchased my template at Design Bundles. They have it as a single file or you can buy it in a bundle with other templates. Then just download the file - they offer multiple file types. You can cut the file by hand or upload it to your Cricut or Silhouette and have your machine cut the file.
The leather I used is available on Etsy. It is sold in individual sheets or as sets. I used chunky white glitter and chunky pink glitter. You could also use felt as long as it isn't too thin.
Once you have the pieces cut, use your hot glue to put them together. The back part of the bow has the feet attached. You will glue the pink pieces to the feet. For the top part of the bow, fold it so that the cut edges are touching. Glue those ends down to the back of the skinny part. Then glue that bow on top of the piece with the feet. Glue your hair clip to the back of the bunny feet part. Take the skinny strip and wrap it around the center and around the hair clip. Open the hair clip then glue the ends of the leather down onto the inside of the clip. Add the pompom or the center piece that was cut from the template to the center front.
You can also glue this onto a hairband if your little one does not have any hair. And you might need to resize the design if your little one is really small.
I hope you enjoy and have a happy Easter! Stay safe!


Mickey Mouse Disney Earrings

Are you planning a vacation to Disney for spring or summer break? If so, be sure to make these cute Mickey Mouse Disney Earrings using your Cricut or Silhouette cutting machine. Here is a link to the free SVG cut file as well as a link to the Cricut file. Just load the file and use either faux black leather or black suede for your material.

Then poke a hole towards the top of each with an awe or other sharp object. Put a jump ring in each hole then add an earring finding. Make a small red bow and glue it to the top near the ear of one Mickey face if you want one to be a Minnie.

Enjoy wearing your earrings on your next trip to Disney!


Mickey Mouse Disney Earrings from www.thisautoimmunelife.com #Disney #MickeyMouse #MinnieMouse #DisneyEarrings

If you would like other earring cut files, click here.


Mickey Mouse Disney Earrings Free Cut File from www.thisautoimmunelife.com #MickeyMouse #MinnieMouse #Disney #DisneyEarrings

Pillowcase Dress from Fat Quarters

Every month a group of bloggers are challenged by C'mon Get Crafty to create a new craft or project from their own stash of goodies! Everyone is allowed a $10 allowance for necessities to complete their project (i.e. paint brushes, glue, etc), but the bulk of it must be created from their own stash of goodies. This month I decided to make a Pillowcase Dress from Fat Quarters

Pillowcase Dress from Fat Quarters from www.thisautoimmunelife.com for February craft destash #craftdestash #pillowcasedress #fatquarter #baby

Pillowcase Dress From Fat Quarters


I made this for my granddaughter who will be 1 in May. I am estimating that she will be between a 12 month and 18 month size this summer.

Materials:


2 Print Fat Quarters (same print)
1 Solid Color Fat Quarter to coordinate with print
1 ½ - 2 yards coordinating 7/8" ribbon
Thread to match
Optional: bias tape to match print fabric

Directions:


You can use this chart to make your measurements. I got this chart from The Polka Dot Chair but if you search on Pinterest you can find others. I looked at several and averaged it out to estimate my measurements.

Print

Step 1:


Put the 2 pattern pieces of fabric together. If your fabric has a pattern, put them right sides together making sure the pattern is going the same direction. Otherwise it doesn't matter. Fold them in half so that your fabric is 9" wide. Cut desired length off bottom. I cut mine so that it was 15" inches long. Draw your armhole using the above dimensions then cut it out. Cut the solid piece of fabric for your band. Since my opened print fabric is 18" wide, I cut mine 18" wide and 5 " wide. You will need 2 of these.

pillowcase dress step 1

Step 2:


Pin the solid bands, right sides together on the bottom of each piece of the dress. Sew using a 5/8" seam. Trim seam and iron open. Pin the 2 dress pieces with right sides together. Sew from under arm hole to the bottom of the dress in a 5/8" seam. Trim seam and iron open. For the arm holes, either sew bias tape along the arm hole or iron and sew a small 1/2" seam. I had to cut the arm hole a little after I had sewn the front to back to make it curve a little more at the bottom.

pillowcase dress collage 2

Step 3:


Fold under and iron 1/2" along the top on both the front and back. Fold under and iron another 1". Sew along the bottom edge to make a casing for the ribbon. Using a safety pin, thread ribbon through the front casing and around through back casing. Tie a bow from the ribbon and trim as needed. To keep the ribbon from unraveling you can use some clear nail polish or some fray check.

pillowcase dress collage 3

I had all the fabric (purchased from Hobby Lobby) and thread so the only thing I had to purchase was the ribbon. It is grosgrain that was on sale at Joann. The roll was $2.50 and I only used part of the roll.


craft room destash


Meet Your Hosts:


Free March Planner Stickers


“In like a lion, out like a lamb” – will it hold true where you live this year? According to the forecasts it looks like this might be more lore than a weather predictor this year with most areas having higher than normal temperatures! Whatever your weather holds, I hope you enjoy these Free March Planner Stickers for your Life or Happy planner! If you click on the picture below it will take you to the PDF file to print for your Life planner. If you would like a PNG file for your cutting machine, click here. The link for the Happy planner is here.
The “lucky” sticker is from a free printable from My Busy Beehives. Check out her Frame It Friday to get a free full size printable!

 Free March Planner Stickers

My Heart Belongs To Daddy

Would you like a free cut file for Valentine's Day? This is the perfect file to make a shirt for your daughter for Valentine's Day to show how much she loves her dad! My Heart Belongs To Daddy is a Cricut cut file you can download for free. Just click on the link below to get the file.


After you download the file just save it to your Cricut Design Space account and use it how you like. The fonts used in this design are Bubblegum and Childish. Both fonts can be downloaded from the DaFont website if you do not have them.


Search This Blog

Powered by Blogger.