Patriotic Quarantine Quilt


To keep my self busy during the quarantine I pulled out all of my red, white and blue fabric and created this "Patriotic Quarantine Quilt". It came together fairly quickly although it's not quite finished due to the fact that I haven't been to the fabric store to buy batting and border/backing fabric!


It's time for the June Pin Challenge! The purpose of the Pinterest Challenge is to motivate us to not just pin, but to make it happen! This month's challenge is all about summer or July 4th projects. The pin I chose was Scrap Jar Stars from Gigi's Thimble.


To make this quilt top I used a red, white and blue layer cake (40 - 10" x 10" pieces), a white jelly roll (2.5" strips) as well as a couple of fat quarters.
The directions on Gigi's Thimble are very well written and were easy to follow. Here is what each 12" block looks like before it is sewn together.


After each block is sewn together white strips are used between each block to create the quilt top. This quilt is made for a full sized bed so I used 25 blocks - 5 rows of 5. Once I add the border it will fit the bed a little better!

For more Pinterest inspired projects from this month's Pinterest Challenge hosts, check out the links below ↓

Pinterest Challenge Blog Hop Image


Now, let's see what the other hosts have created ⇓⇓

You are invited to the Inlinkz link party!

Click here to enter


Fruit and Nut Bars

Fruit and Nut Bars


Fruit and nut bars make a great snack on the go. With 5 grams of protein and 4 grams of fiber per serving they can certainly help to curb your appetite. They are quite high in carbs (28 grams per serving) so you want to go easy on these and not eat the whole pan. Although they are delicious and you might be tempted!

Ingredients:

1 cup pitted dates
1/4 cup almond butter
1/4 cup honey
1 teaspoon vanilla
1 cup chopped almonds
1/2 cup old-fashioned oats
1/2 cup dried fruit (raisins, cranberries . . .)

Directions:

Chop dates in a food processor until they form a ball. 
In a medium sized glass bowl, add the almond butter, honey and vanilla. Heat at half power in 30 second increments until the almond butter is melted and the mixture is a little warm.
Add the chopped dates to the bowl and mix well. 
Stir in the chopped almonds, oats and dried fruits.
Press the mixture into a non-stick 8" pan. Place the pan in the freezer until the bars have hardened up.
Cut into 12 bars and store in the refrigerator until you are ready to eat them.


Pregnancy Announcement Idea

Need an idea to announce your pregnancy? This cute image should be just the thing! 


Now that my daughter is expecting her first child, a lot of my posts will probably be baby related!

I created this file in Cricut Design Space using the free "Friends" font from daFont. If someone you know is due in November of 2020, you can feel free to get a copy of my file here. I then used the file to create a design in Canva. 
To create the design in Canva, first remove the grid in Cricut Design Space using the settings. Then use your screen snipping tool to capture the image. Create a new design in Canva. Find a onesie background in the images. Then upload the clipped image into Canva. Add it to your image then edit it to remove the background ( I love this feature!). Arrange the image on the onesie and you're finished! Canva saves automatically but you can download your creation for free or create prints at a cost.
If you need to create your own file for a different month, see this post for directions on how to use this font in Cricut Design Space. 

Crocheted Baby Wash Cloths

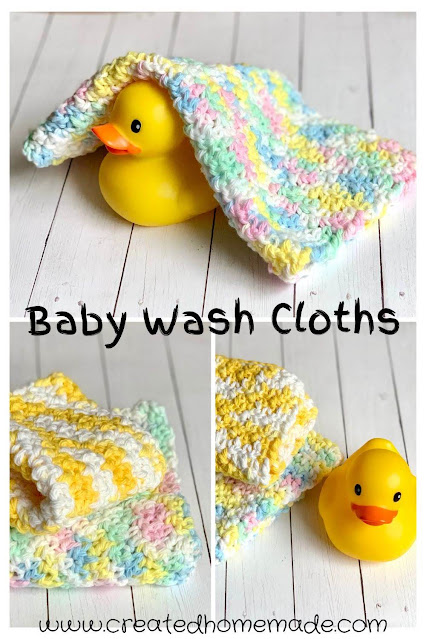
Collaborating once again this month with a lovely group of Bloggers to bring you some new craft ideas. For the May Craft Destash we are challenged to create a project using only items currently found in our craft stash. We were to make something new with crafty supplies or re-make an item we've been holding on to for a while. For this challenge, hosted by Megan from C'mon Get Crafty,  I decided to make these Crocheted Baby Wash Cloths.

Crochet Baby Wash Cloths


Do you know someone who is expecting? These crocheted baby wash cloths will make the perfect gift! They stitch up quickly and can be made in any color. I made these for my daughter who is expecting in Novemeber. She will find out the gender this week but I wanted to make something for her while waiting to find out. 
I had all the yarn I needed for these wash cloths. I actually made a few other colors as well - they just are not in the pictures! So I had no additional cost for this project.


Materials:
Small amount of cotton yarn
Size G crochet hook

Directions:
Chain 27 (or any odd number of chains to your desired width)
Row 1: Single crochet (SC) in the second chain from hook then double crochet (DC) in the next chain. Repeat those two stitches until you reach the end. Your last stitch should be a double crochet. You should have 26 stitches.
Row 2: Chain 1 (does not count as a stitch) then single crochet in the first double crochet and double crochet in the next stitch. Repeat SC, DC until you reach the end of the row. You should have 26 stitches.
Repeat Row 2 until you have the desired length. That's it - very easy and oh so cute!


craft room destash


Every month a group of bloggers are challenged by C'mon Get Crafty to create a new craft or project from their own stash of goodies! Everyone is allowed a $10 allowance for necessities to complete their project (i.e. paint brushes, glue, etc), but the bulk of it must be created from their own stash of goodies.

Let's meet this month's blogg ers!!

C'mon Get Crafty | Slices of Life

Domestic Deadline | Across the Blvd | Chas' Crazy Creations

Created Homemade | Purple Hues and Me


You are invited to the Inlinkz link party!

Click here to enter

Pregnancy Announcement T-Shirts

Do you know someone who is pregnant or planning to be soon? These pregnancy announcement t-shirts are the perfect way to let everyone know!


My daughter is 3 months pregnant this week and will be announcing her pregnancy this weekend. She wanted something special for her and her husband to wear to take a picture. These "Friends" designs were something she wanted so I was able to create them for her.

To create the design you can download the free "Friends" font from daFont. I made these designs in Cricut so I just used the system fonts and found this font that I had downloaded. 
Add text and type "the one where I become a" in one text box. Then create a new text box for each of the letters in Mommy or Daddy. Space those text boxes out. Add a circle shape and resize it to fit in between your letters. Change the color of your circles to red, blue and yellow.
When you cut your design, don't forget to mirror your image so that it will iron on correctly!

Fabric Scrap Coasters

Welcome to the monthly Pinterest Challenge for April!  The purpose of the Pinterest Challenge is to motivate all the participants (and you too) to not just pin, but to make it happen! This month's challenge is about Mother's Day or projects geared towards the women in our lives. For this month's project I chose to make these Fabric Scrap Coasters.

This project was inspired by this Pinterest pin from The Fabric Mill Blog.


TO JOIN NEXT MONTH’S #PINTERESTCHALLENGE, CLICK HERE TO SIGN-UP ⇒ May Pinterest Challenge


Materials:


To make 1 coaster you will need 5 - 5" squares of fabric and 1 - 5" square of thin batting. This is a great scrap buster project!


Directions:

Lay the material out as shown in the picture below. The center piece will be the back of the coaster. Lay the piece of batting under that piece.


Fold each of the side pieces in half with the folded side toward the center piece.


Then layer the side fabrics on top of the backing fabric.


Then sew around all 4 sides. Reach into the center of the layered fabric and flip the layered fabrics to the other side. Use something with a dull point to push out the corners. Press the coaster so it lays flat. For more detailed directions for this step, visit the Fabric Mill Blog


For more Pinterest inspired projects from this month's Pinterest Challenge hosts, check out the links below ↓


Pinterest Challenge Blog Hop Image


 Now, let's see what the other hosts have created ⇓⇓


You are invited to the Inlinkz link party!
Click here to enter


Toddler Apron From Fat Quarters

Collaborating once again this month with a lovely group of Bloggers to bring you some new craft ideas. For the April Craft Destash we are challenged to create a project using only items currently found in our craft stash. We were to make something new with crafty supplies or re-make an item we've been holding on to for a while. For this challenge, hosted by Megan from C'mon Get Crafty,  I decided to make this Toddler Apron From Fat Quarters.


I had all the material I needed for this apron so my additional cost is $0! This is going to be a gift for my granddaughter who will be turning 2 next month. She loves to stand on a chair and "help" with the cooking!

Materials:

2 Fat Quarters (19" x 21" pieces of material)
scrap of fabric for pocket
scrap of fabric for ruffle
pattern from Ordinary Lovely blog

Directions:

Print out pattern and tape an 8 1/2" x 11" sheet of paper to the bottom.

Cutting:

Fold your fat quarters (1 is the front fabric and 1 is the backing fabric) in half. Lay them one on top of the other making sure they are lined up. Place the pattern on the folds and pin in place. Cut out making sure to cut both pieces of fabric.
Cut 2 -  19" x 2" pieces for the top ties and cut 2 -  19" x 2" pieces for the waist ties. I used the extra pieces from the fat quarters to cut these.
Cut a 9" x 12" piece out of the scrap fabric for the pocket.
If you are adding a ruffle to the bottom, cut a piece that is 5" x width of fabric (about 42").

Sewing:

I monogrammed the pocket but that is completely optional. If you choose to monogram it, do that first. Then fold the pocket piece in half  with right sides together so the rectangle is 9" x 6". Sew around the edges using a 1/2" seam, leaving a small opening to turn. Clip corners and turn right side out. Press flat. Center the pocket on the front apron piece and sew down one side, across the bottom and up the other side. Make sure to back stitch at the beginning and end to secure it from coming loose.

To make the ties, fold each piece in half lengthwise, right sides together. Sew across one end and up the side of each using a 1/2" seam. Clip corners and turn each piece right side out. Press flat.

If you are adding a ruffle, fold ruffle piece with right sides together so you have a piece that is 2 1/2" x 42". Stitch along the two 2 1/2" edges. Turn right side out and press. Stitch a gathering (long stitch) along the unfinished edge. Pull up gathering stitches so that the ruffle is the same width as the bottom of the apron.

Pin the raw edge of the ruffle to the raw edge of the bottom of the front piece of the apron.  The ruffle will be in laying on the apron. Baste in place. 

Lay the lining fabric right side up. Place one tie at each top corner, raw edges even with ties laying on fabric. Place one tie at each of the waist corners, raw edges even with ties laying on fabric. I forgot to take a picture so I hope this one helps! The blue lines indicate where the pieces should be laying.


Lay the main fabric right side down on top of lining piece. It will be like a sandwich with the ties and ruffle inside. Pin edges and sew in a 1/2" seam all the way around. Leave a small opening for turning. Clip corners and curves. Turn right side out and press. Edge stitch all the way around and you're finished!

Check out some awesome creations you might be able to make from your own stash! #CraftRoomDestashChallenge
 

If you'd like to join in the Craft Room De-Stash Challenge, you can request to join our Facebook group here!

 
craft room destash


Let's meet this month's bloggers!!
 
You are invited to the Inlinkz link party!
Click here to enter

Easter Chick Hair Bow

Make an Easter Chick Hair Bow as an accessory to your little girl's Easter outfit!


To make this hair bow you will need:

sheets of leather in blue, yellow and easter print
felt in yellow and white
hair clip
hot glue

How to make the hair bow:

Trace the bow template on the back of the leather using a different color leather for each layer. Cut out each piece. The back piece will lay flat, pattern side up.  The other 2 layers need to be folded and glued on the back to secure. Glue the 3 layers together. Then wrap the center strip around all 3 layers and glue along the back to hold it. Use a hair clip or hair band of your choice and glue it to the back of the hair bow.
The Easter chick in the center is an embroidery design from Embroidery Boutique. The chick is an in-the-hoop design to be made on an embroidery machine. If you don't have an embroidery machine you can just cut a chick shape from yellow felt and a cracked egg from white felt. Embroider a beak and eye on the chick then sew the cracked egg to the bottom of the chick. Glue the chick on the front center of the bow and you are finished!


Search This Blog

Powered by Blogger.