Fabric Scrap Christmas Tree Garland

Welcome to the November Pinterest Challenge Blog Hop!  The purpose of this Pinterest Challenge is to motivate all the participants of this hop (and you too) to not just pin, but to make it happen! This month, I chose to make a Fabric Scrap Christmas Tree Garland. My inspiration came from this pin from Crafting Cheerfully.


Fabric Scrap Christmas Tree Garland


Materials:

Christmas tree pattern from Crafting Cheerfully (or you can make your own)
Green felt - 1 large sheet or 2 small
Scraps of fabric in green as well as brown
Fabric glue
Contrasting thread or embroidery floss
Ribbon or twine

Directions:

Print and cut out Christmas tree pattern. I traced it on a piece of cardboard to use as my template. Use the template to cut trees out of the felt. This will be your backing.

Then I made a template for each section of the tree. Using 6 different fabrics, I cut one of each section of the tree from each fabric. I also used the brown fabric to cut small rectangles for the trunk.

fabric scrap christmas tree garland 5 

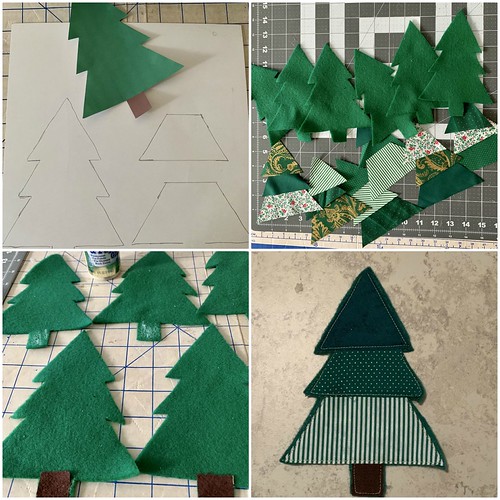
Starting with the trunk and working your way up the tree, use a small amount of fabric glue to adhere each section of fabric to the felt.

If you don't like sewing you could add extra fabric glue and stop here, attaching each tree to the ribbon with hot glue.

I used a gold thread in my sewing machine and stitched around each section of the tree. You could also use embroidery thread and sew around the edges - totally up to you!

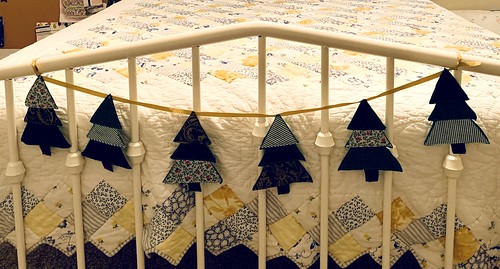
I spaced my trees out about 8" apart on the ribbon then sewed them on with the gold thread. 

This is a really quick little project that you can do with your kids! I hung the garland on the footboard of my daughter's bed  to make it a little more festive when she comes to visit!

fabric scrap christmas tree garland 6 


Fabric Scrap Christmas Tree Garland from www.thisautoimmunelife.com #PinterestChallenge #Christmas #ChristmasTree #ChristmasGarland #FabricScraps


Gluten Free Autumn Apple Spice Cake

Gluten Free Autumn Apple Spice Cake


One of my favorite things about the fall season is all of the delicious flavors! This recipe for Gluten Free Autumn Apple Spice Cake includes many of those fall flavors - apples, cinnamon and pumpkin spice! It would certainly make a great addition to your Thanksgiving dessert table. In addition to being full of flavor it is also gluten, dairy and refined sugar free! 


Gluten Free Autumn Apple Spice Cake


Ingredients for cake:

3/4 cup almond flour
1/2 cup gluten free flour blend
1 teaspoon baking soda
1 teaspoon pumpkin pie spice
1/2 teaspoon salt
1/4 teaspoon xantham gum
1/2 cup honey
1 egg
1/2 cup applesauce
1/4 cup melted coconut oil
1 small apple chopped

For the "icing":
2 tablespoons softened coconut oil
1/2 cup honey
1/2 teaspoon cinnamon

Directions:
Preheat the oven to 350 and lightly grease an 8" x 8" pan.
Mix all dry ingredients (from almond flour to xantham gum) in a medium size bowl.
In a large bowl mix 1/2 cup of honey, egg, applesauce and coconut oil. 
Slowly mix the dry ingredients into the wet ingredients until well blended. Then stir in the apples.
Pour batter into greased pan and bake for about 20 minutes or until lightly browned.
Mix the icing ingredients in a small bowl until well blended. Once cake has cooled, pour the icing over the cake right before serving.


November 2017 Planner Stickers

November 2017 Planner Stickers


"Give thanks to the Lord, for He is good; His love endures forever!" Psalm 107:1 I am thankful for so many things this year! First of all, my family which will be growing next year with a new son-in-law (my daughter) and a new grandchild (my step-daughter)! Second is my health which has held steady this year. And also my job where I have wonderful friends and get to touch the lives of many children each and every day! What are some of the things you are thankful for this year? Whatever they may be, I hope you can use these November 2017 Planner Stickers to remind you of all of those things!

Just click on the link below to get your free pdf or png download.  Cut these on your cutting machine or the old fashioned way - with scissors! This is the sticker paper I use to print them on. It is a nice quality paper at a reasonable price!

Happy Thanksgiving!


November 2017 Planner Stickers


These free images are mostly found on Pixabay or Freepik.

How to Make Your Own Chicken Stock

How To Make Your Own Chicken Stock


Do you want to get the most out of your Thanksgiving turkey? Learn How To Make Your Own Chicken Stock (or turkey stock in this case) and nothing will go to waste! Why would you want to make your own when you can buy it at the store? First and foremost is all the health benefits it has to offer!

There is good reason why your mother or grandmother fed you homemade chicken soup when your were sick! In a study done by the University of Nebraska, the findings "suggests that chicken soup may contain a number of substances with beneficial medicinal activity. A mild anti-inflammatory effect could be one mechanism by which the soup could result in the mitigation of symptomatic upper respiratory tract infections." UNMC

According to Dr. Axe, ingredients released from the bones including "proline and glycine are important for a healthy gut and digestion, muscle repair and growth, a balanced nervous system, and strong immune system." In addition, collagen and gelatin formed in the bone broth prevent bone loss, reduce joint pain and promote healthy skin, hair, and nails


How To Make Your Own Chicken Stock

Ingredients:


1 large stock pot

bones from turkey or chicken

several carrots

several celery stalks

small onion 

fresh herbs of your choice

salt and pepper

apple cider vinegar*

water

Directions:


  1. Break up the bones from your turkey or chicken and place them in the bottom of the stock pot.

  2. Cut carrots, celery and onion into chunks and place in the pot.

  3. Place herbs (I use thyme and rosemary) in herb infuser (or make a bouquet garni) and place or hook that in the pot.

  4. Fill the pot with water covering all of the other ingredients. Add 2 tablespoons of apple cider vinegar and salt and pepper to taste.

  5. Cover the pot, bring to a slow boil then simmer on low for at least 12 hours or up to 24 hours. Be sure to skim off any foam (impurities) that form on the top.

  6. Let cool then pour broth through a strainer to remove all solids. 

  7. Store broth in the refrigerator for 3-5 days or pour into freezer bag and freeze for later use.


*Adding an acid (like lemon juice or apple cider vinegar) will help to extract minerals from the bones.

Healthy Thanksgiving Side Dishes

Healthy Thanksgiving Side Dishes


If you are trying to find Healthy Thanksgiving Side Dishes, look no further! These side dishes will help you cut the calories without sacrificing flavor on your Thanksgiving table! 


Healthy Thanksgiving Side Dishes


Healthy Thanksgiving Side Dishes


1. Cranberry Sauce from Alton Brown uses honey and fresh cranberries.


2. Garlic Roasted Butternut Squash from Eat Well 101 gets its flavor 

from garlic sauce and Cajun seasonings.


Healthy Thanksgiving Side Dishes


3. Thanksgiving Slaw from The Kitchn include almonds and

cranberries and will last up to 2 hours on the buffet without wilting.


Thanksgiving Salad

4. Apple Cranberry Spinach Salad from Julia's Album combines

spinach, fruits, nuts and avocados served with a vinaigrette dressing.


5. Baked Carrots from This Autoimmune Life uses a small

amount of olive oil with Montreal steak seasoning for a burst of flavor.


6. Nanou's Garlic Green Beans from The Life Jolie combines fresh 

green beans, garlic and a brown butter sauce.


7. Cauliflower Stuffing from Delish offers a great alternative

for your gluten-free or low-carb friends.


8. Roasted Broccoli and Brussels Sprouts from Moms Without Answers are

roasted with a small amount of Parmesan cheese until crispy.


9. Sweet Potatoes with Cranberries offers a sugar-free sweet potato option

Thanksgiving Baby Outfit

Are you getting ready for Thanksgiving? Get your little one ready as well with this Thanksgiving Baby Outfit. Just  click here to access your free Cricut Design Space file. 

Thanksgiving Baby Outfit


Thanksgiving Baby Outfit

Halloween Wreath Tutorial

Halloween Wreath Tutorial


Halloween will be here before you know it! Decorating for Halloween can be so much fun. Decorative mesh wreaths have become a really popular way to decorate over the last few years. However, purchasing a pre-made wreath can be quite expensive - $50 or more!  For under $15 and a few hours of your time you can make your own. Give this Halloween Wreath Tutorial a try to add color to your door without adding the expense of a pre-made one.


Materials:


18" wire wreath frame

orange and purple decorative mesh rolls

25 pipe cleaners (I used black)

Halloween ribbon -

  1 roll plaid 

  1 roll green glitter

  1 roll  dots

"boo" sign from the dollar store

other decorations of choice
Instructions: 


  1. Gather materials. If desired, use pipe cleaners to wrap around metal wreath frame. This prevents the bow bundles from slipping.Halloween Wreath

  2. To start, cut decorative mesh into 10 inch pieces then cut plaid and green ribbon to the width of the decorative mesh. Mine was 5 inches wide so that is how long I cut the ribbon. It took me about 30 "bow bundles" to make this wreath. So you will cut 30 orange mesh, 30 purple mesh, 30 plaid ribbon and 30 green ribbon pieces. Then cut 15 pipe cleaners in half to make 30 pipe cleaner pieces.Halloween Wreath

  3. Roll 1 piece of orange mesh (use the natural curl of the ribbon) and 1 piece of purple mesh. Pinch them together in the middle. Then add 1 piece of plaid ribbon. I did 20 of these then I made 10 with the green glitter ribbon.Halloween WreathHalloween Wreath Tutorial

  4. While everything is pinched, use 1 piece of the pipe cleaner to wrap around the middle where the ribbon is pinched together. As you make them, lay them on the wreath form to make sure you have enough.Halloween Wreath TutorialHalloween Wreath Tutorial

  5. When you have enough start attaching them to the wreath form by wrapping the ends of the pipe cleaner around the form.

  6. To attach the "Boo" sign just use a little bit of hot glue and place it on the ribbon. Attach any other decorative items you have.

  7. Finally, make a large bow from the dot ribbon. Use this video if you need help making the bow.


Happy Halloween!


Halloween Wreath Tutorial from www.thisautoimmunelife.com #Halloween #wreath #tutorial

October 2017 Stickers

October 2017 Stickers


October is the month for pumpkin spice everything, caramel apples, candy corn and trick-or-treating! The weather is starting to cool off and the holiday season is just beginning.  Don't you just love this time of year! To help you celebrate the season you can download these free October 2017 Stickers. They come in pdf and png for both the Life and Happy planners. Use your Cricut or Silhouette cutting machine or cut by hand. Just click on the picture below. It will take you to the folder with all the files you need. 


This sticker paper is what I use to print my stickers. 

Happy Halloween!


Search This Blog

Powered by Blogger.